Filter anomaly alerts depending on their severity.
The Getting Started with the Eyer Connector section explains that while you can opt to receive alerts for every anomaly and its changes, this can quickly become overwhelming and lead to alert fatigue.
The Eyer documentation explains how to filter anomalies to receive new, updated, or closed alerts for relevant anomalies.
But there's more! With the Boomi ecosystem's many connectors, you can get alerts for anomalies and track their changes throughout their lifecycle until they're closed.
This use case shows you exactly how to do that.
Prerequisites
To get the most out of this use case, you must have:
- Knowledge of how to create Boomi processes and configure the Database and Mail connector
- Configured the Eyer connector using the Dynamic Operation properties. To learn how to configure this connector, please check out the official documentation.
Understanding the Boomi process structure
This use case demonstrates how to check for an anomaly and receive alerts for any changes to anomalies. To monitor these changes, you need the anomaly ID, which must persist beyond a single Boomi process run. In this use case, you will collect and persist the ID by:
- Caching the IDs of anomalies that have been updated or closed
- Saving the IDs of every new anomaly to a database so that they persist past the single Boomi process
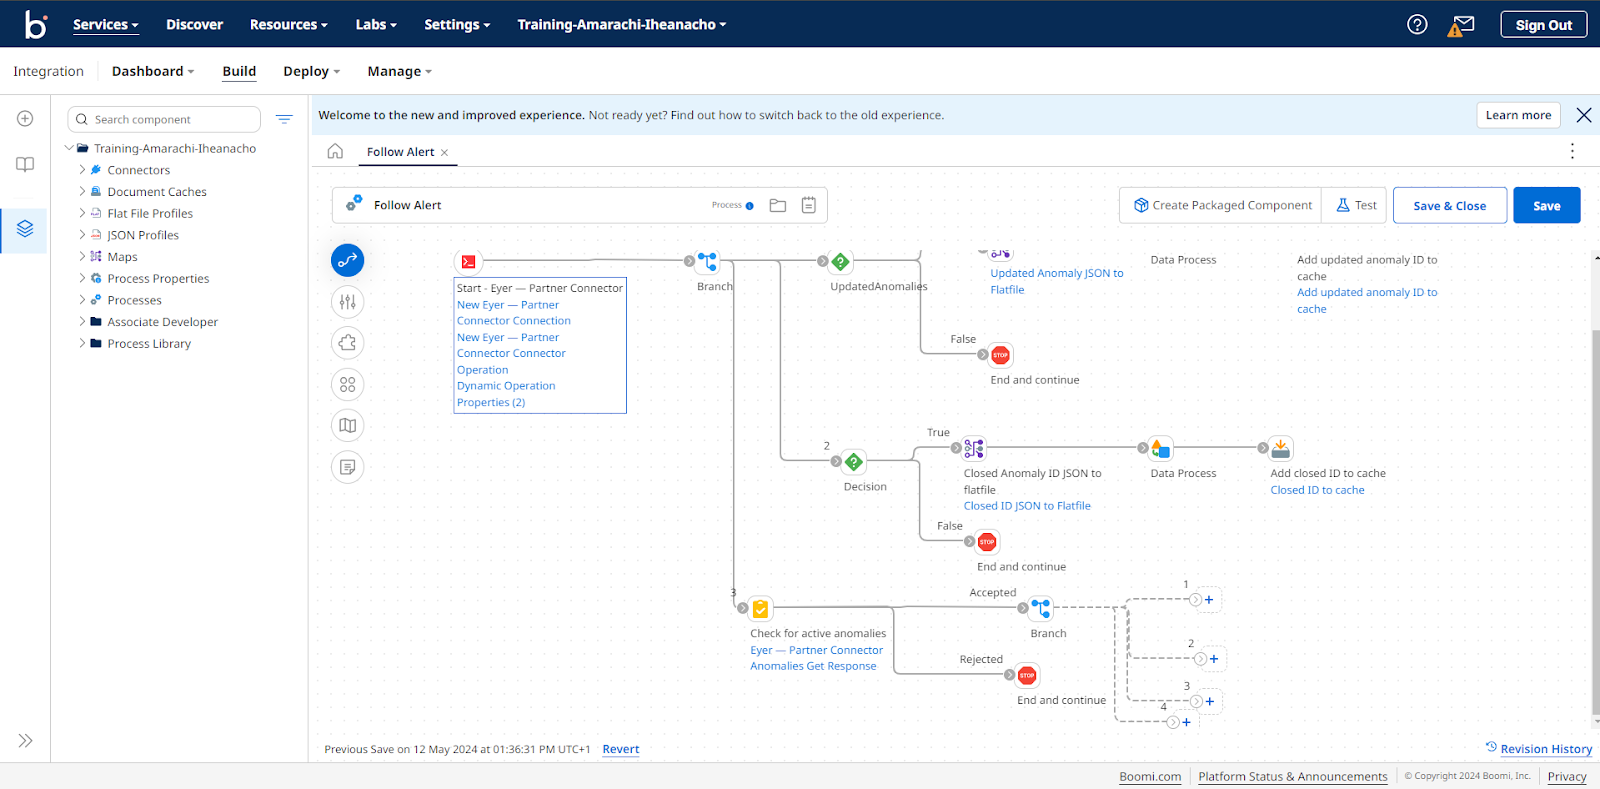
After understanding the importance of collecting and storing anomaly IDs, this section will explain the project structure. The use case is divided into the following parts:
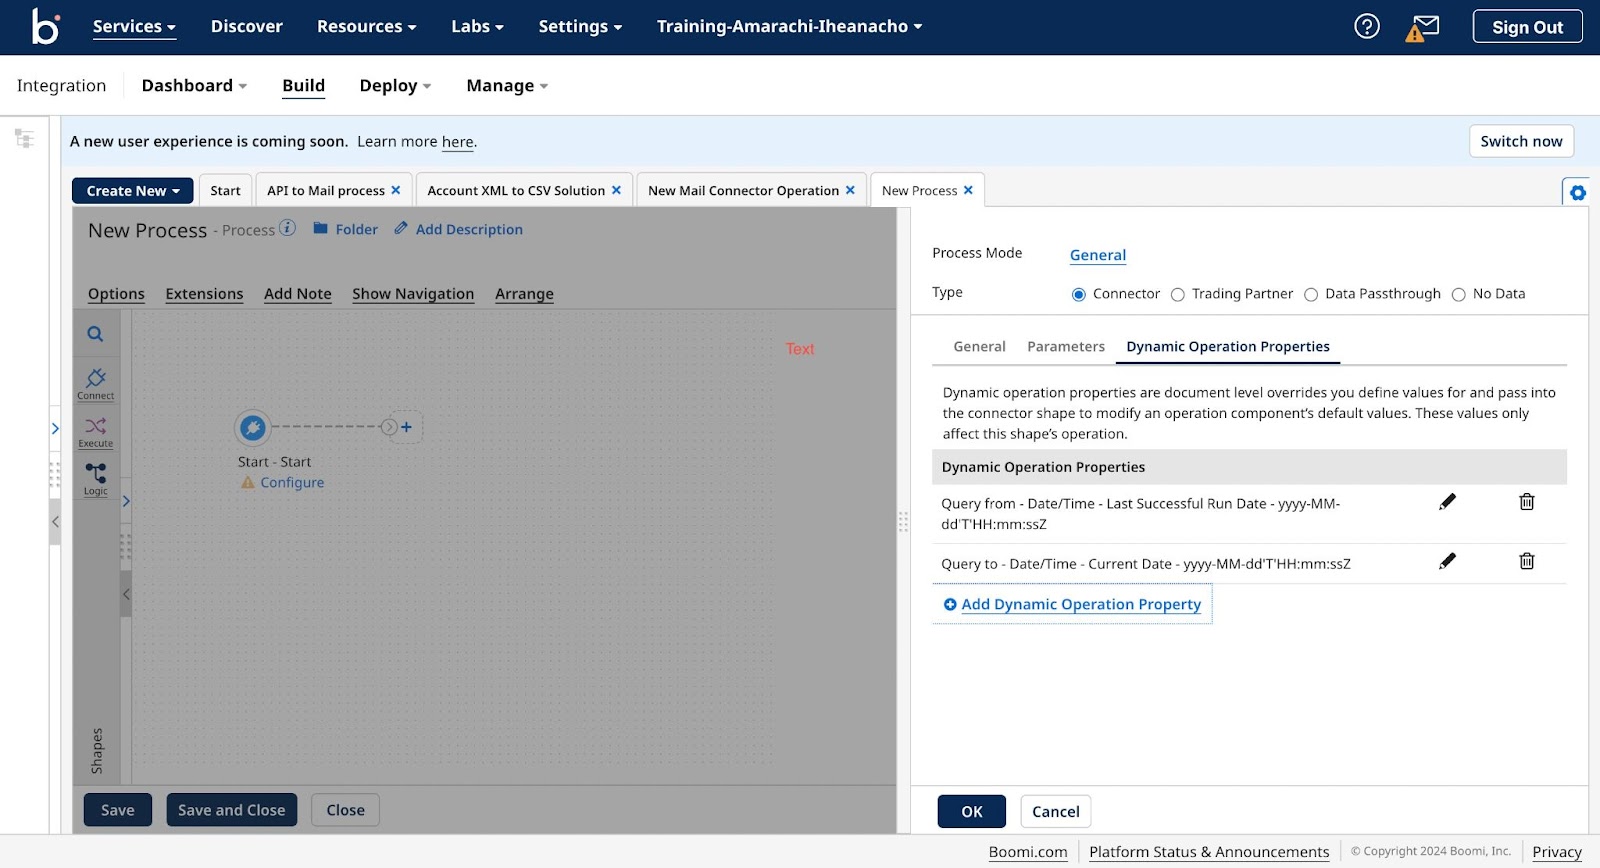
- Configure the Eyer-Partner connector using Dynamic Operation Properties
- Store the updated anomalies ID in a cache document
- Store the closed anomalies ID in a cache document
- Filter through the anomalies
- Store new anomaly IDs in the database and send out an alert when the anomaly is new
- Send out an alert when an anomaly is updated
- Send out an alert when an anomaly is closed
- Send an alert regardless
Configuring the Eyer-Partner connector
To get started, create a new Boomi process using the Eyer-Partner connector and configure it with the Dynamic Operation properties. For detailed instructions on setting up this connector, refer to the Configuring the Eyer Connector documentation.
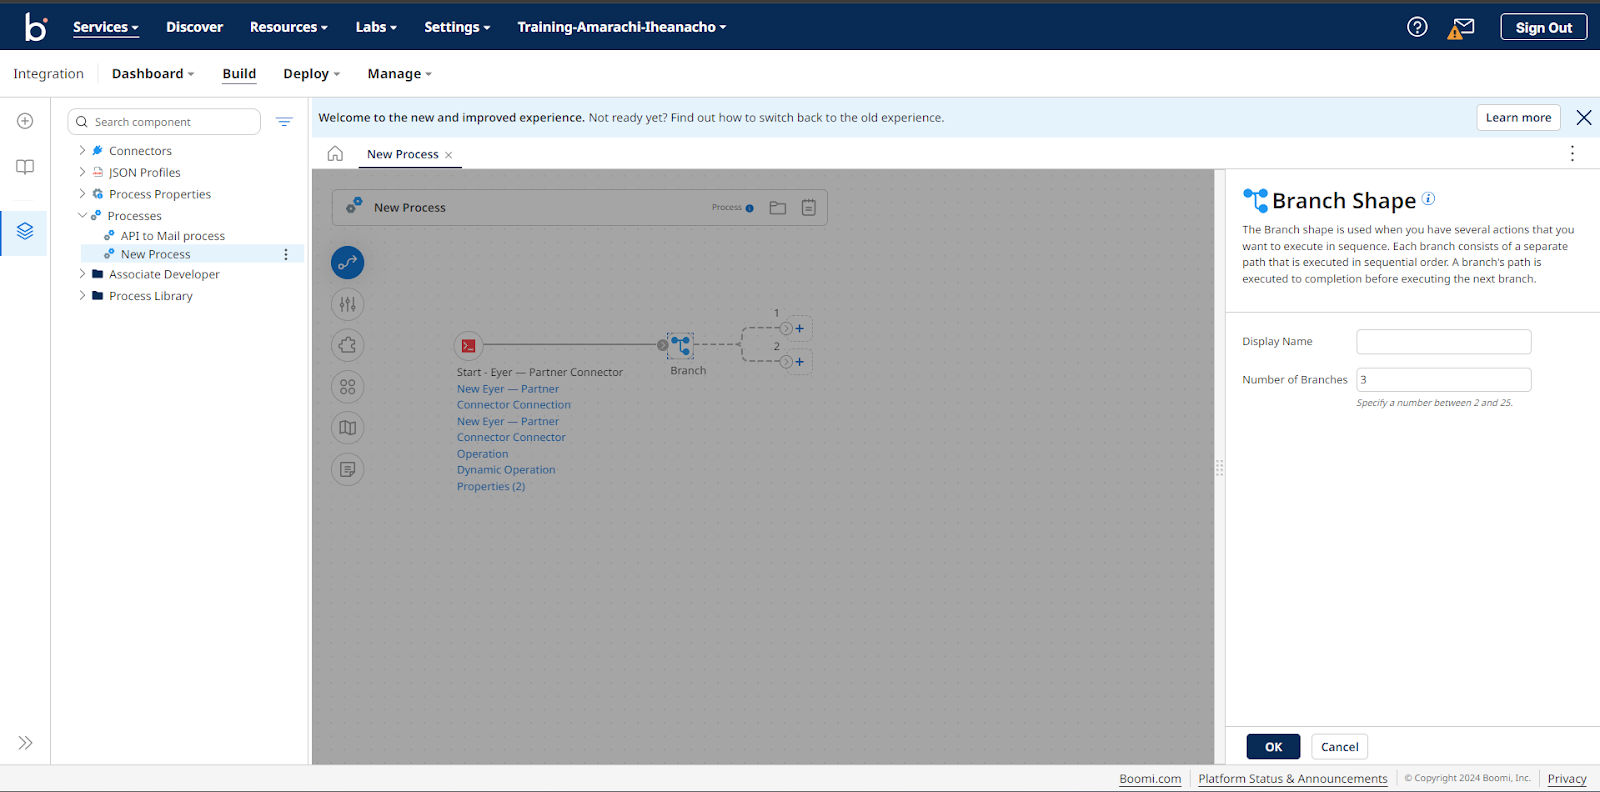
Adding a Branch shape to run the processes consecutively In Boomi, to run a series of processes consecutively, you need the Branch shape; with this Branch shape, you can:
- Store the updated anomaly IDs in a document, then
- Store closed anomaly IDs in another document, and
- Finally, send out alerts based on the status of the anomalies
Add a Branch shape to your process and click on it to open its dedicated sidebar. In the sidebar, change the number of branches to three and click OK to save your selection.
Store the updated anomalies ID in a cache document
To cache the ID from the updated anomalies, you need to:
- Determine if updated anomalies actually exist on the anomaly object
- Convert the JSON data received from the Eyer connector into a flat file format fo reasy processing
- Split the flat file by each line
- Add the updated anomaly id to a document
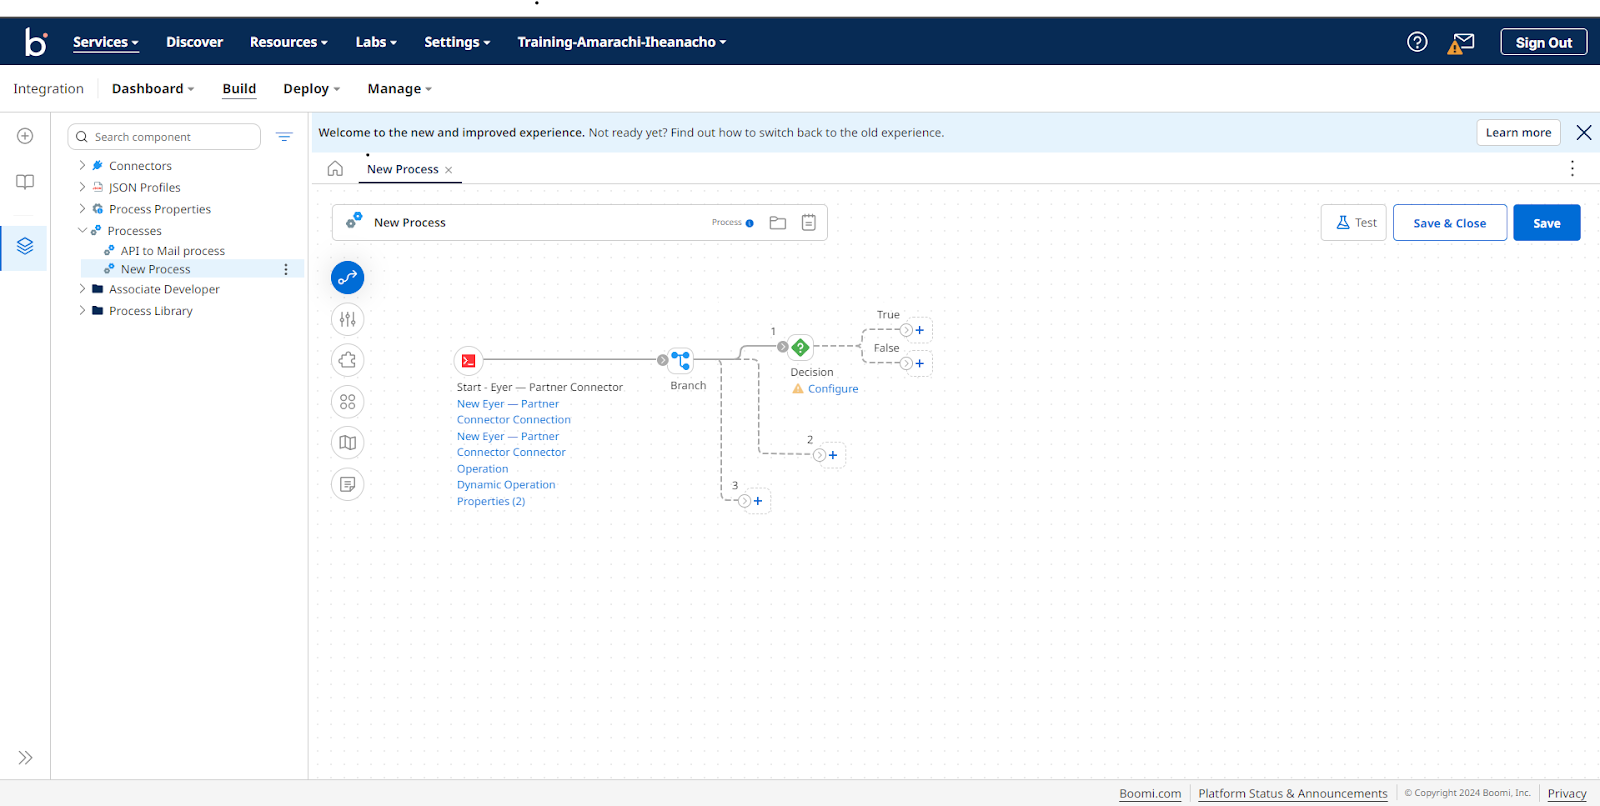
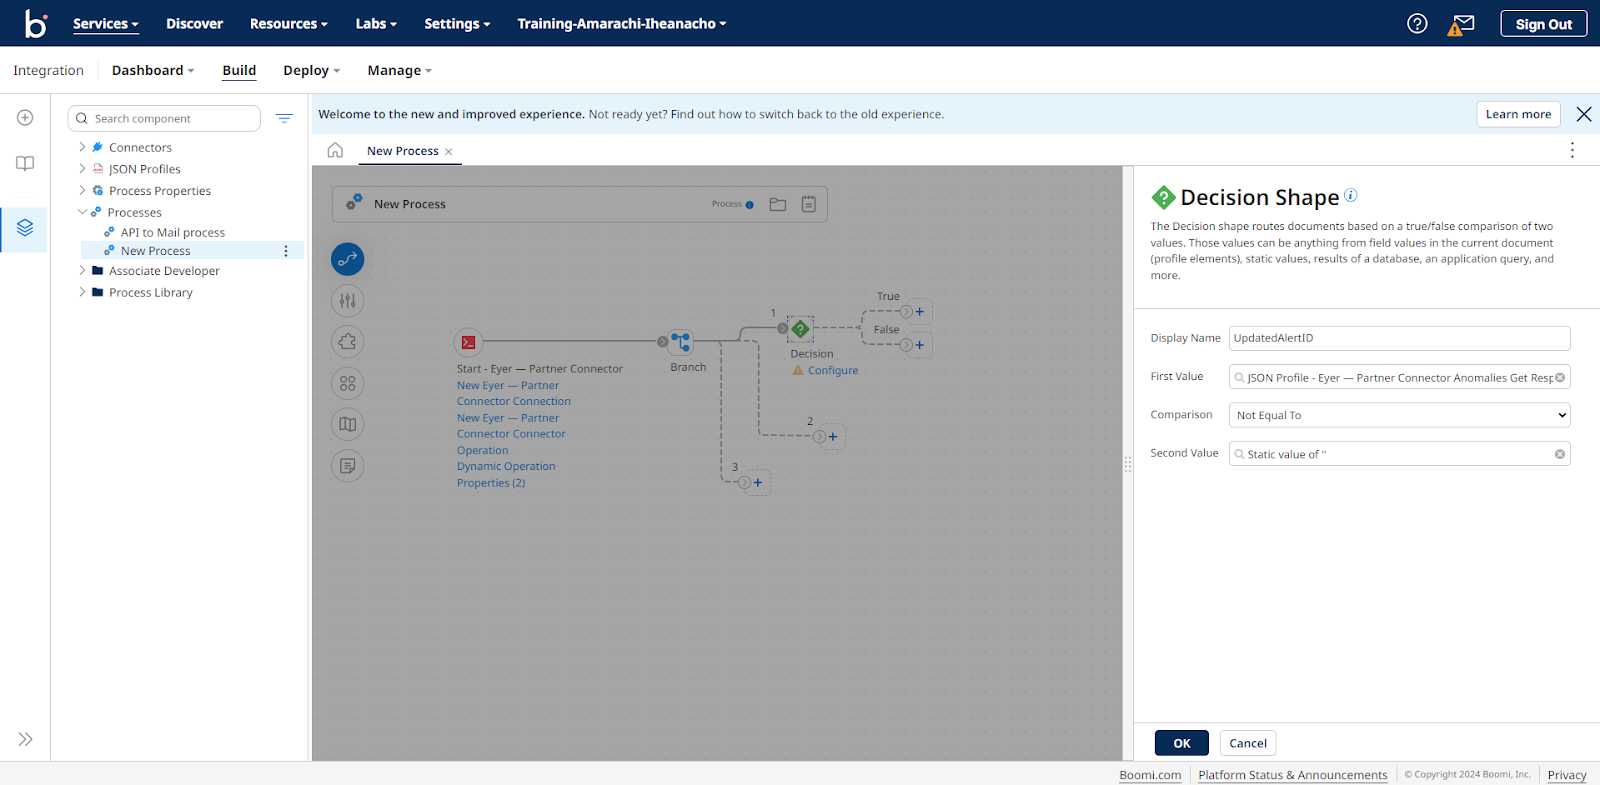
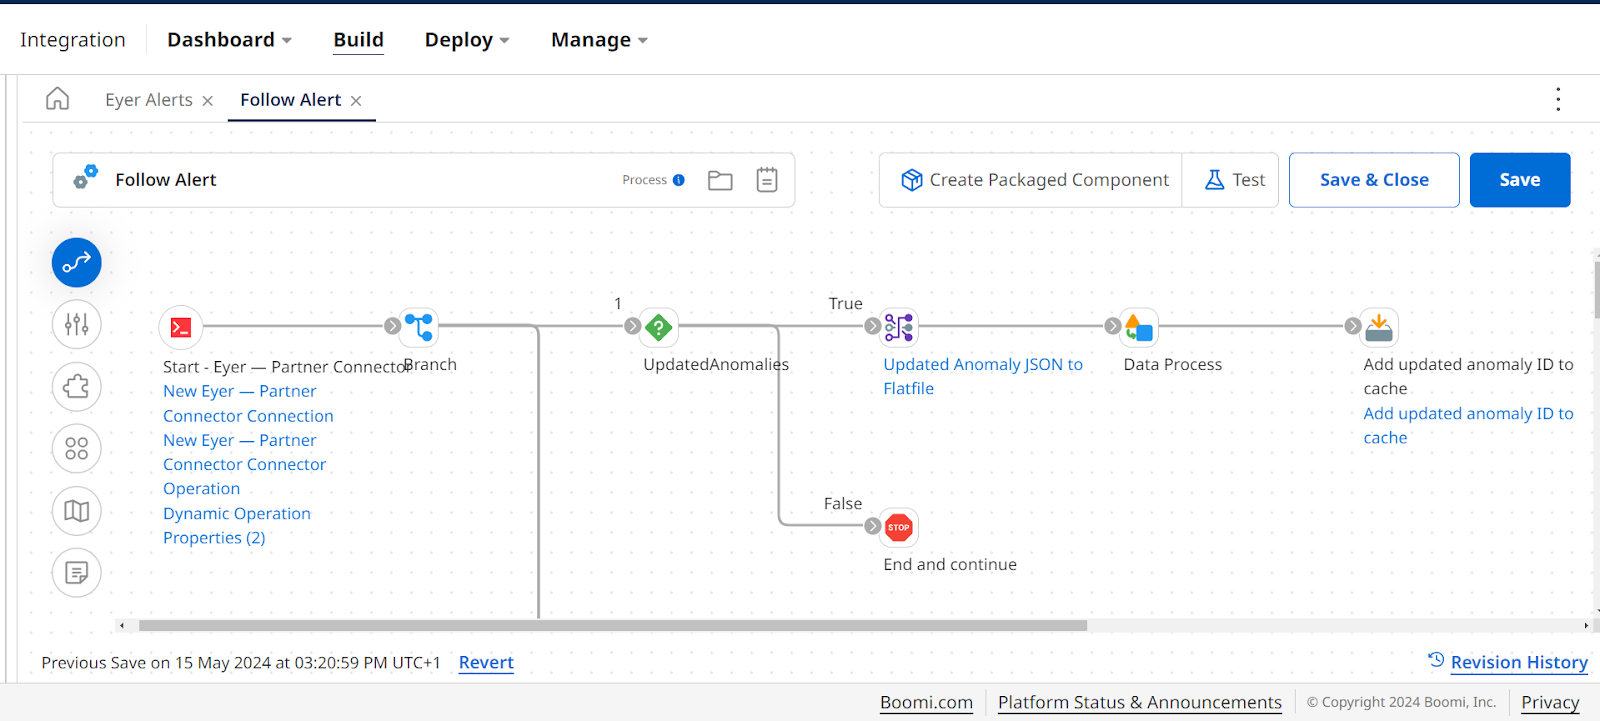
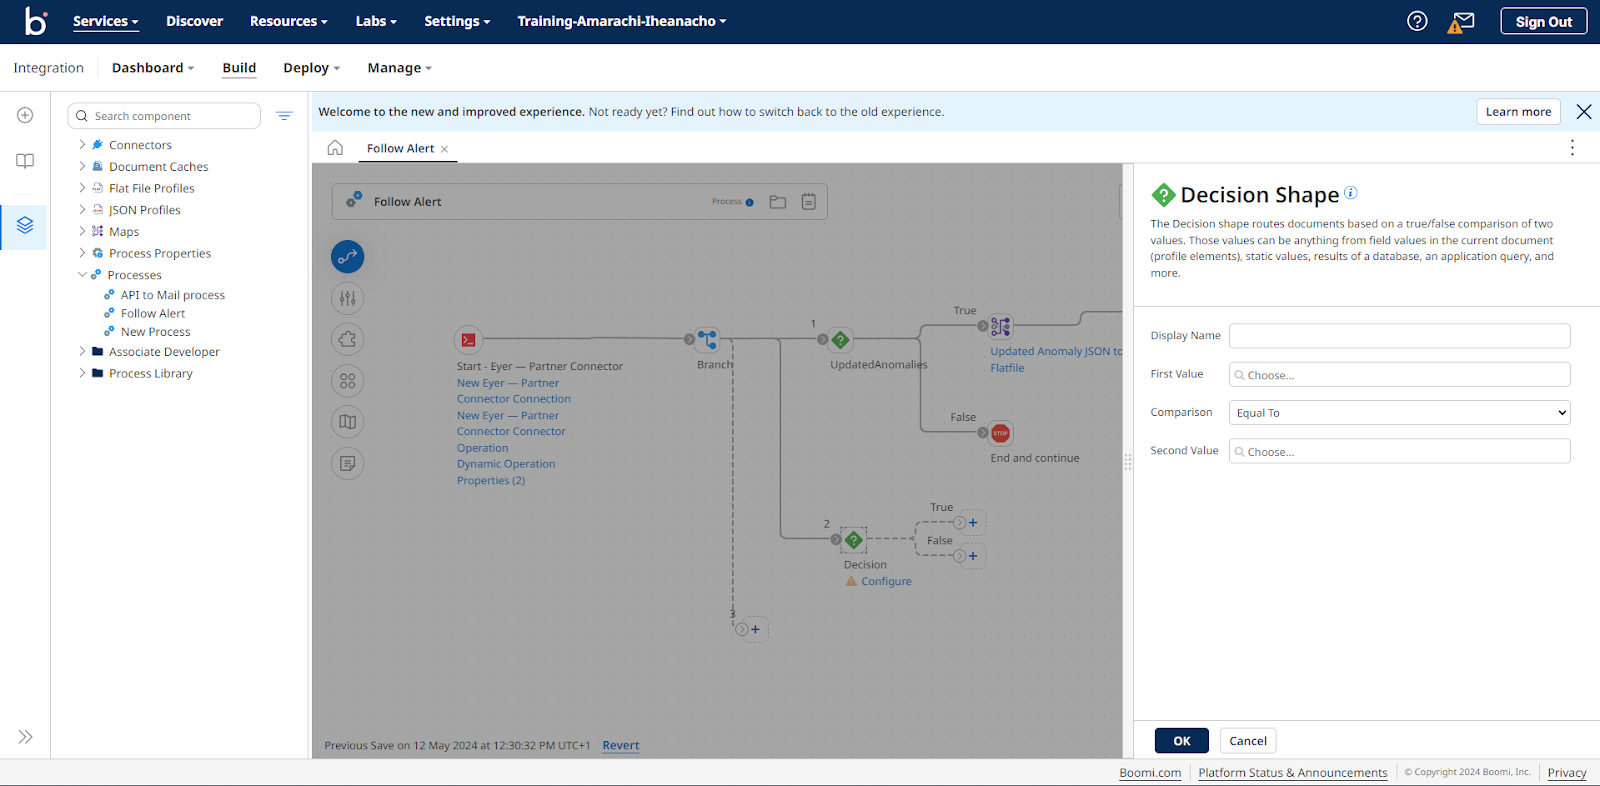
Determine if the updated anomalies exist on the anomaly object In the first path from the Branch shape ( labeled 1 ), add a Decision shape to ensure that the updated anomalies data exist before processing the data
Click the Decision Shape to open up its dedicated sidebar.
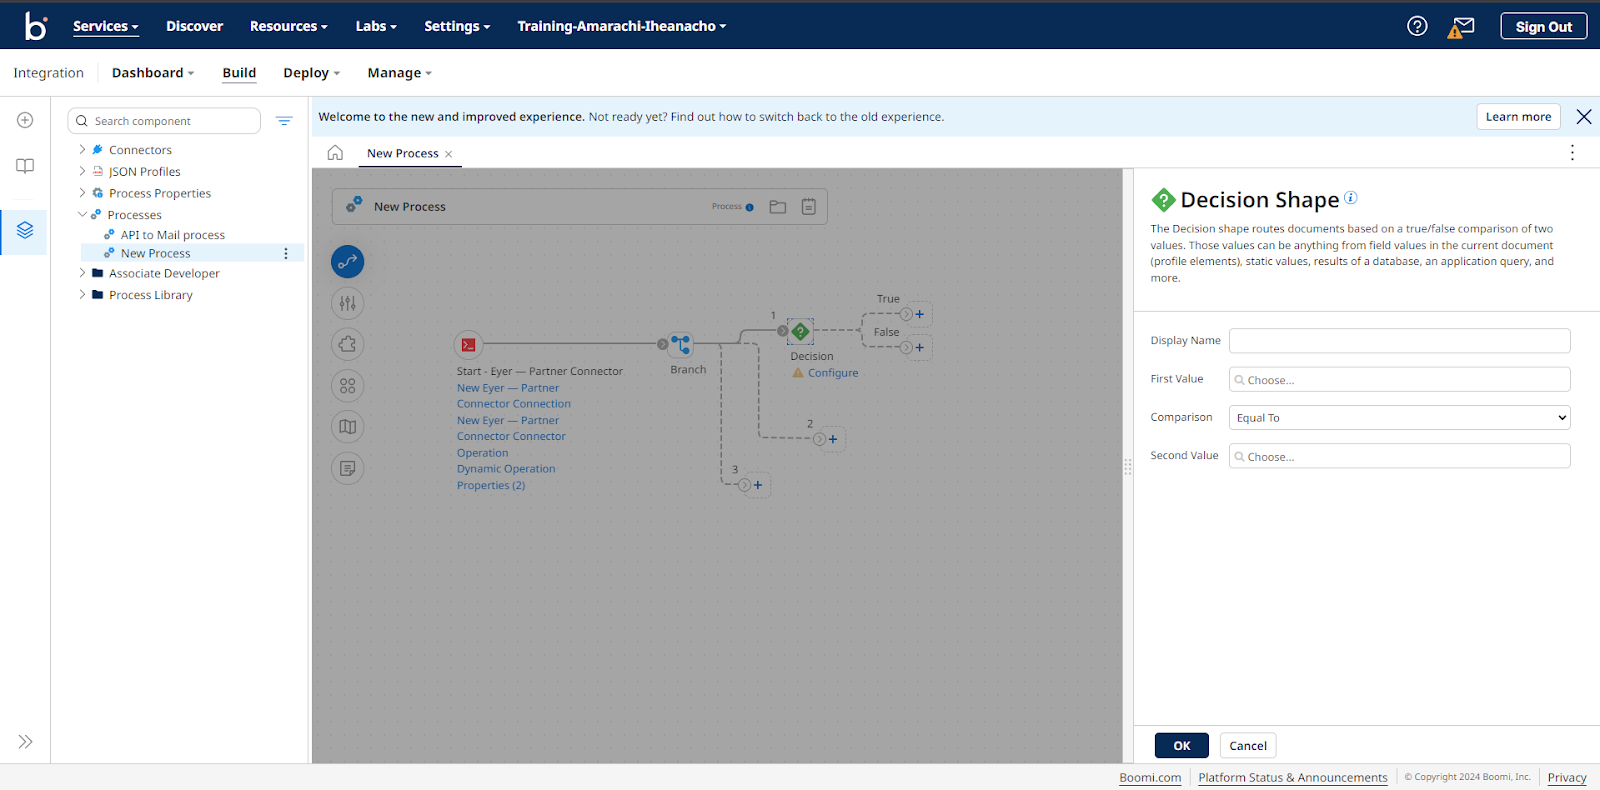
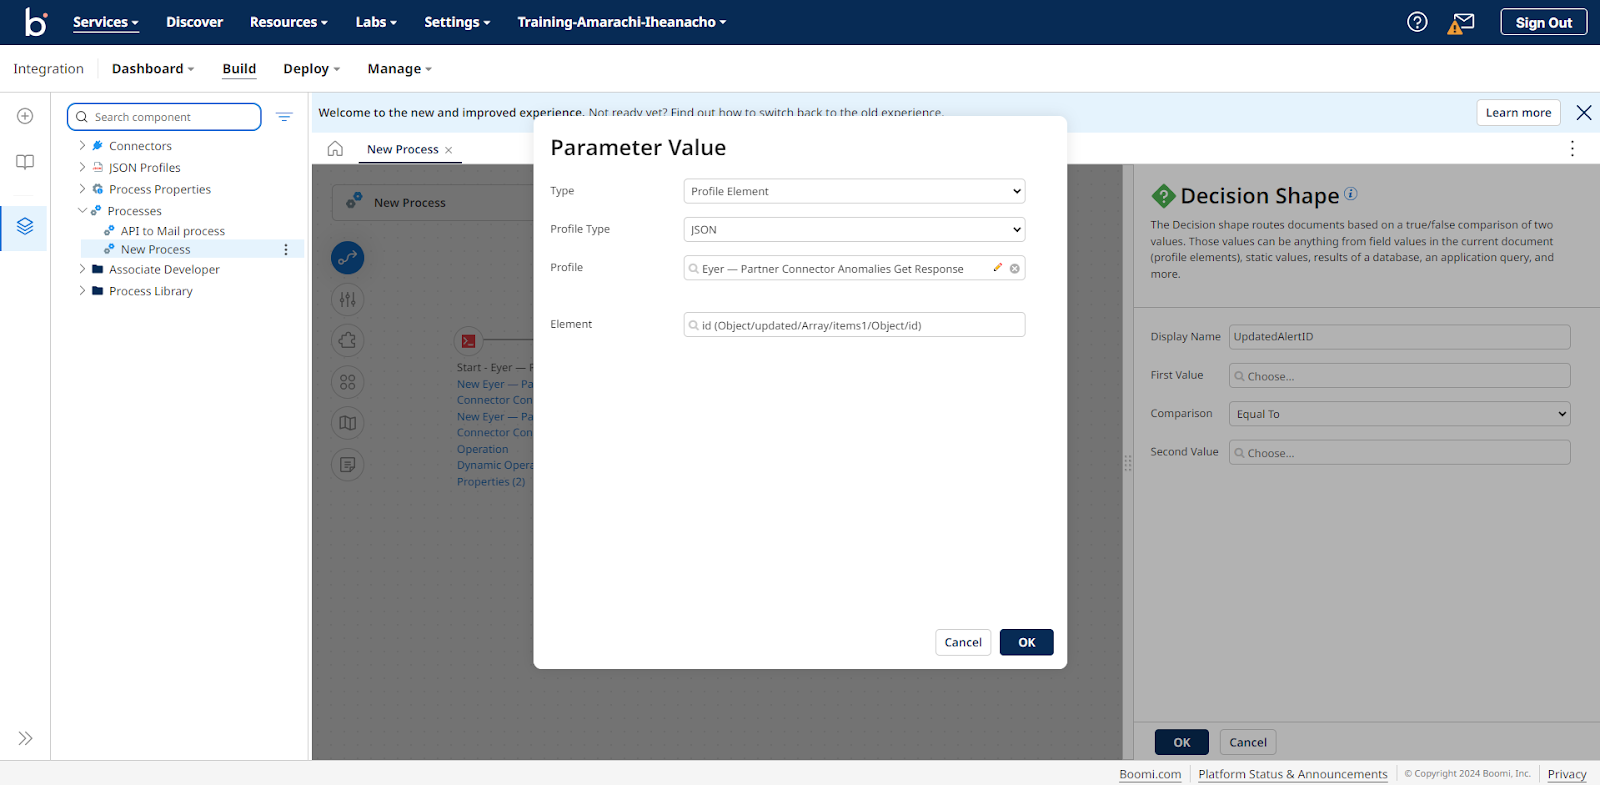
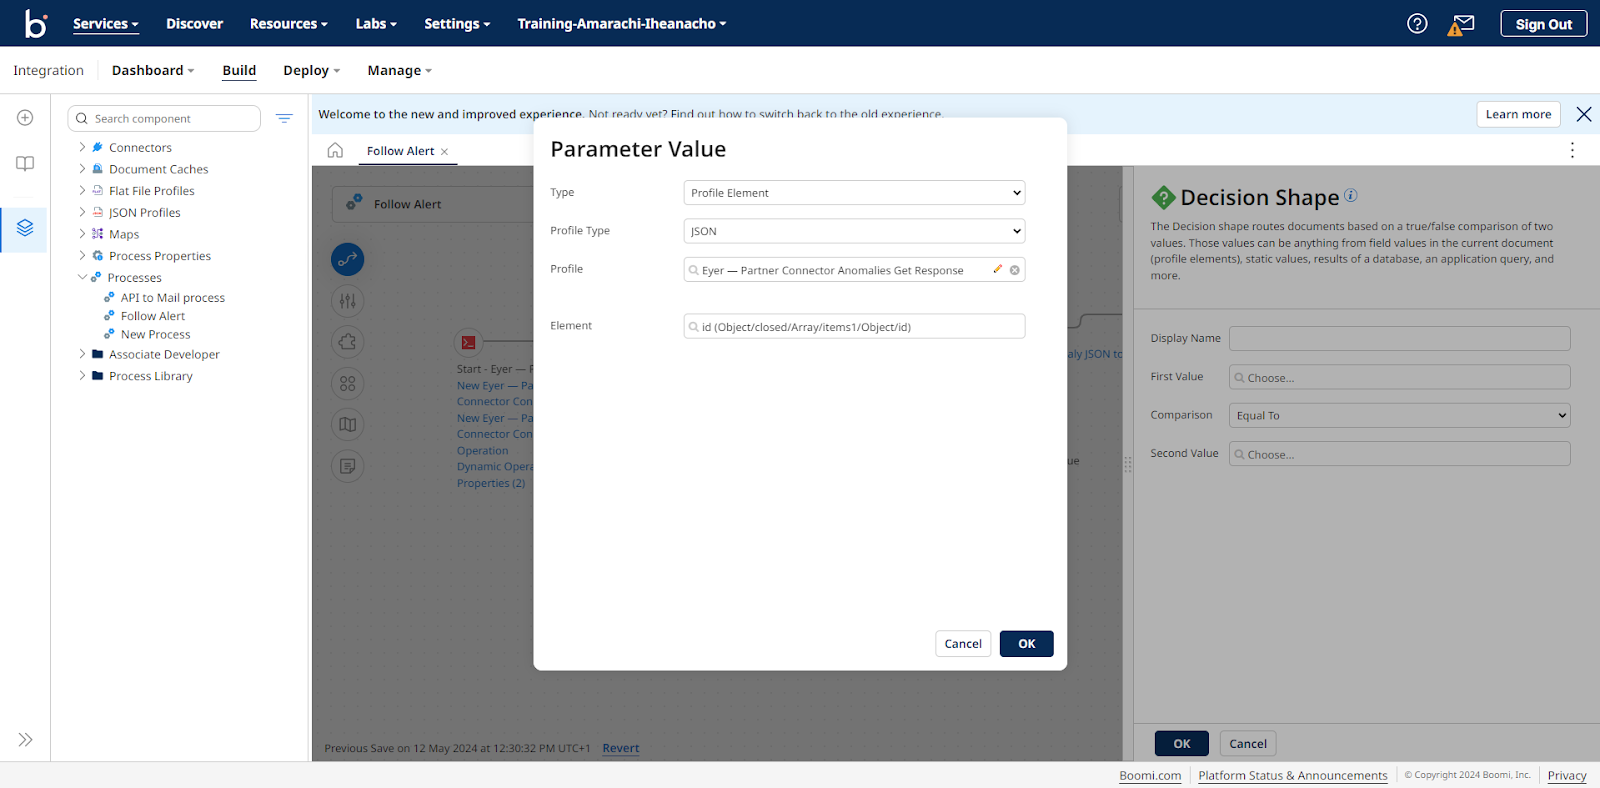
In this sidebar, click the First Value field to open the Parameter Value modal. Fill out this modal with the following information:
- Type -> Profile Element
- Profile Type -> JSON
- Profile - > Select the profile you created when configuring your Eyer connector
- Element -> Click the Element field to open up the New Output modal. Navigate through this modal, and select this menu Object -> updated -> Array -> items1 -> Object -> id
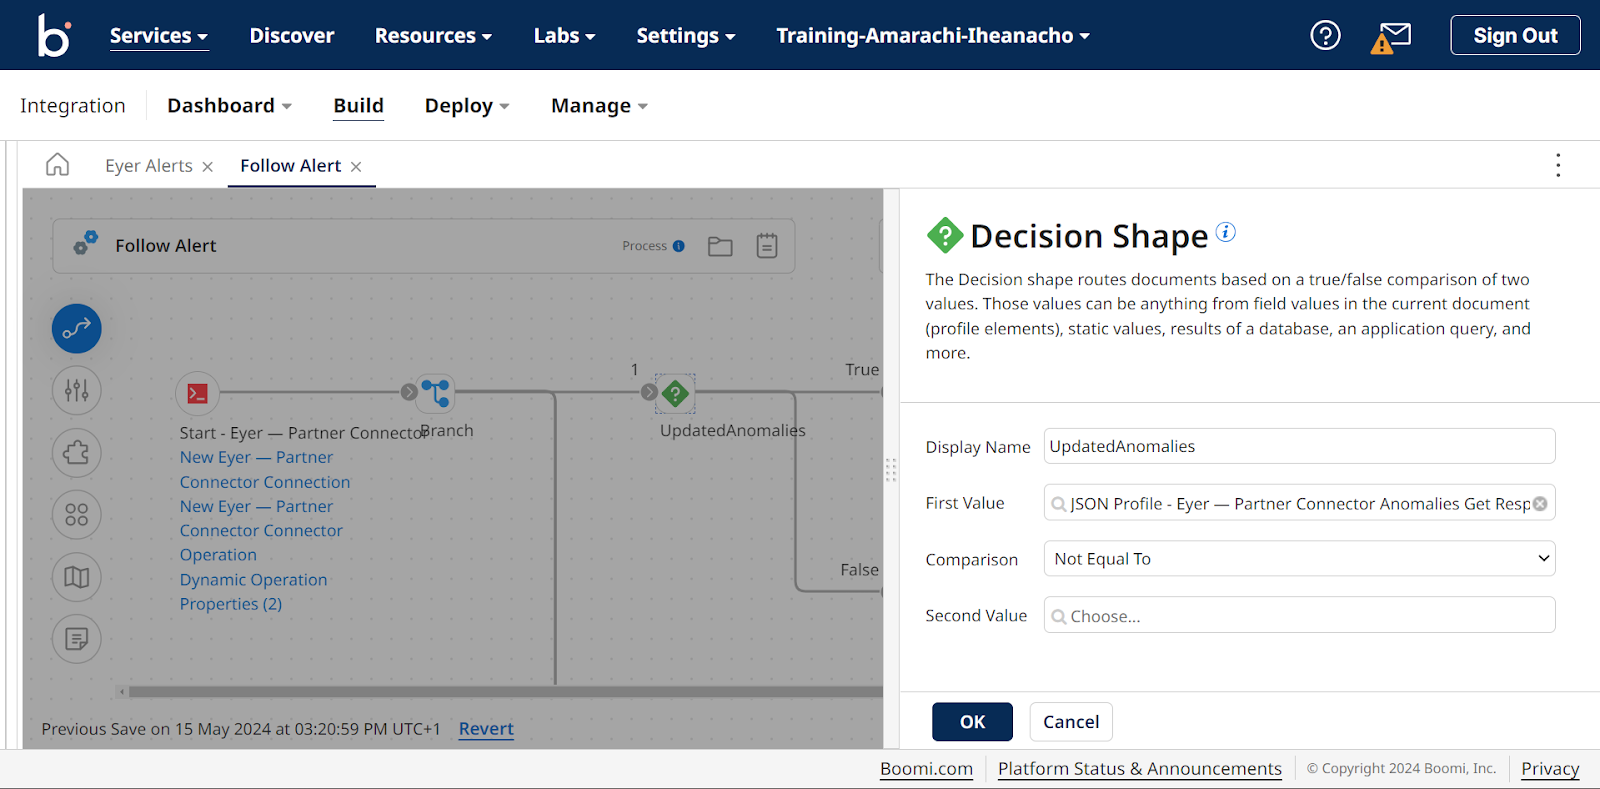
Click the OK-> OK button to return to the decision shape sidebar. Next, select Not Equal To in the Comparison dropdown.
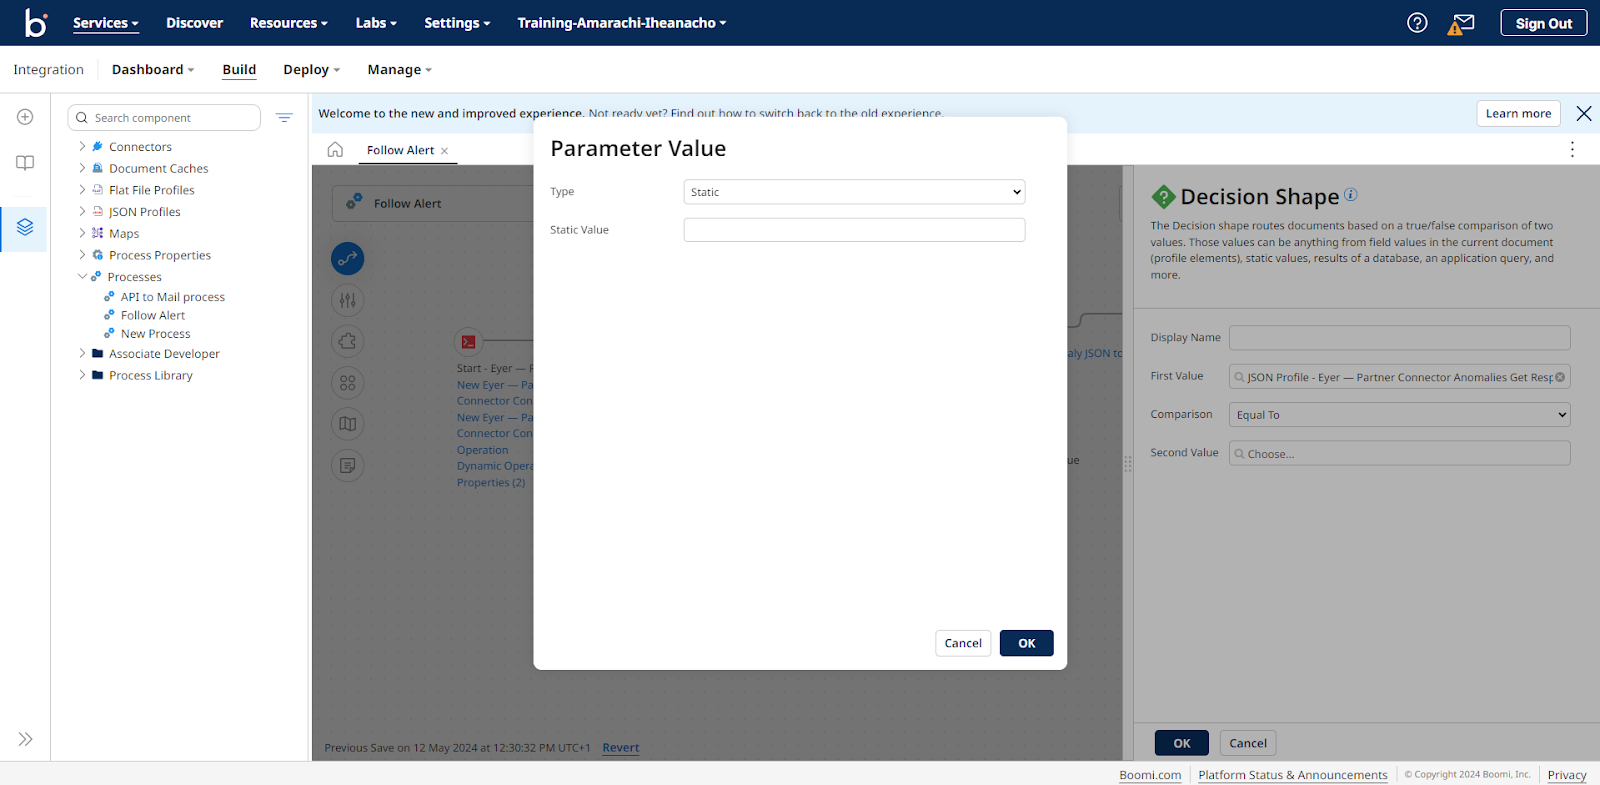
In the Second Value field, click the input field to open the Parameter Value modal. Select Static in the Type dropdown in this modal and leave the Static Value field empty.
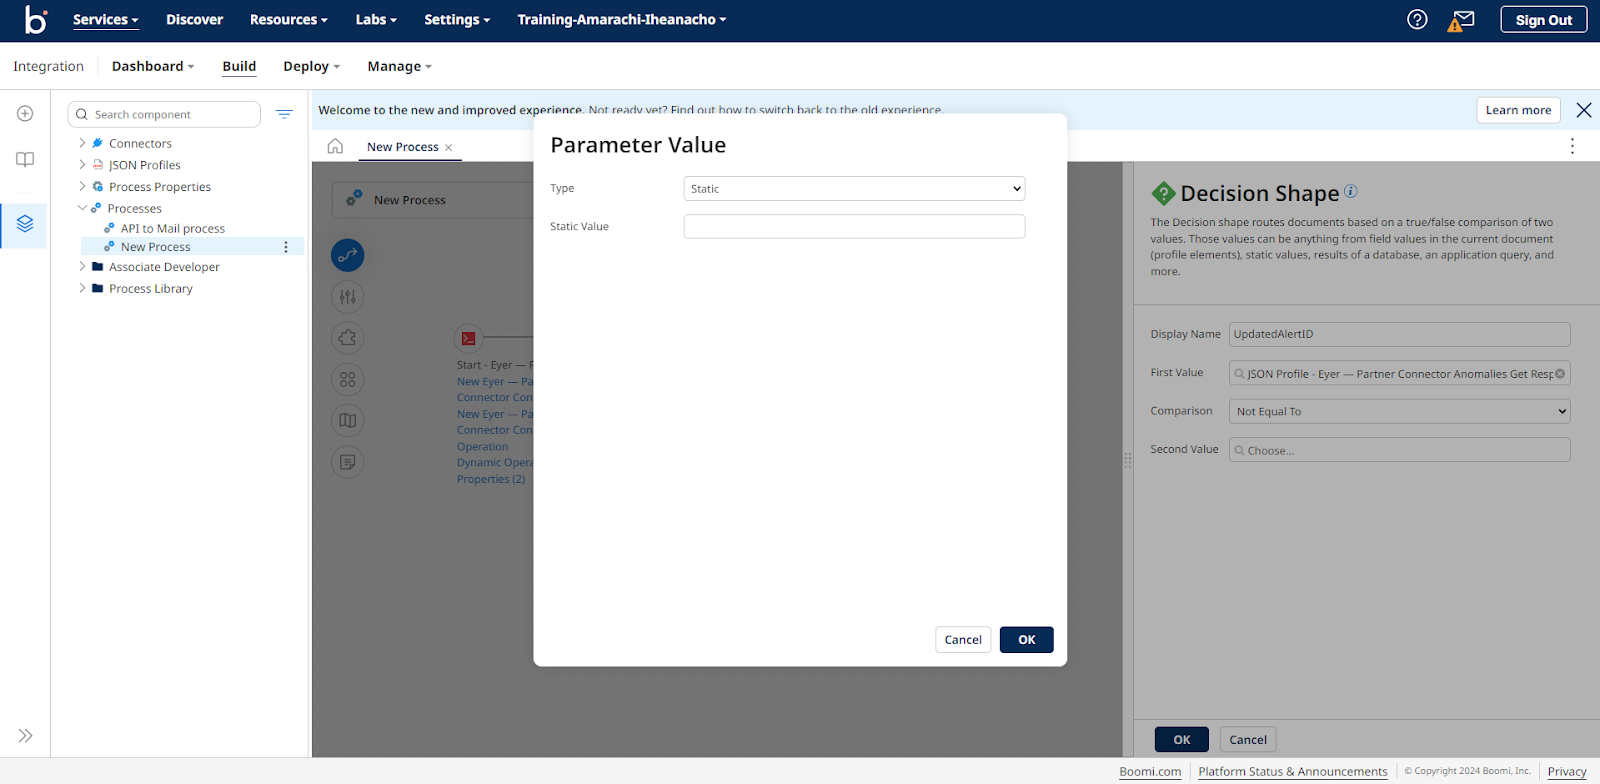
Your decision shape should look like this:
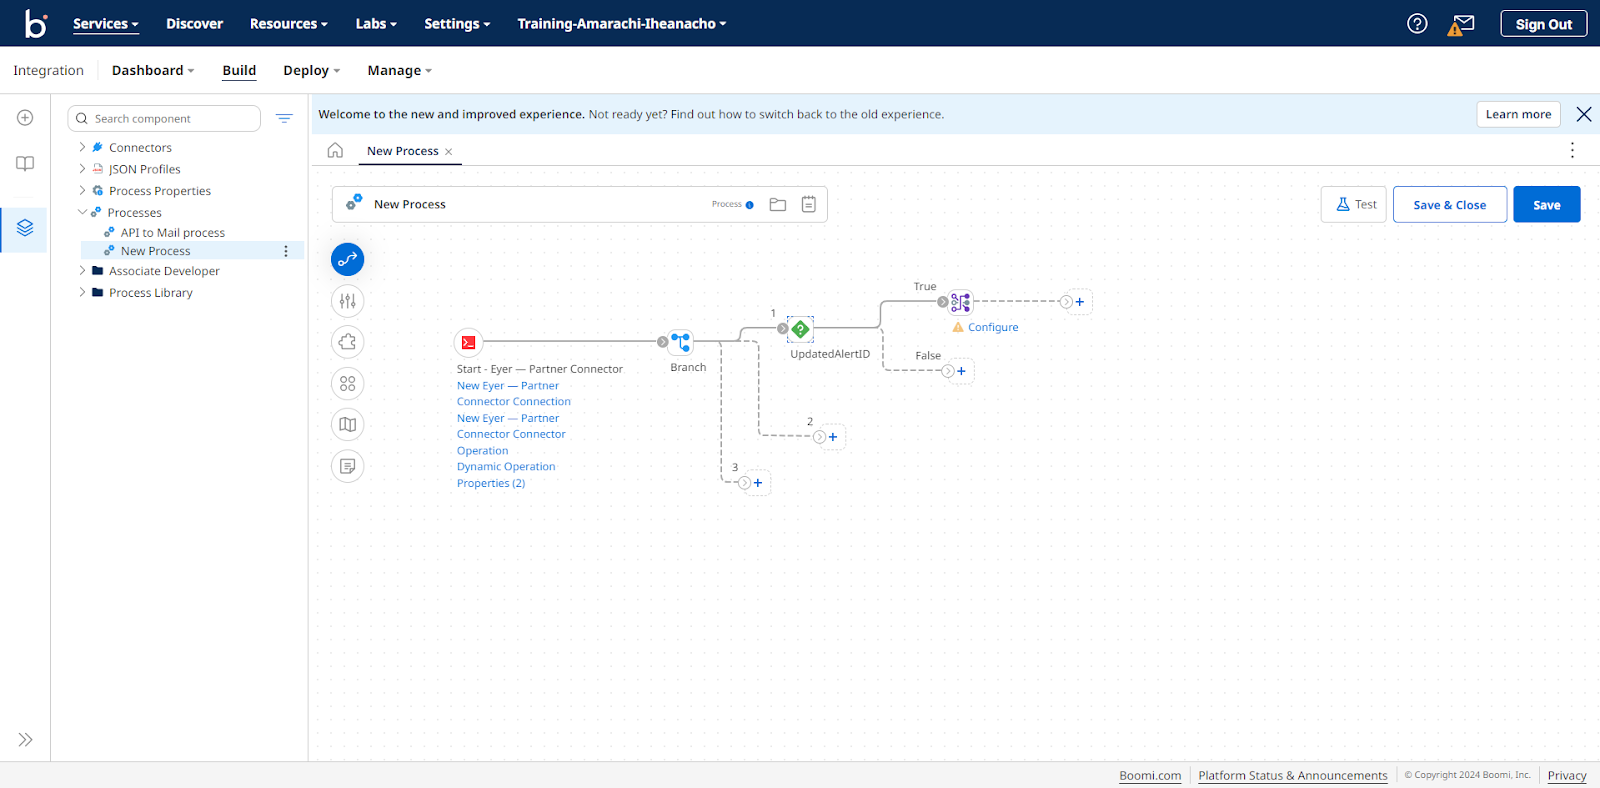
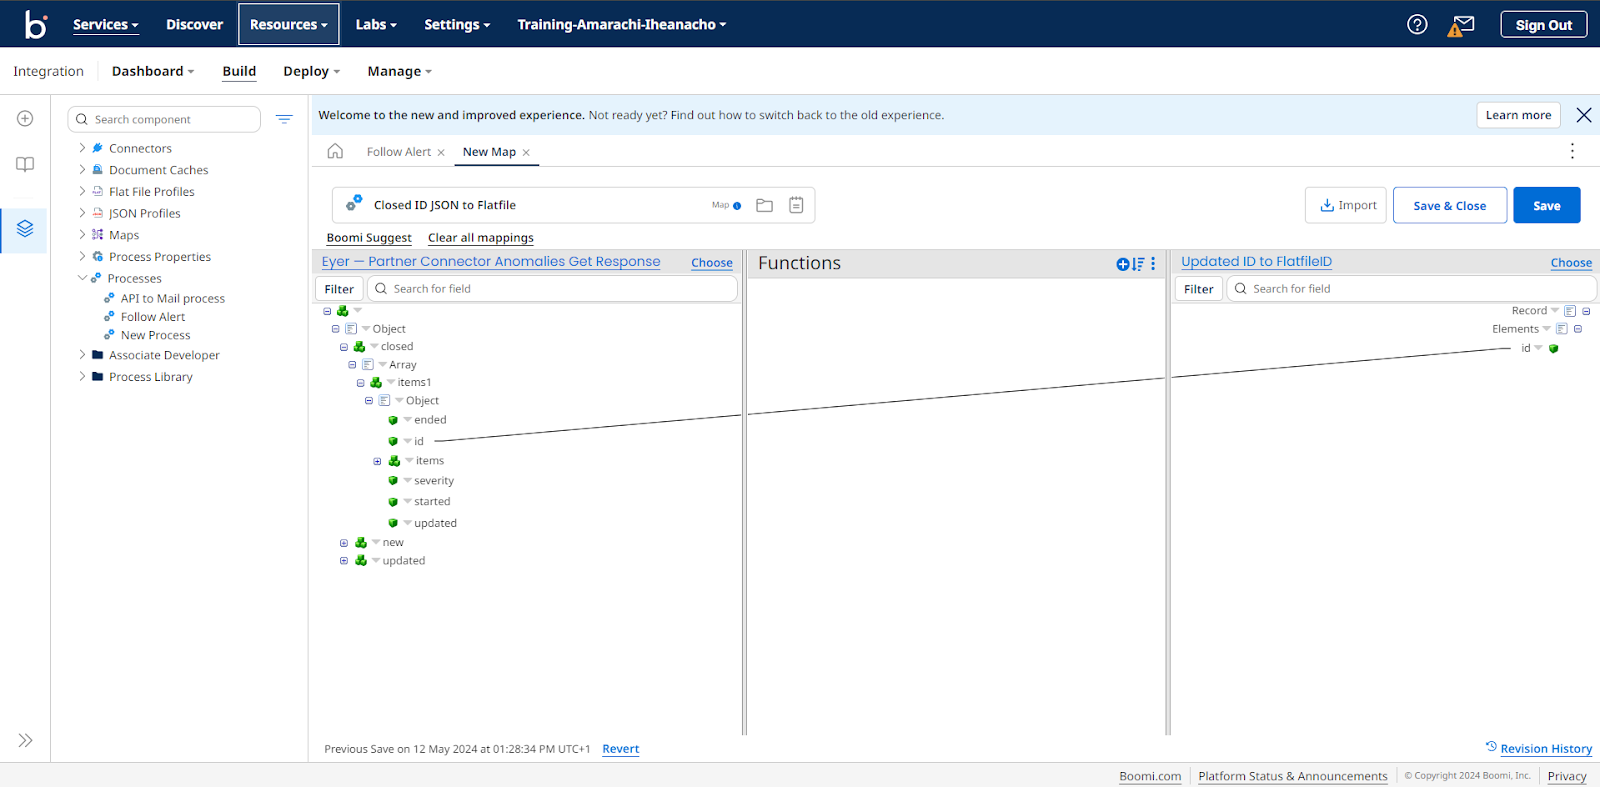
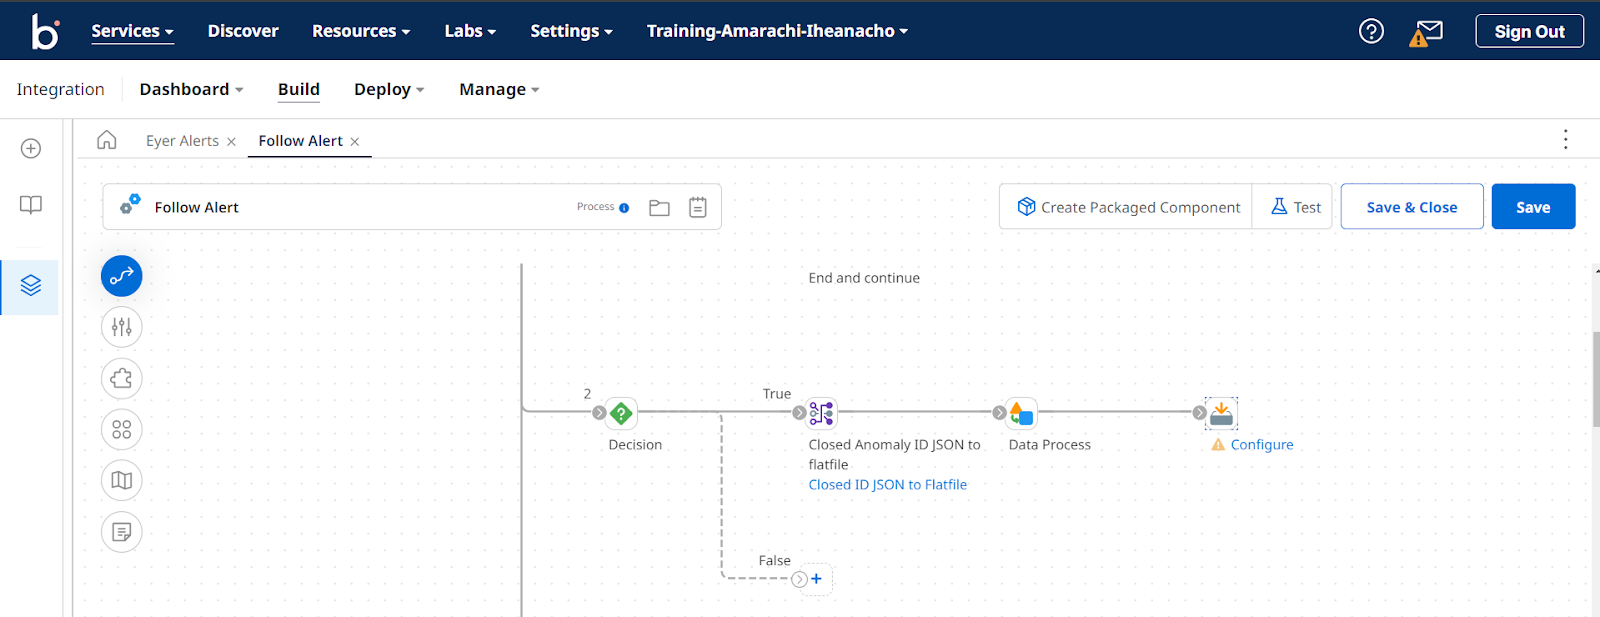
Click the OK -> OK button to return to the Boomi canvas. Convert the JSON data received from the Eyer connector into a flat file format Add the map shape to the True path from the Decision shape. This shape allows you to convert data from one format to another. For in-depth information about the Map shape and its properties, refer to the Boomi documentation.
While this section won't cover the complete Map shape configuration, here are some key points to remember:
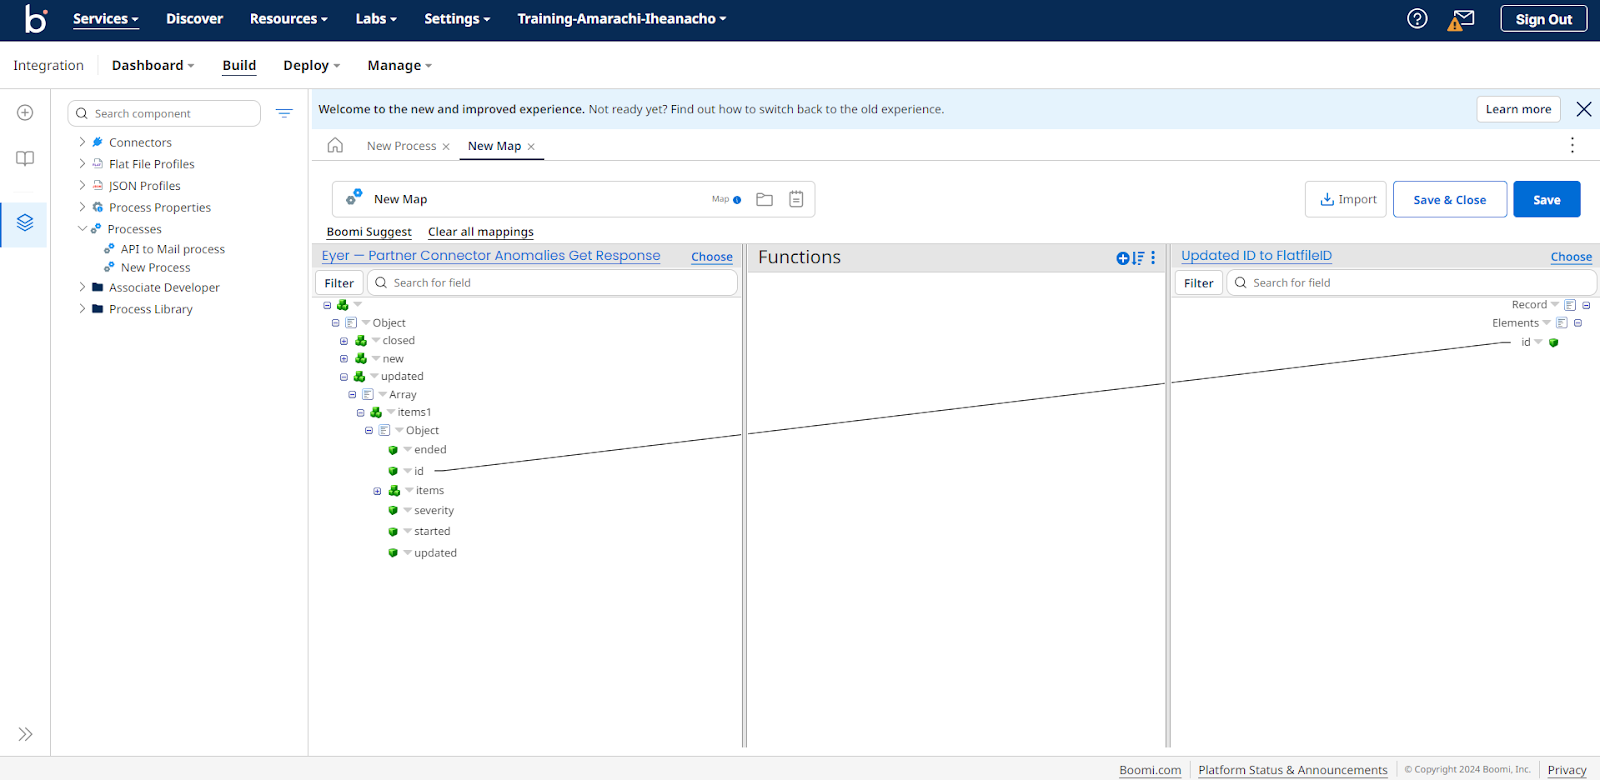
- Source Profile: The profile type is JSON, and the profile is the Eyer Connector Profile.
- Destination Profile: The profile type is Flatfile with a single field named id.
Mapping Instructions: Within the Map source, locate the field path updated -> Array -> items1 -> Object -> id. Map this field to the "id" field in the Map destination section. This essentially extracts the "id" value from the JSON data and places it in the designated field of the flat file.
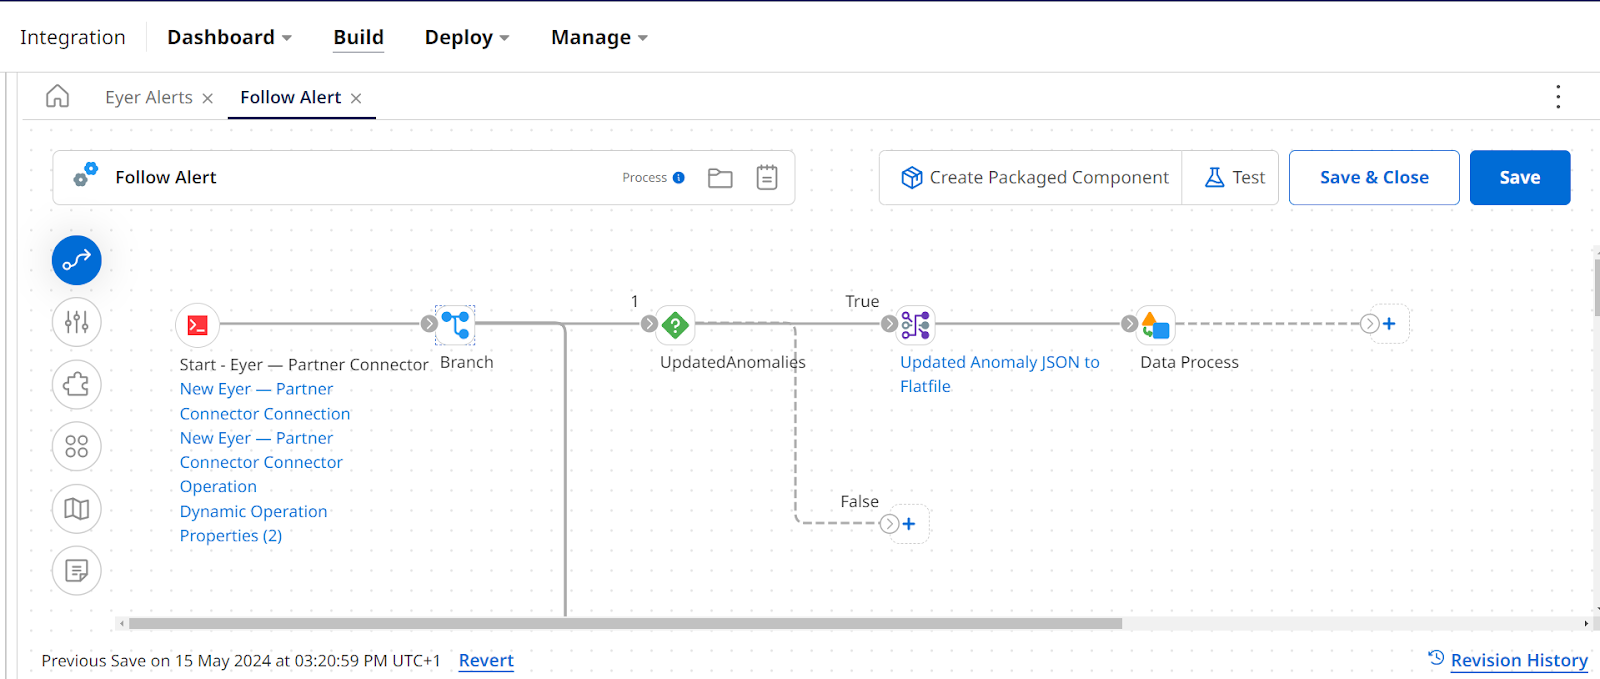
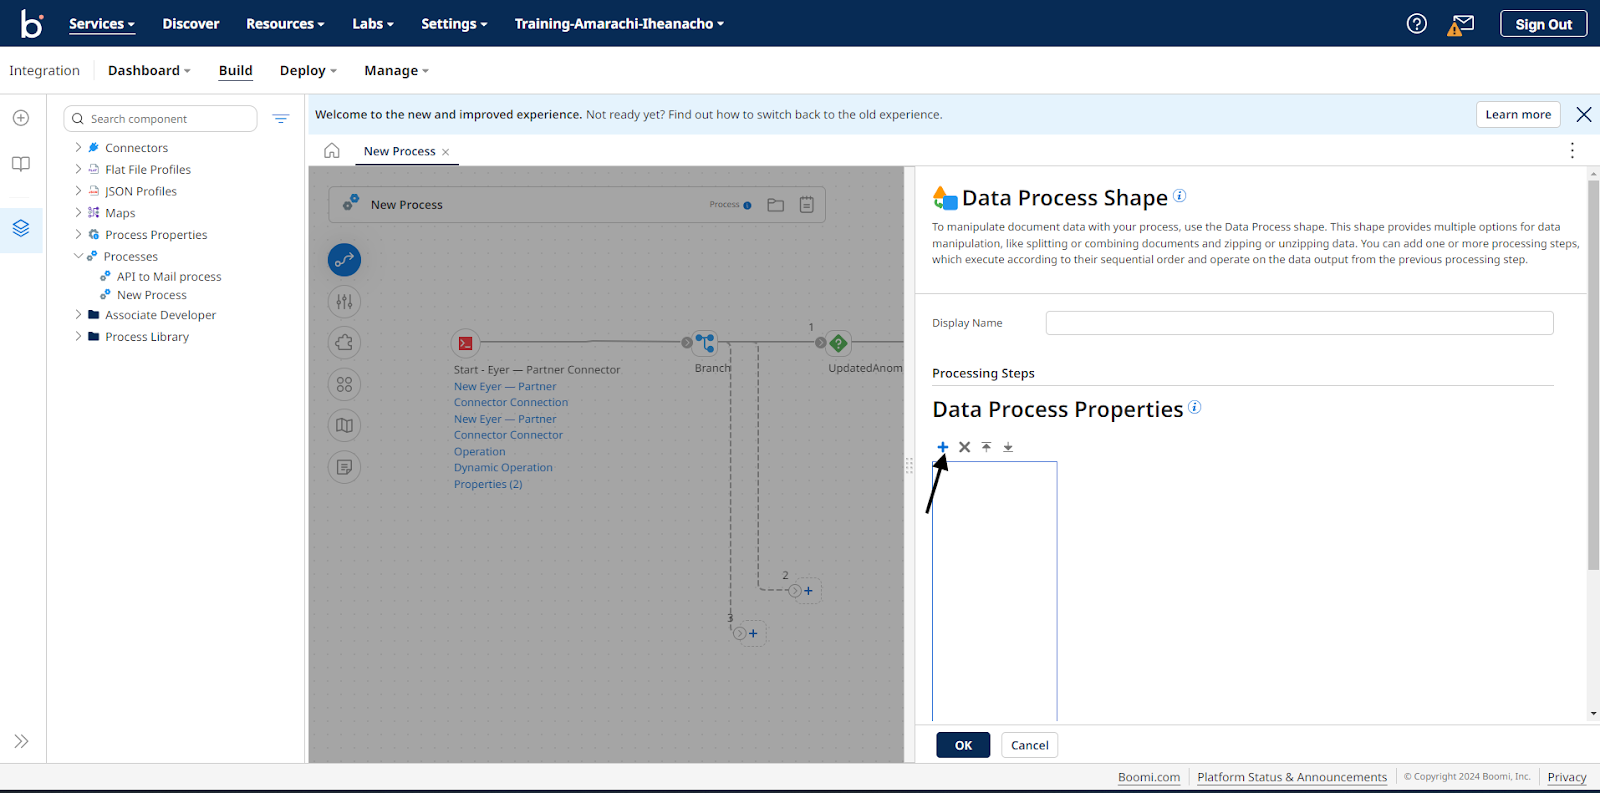
Split the flat file by each line After converting your JSON data to a flat file, you want to split the data by each anomaly ID. To do this, you need to add the Data Process Shape to the Boomi process.
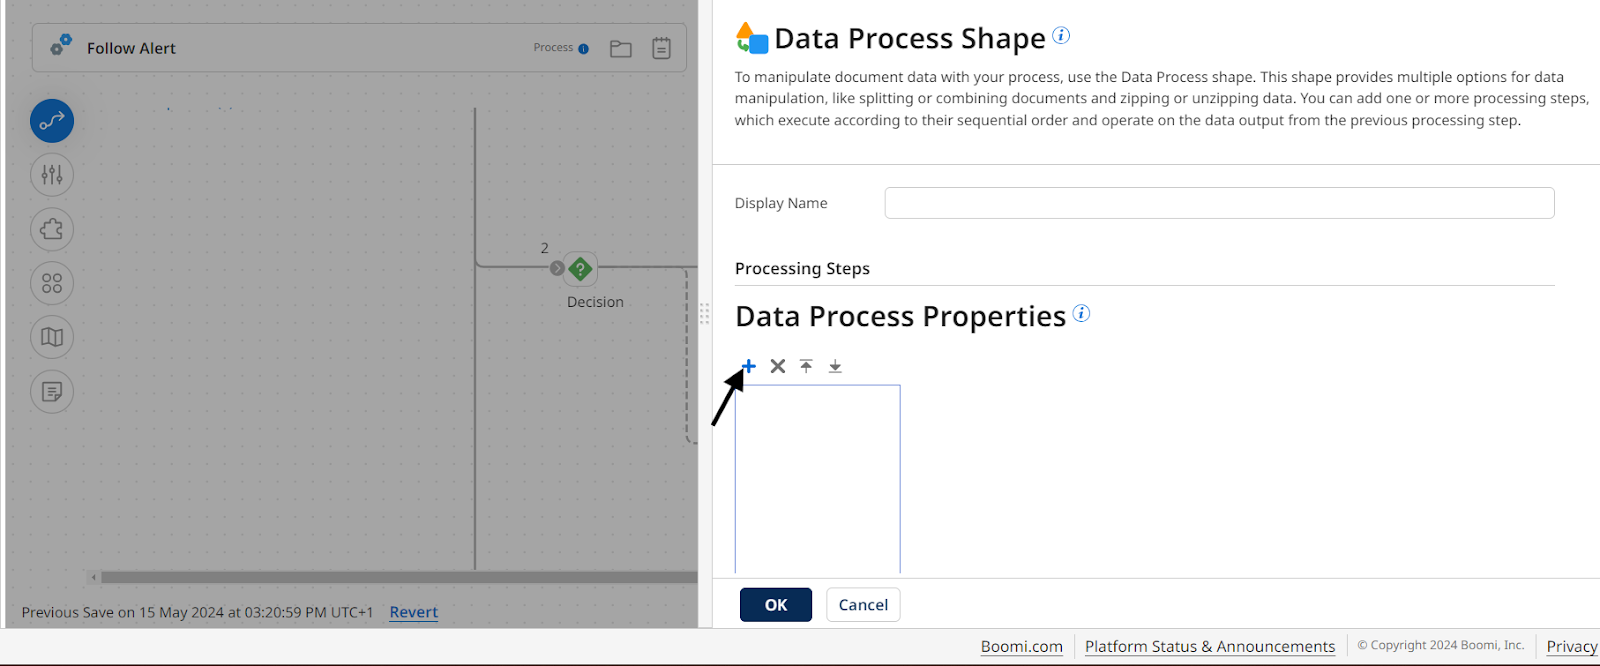
Next, click on the Data Process shape to open up its dedicated sidebar. In this dedicated sidebar, click on the + sign to specify a processing step for your data.
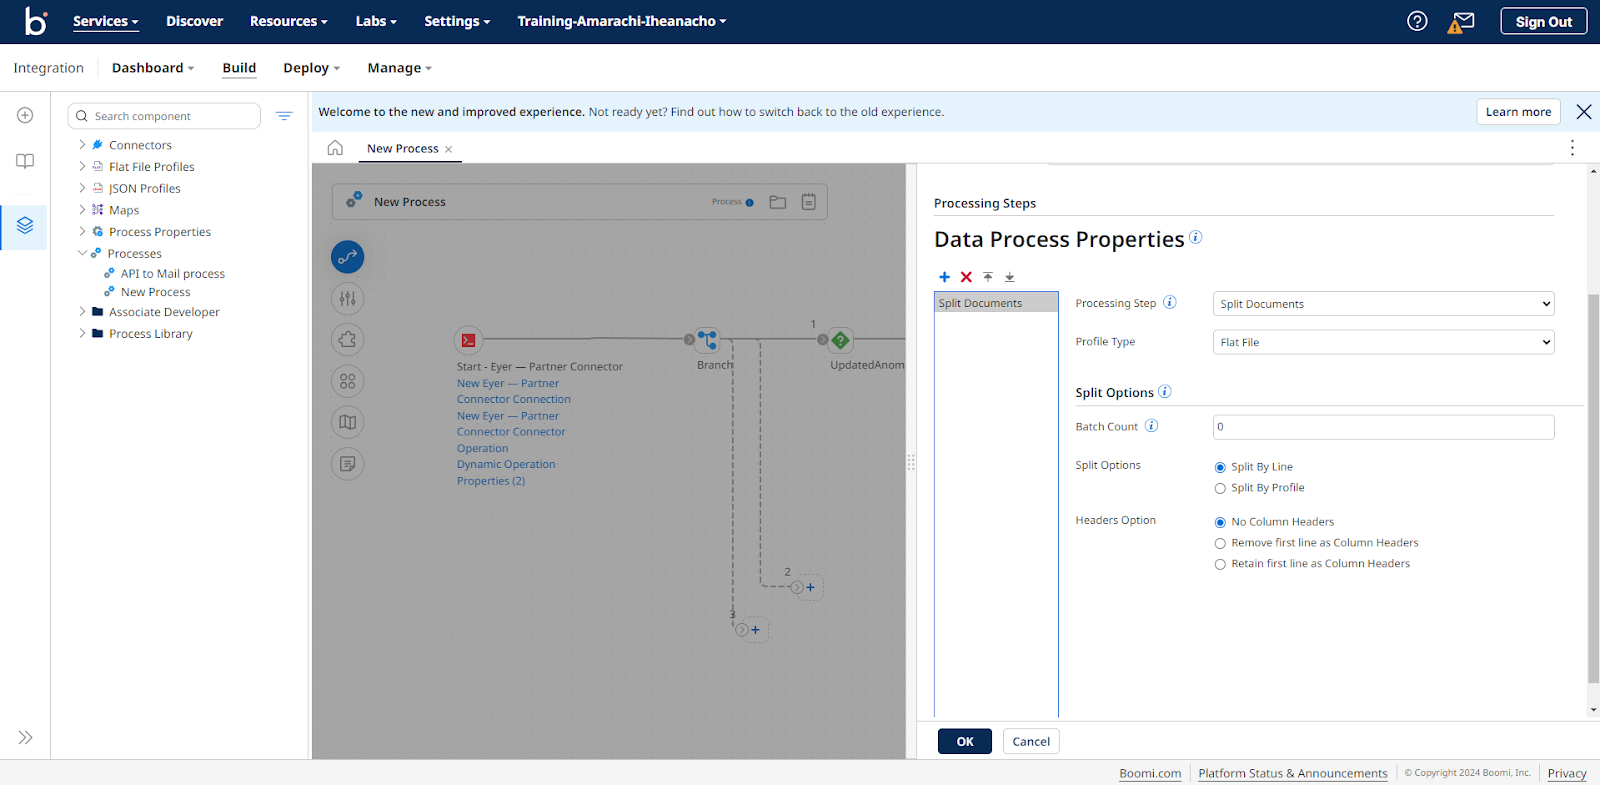
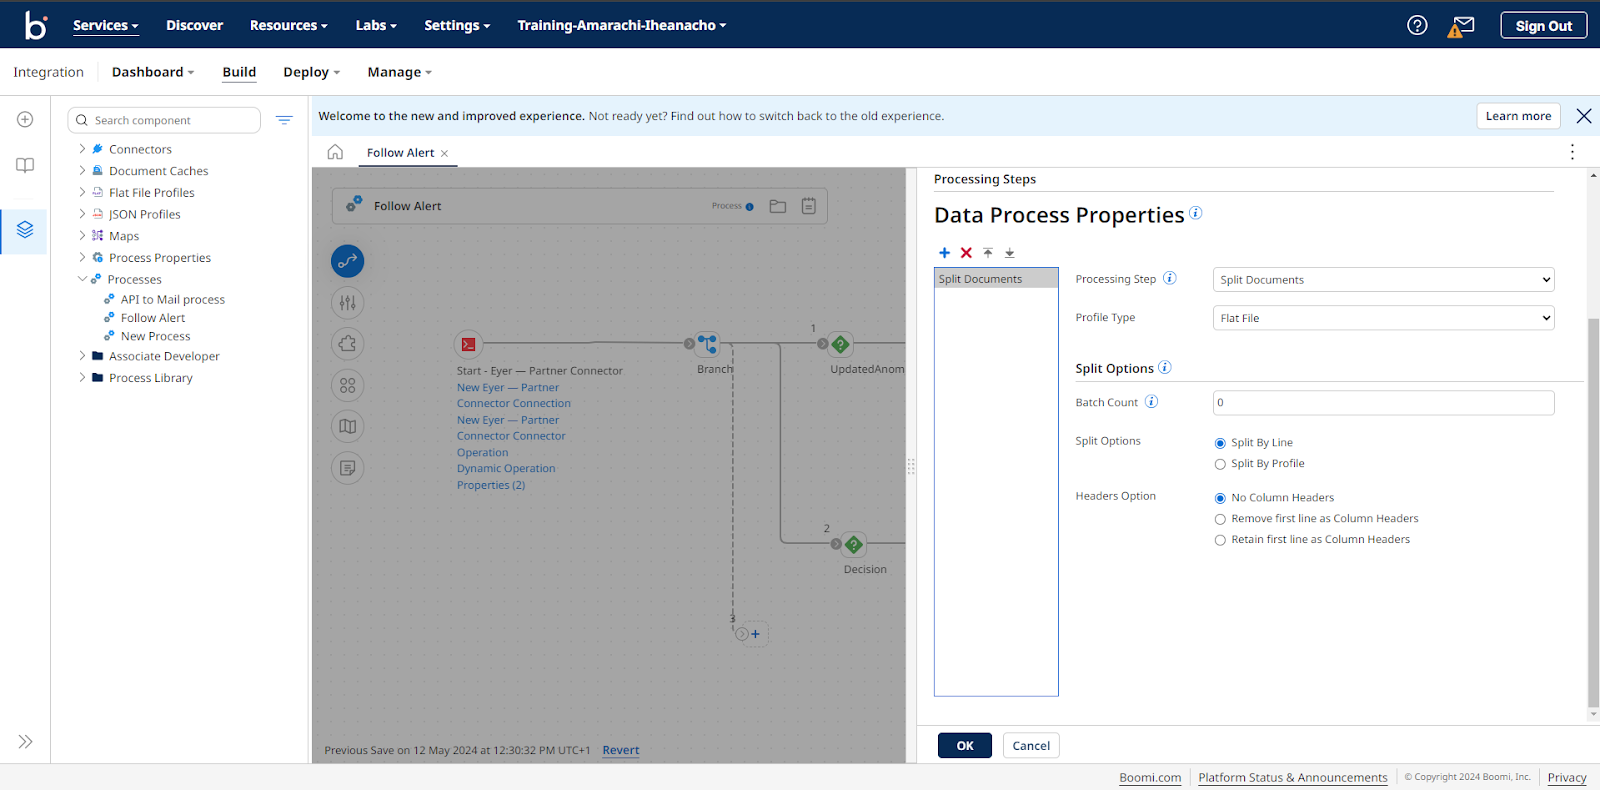
This action opens up a form; in this form, select:
- Split Documents from the Processing Step dropdown
- A Profile Type of Flat File to match the flat file you just mapped the ID to
- Split Options of Split By Line
- A Headers Option of No Column Headers
Click the OK button to save this Data Process Shape configuration.
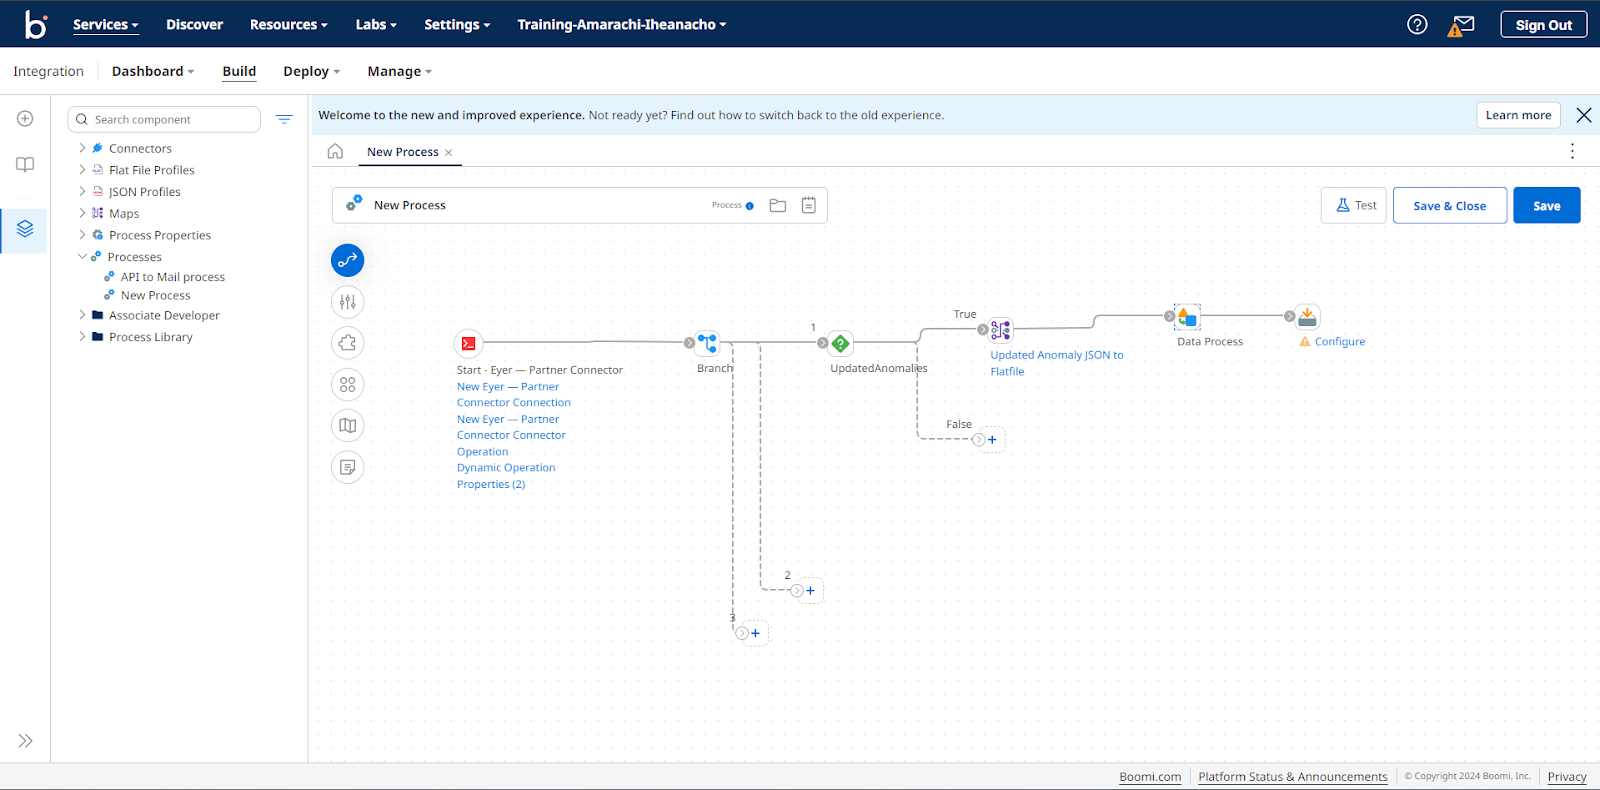
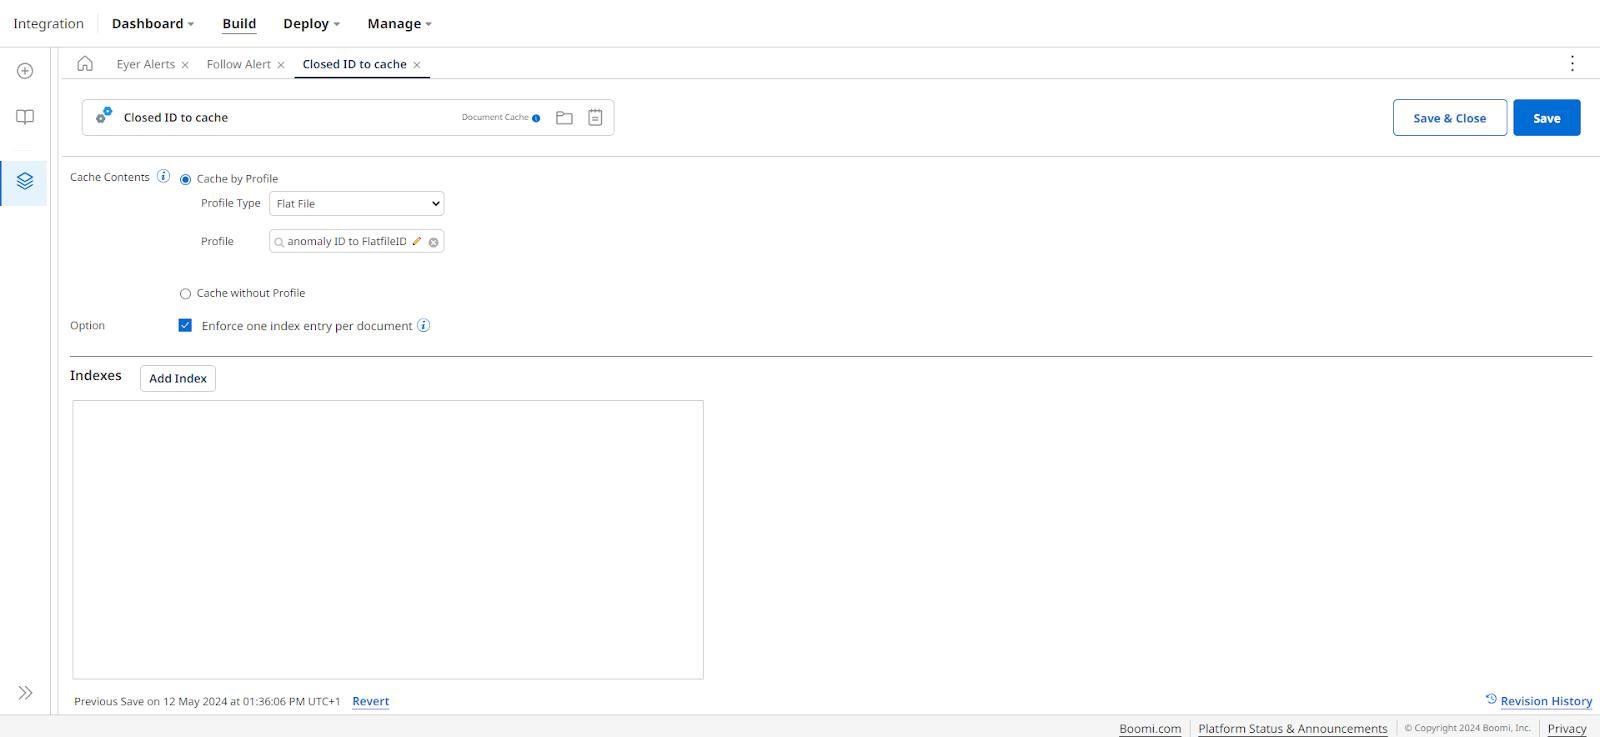
Add the updated anomaly id to a document To cache data, add the Add to Cache shape to your Boomi process.
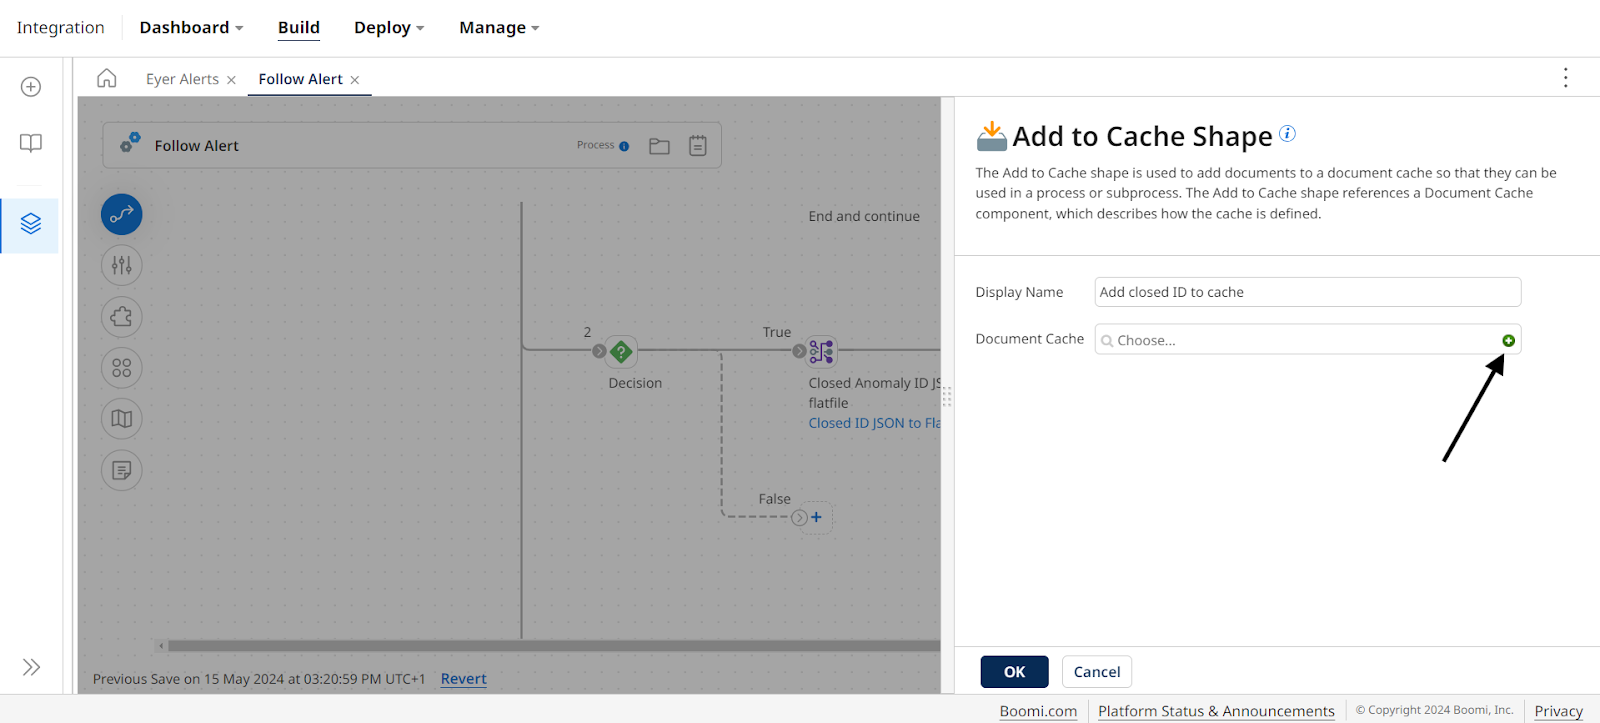
Click on the Add to cache shape to open up its dedicated sidebar. In the sidebar, give the Display Name a name you'd like the shape to represent. Click the + sign in the Document Cache field to open the Document Cache page.
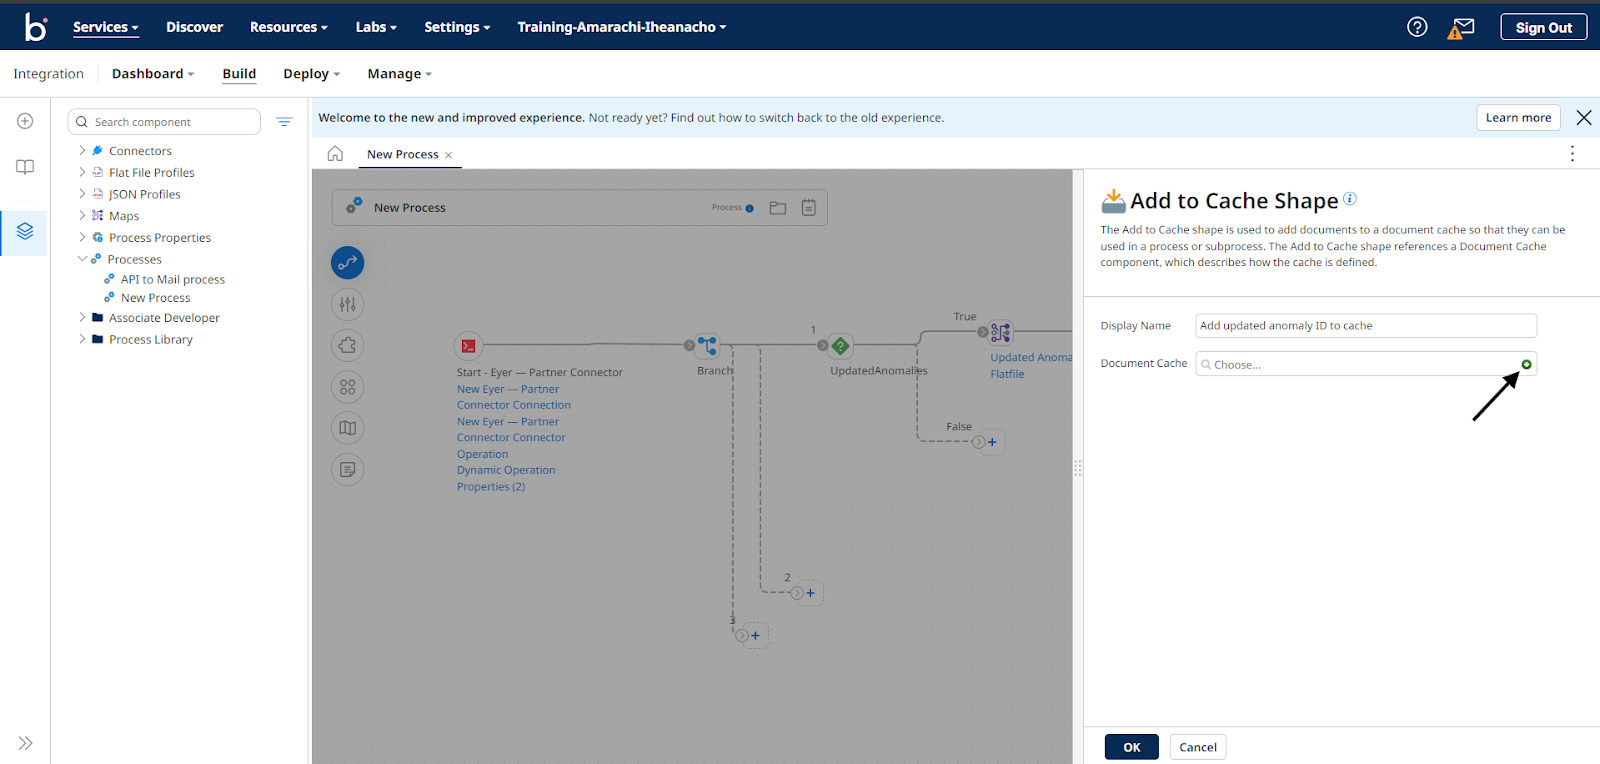
On this page, do the following:
- Select the Cache by Profile radio button
- Choose a Profile Type of Flat File
- Select the flat file Profile you created when mapping the ID on the JSON object to a Flat file document
- Select the Option Enforce one index entry per document
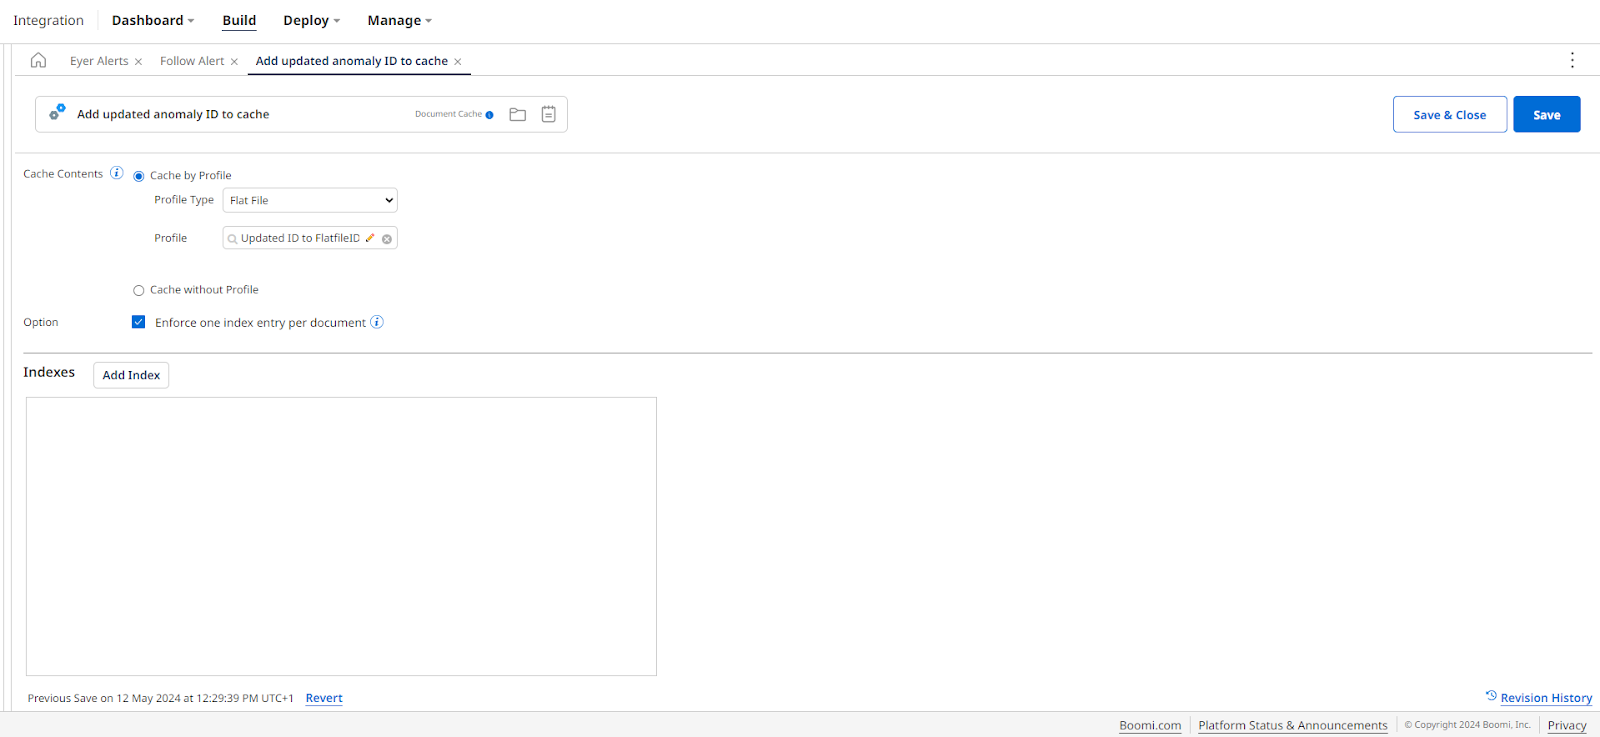
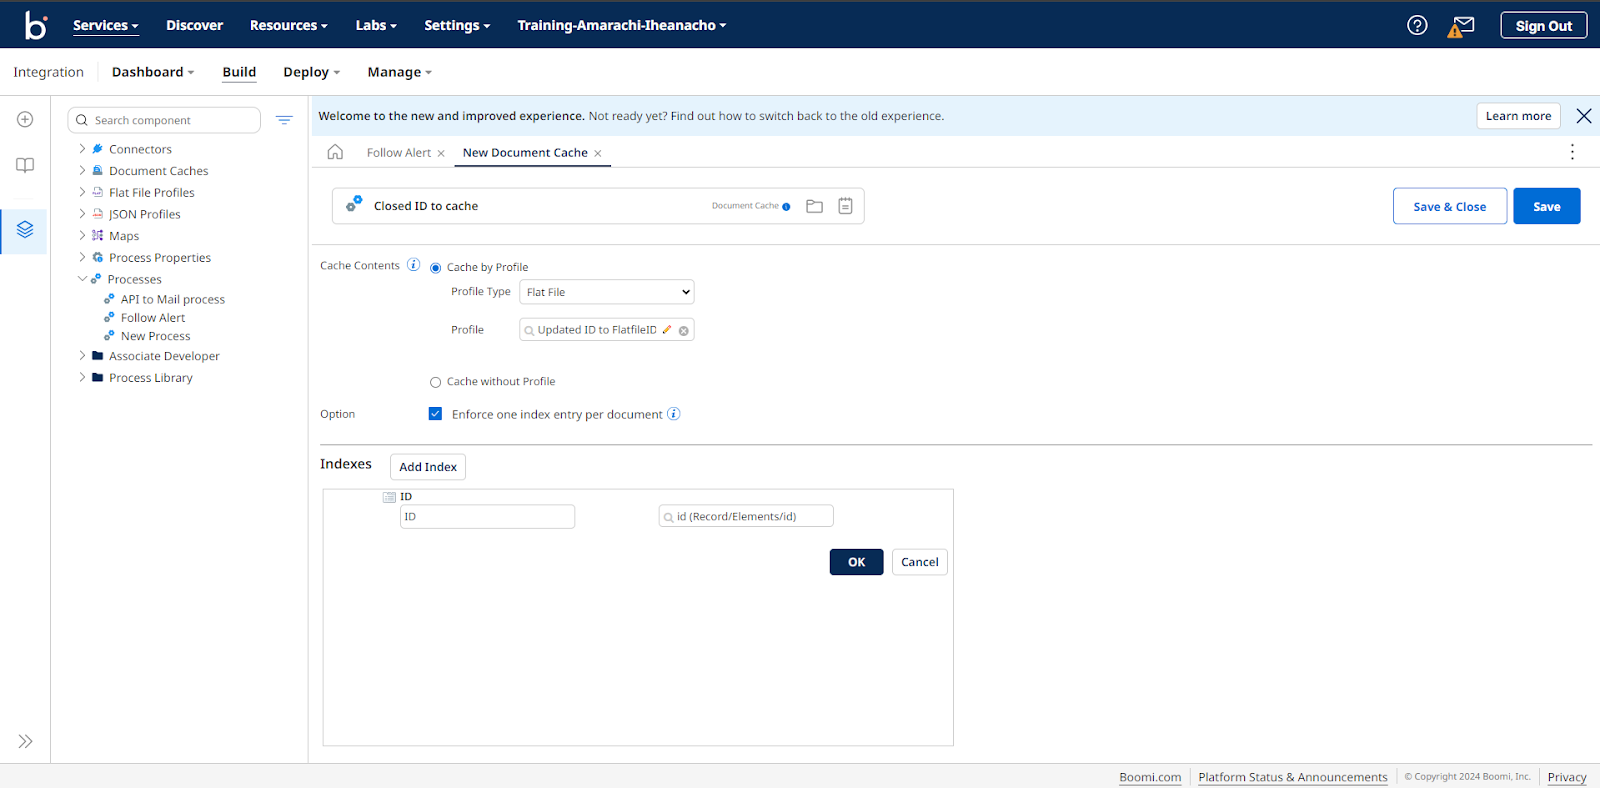
Next, create an Index in the Indexes section. These indexes store the values for all keys; in this case, it will store your anomaly ID. Click the Add Index button, and input an Index Name in the Add Index modal.
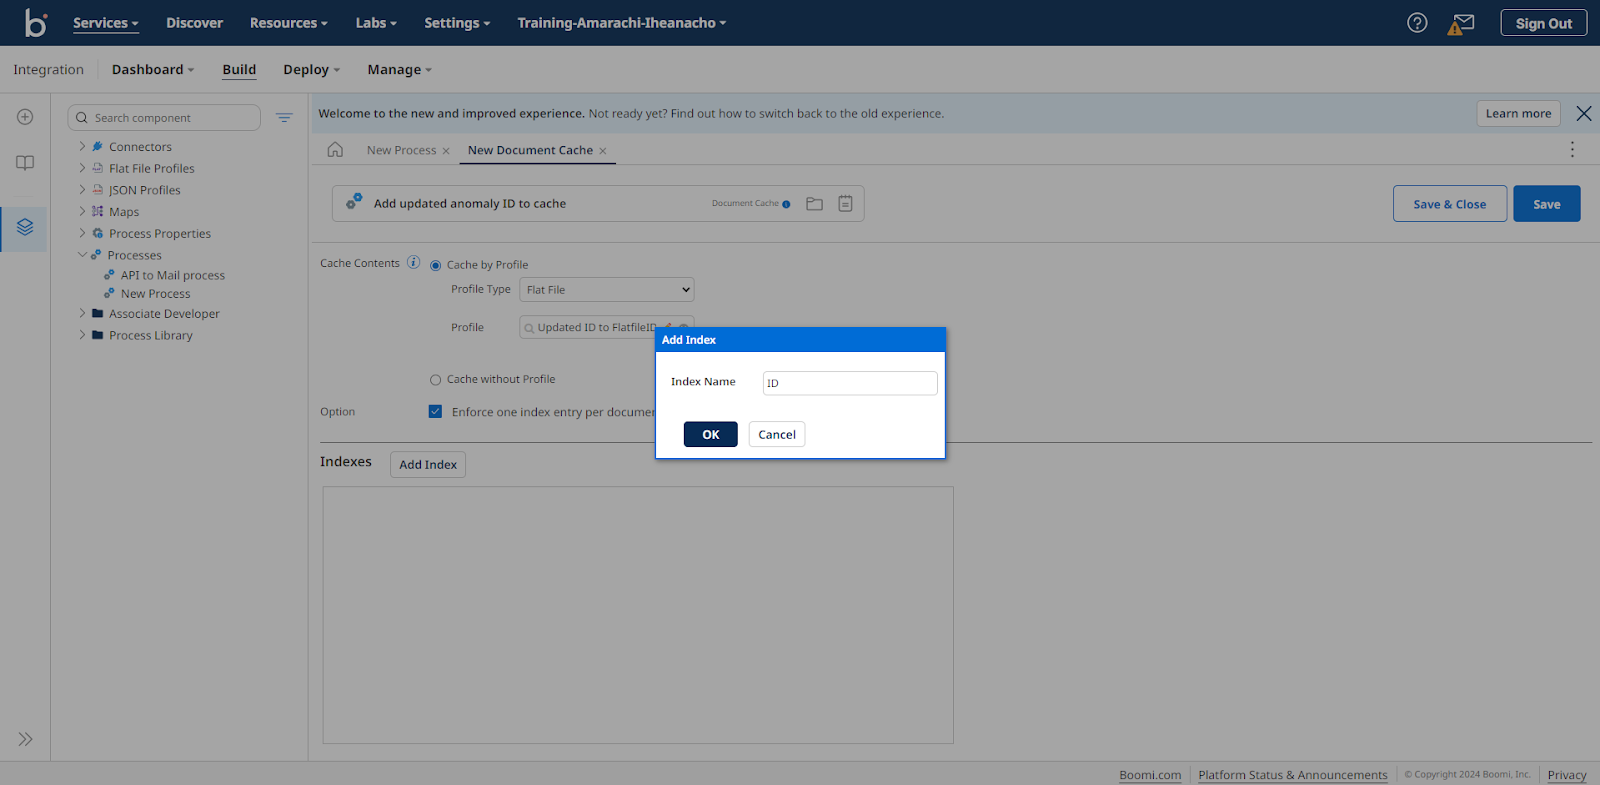
This tutorial uses ID, so click the OK button. Next, click the Add a Profile Element link to open a search bar. Click on this search bar to open the New Input modal, navigate through this modal, and select the Record -> Elements -> Id menu.

To save your index and return to the sidebar, click the OK button followed by Save and Close. Once back in the sidebar, click OK again to return to the Boomi canvas. Next, add a Stop shape to the rejected path from the Decision shape to stop the process if the data does not meet the condition specified in the Decision shape.
Store the closed anomalies ID in a cache document
To cache the ID from the closed anomalies, you need to do the following:
- Determine if closed anomalies actually exist on the anomaly object
- Convert the JSON data received from the Eyer connector into a flat file format
- Split the flat file by each line
- Add the closed anomaly id to a document
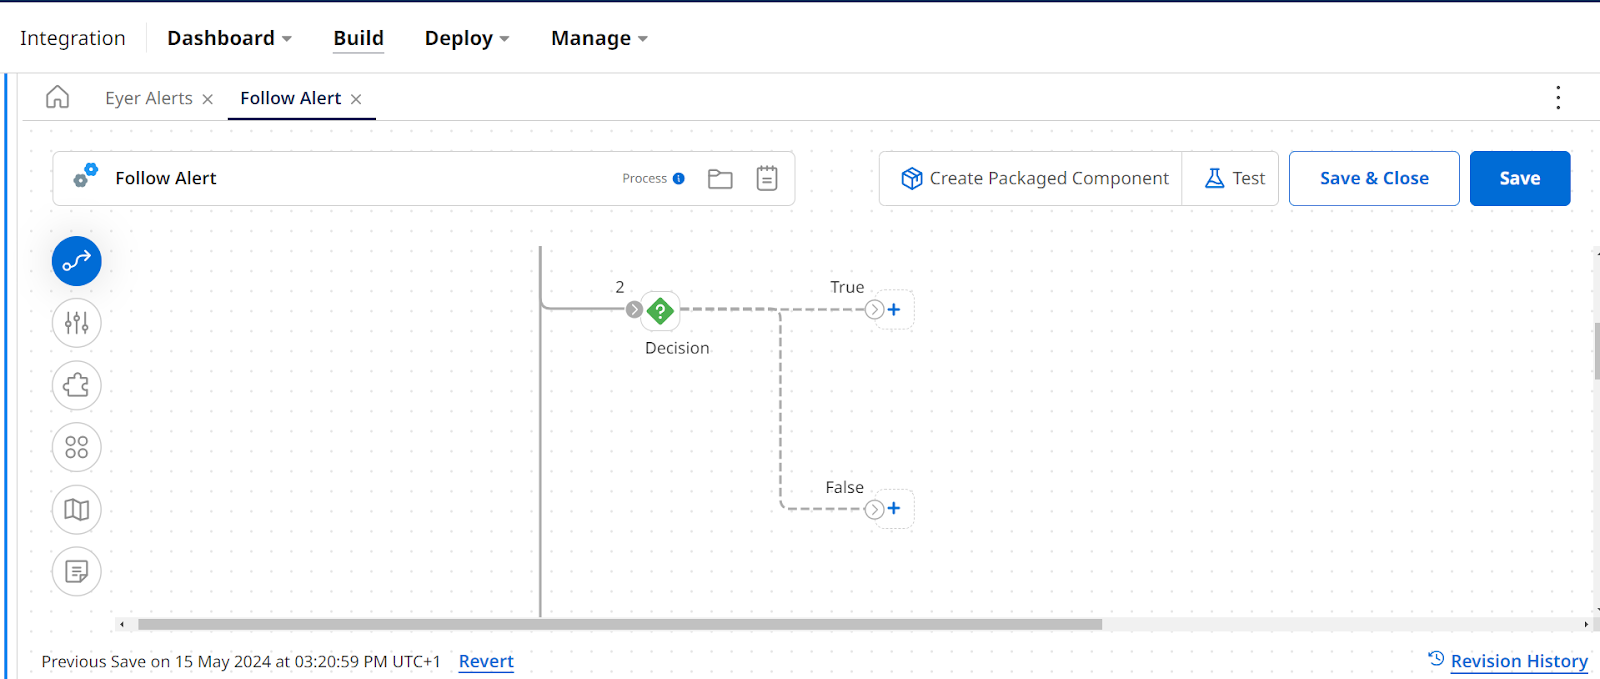
Determine if the closed anomalies exist on the anomaly object In the second path from the Branch shape ( labeled 2 ), add a Decision shape to ensure that the closed anomalies data exist before processing and caching the data.
Click the Decision Shape to open up its dedicated sidebar.
In this sidebar, click the First Value field to open the Parameter Value model. Fill out this modal with the following information:
- Type -> Profile Element
- Profile Type -> JSON
- Profile - > Select the profile you created when configuring your Eyer connector
- Element -> Click the Element field to open up the New Output modal. Navigate through this modal, and select this menu Object -> closed -> Array -> items1 -> Object -> id
Click the OK-> OK button to return to the decision shape sidebar. Next, select Not Equal To in the Comparison dropdown. In the Second Value field, click the input field to open the Parameter Value modal. Select Static in the Type dropdown in this modal and leave the Static Value field empty.
Click the OK -> OK button to return to the Boomi canvas. Convert the JSON data received from the Eyer connector into a flat file format Add the map shape to the True path from the Decision shape.

While this section won't cover the complete Map shape configuration, here are some key points to remember:
- Source Profile: The profile type is JSON, and the profile is the Eyer Connector Profile.
- Destination Profile: The profile type is Flatfile with a single field named id.
Mapping Instructions: Within the Map source, locate the field path closed -> Array -> items1 -> Object -> id. Map this field to the "id" field in the Map destination section. This essentially extracts the "id" value from the source data and places it in the designated field of the flat file
Split the flat file by each line After converting your JSON data to flat file, you want the split the data by each anomaly id. To do this, you need to add the Data Process Shape to the Boomi process.

Next, click on the Data Process shape to open up its dedicated sidebar. In this dedicated sidebar, click on the + sign to specify a processing step for your data.
This action opens up a form; in this form, select:
- Split Documents from the Processing Step dropdown
- A Profile Type of Flat File to match the flat file you just mapped the ID to
- Split Options of Split By Line
- A Headers Option of No Column Headers
Click the OK button to save this Data Process Shape configuration.
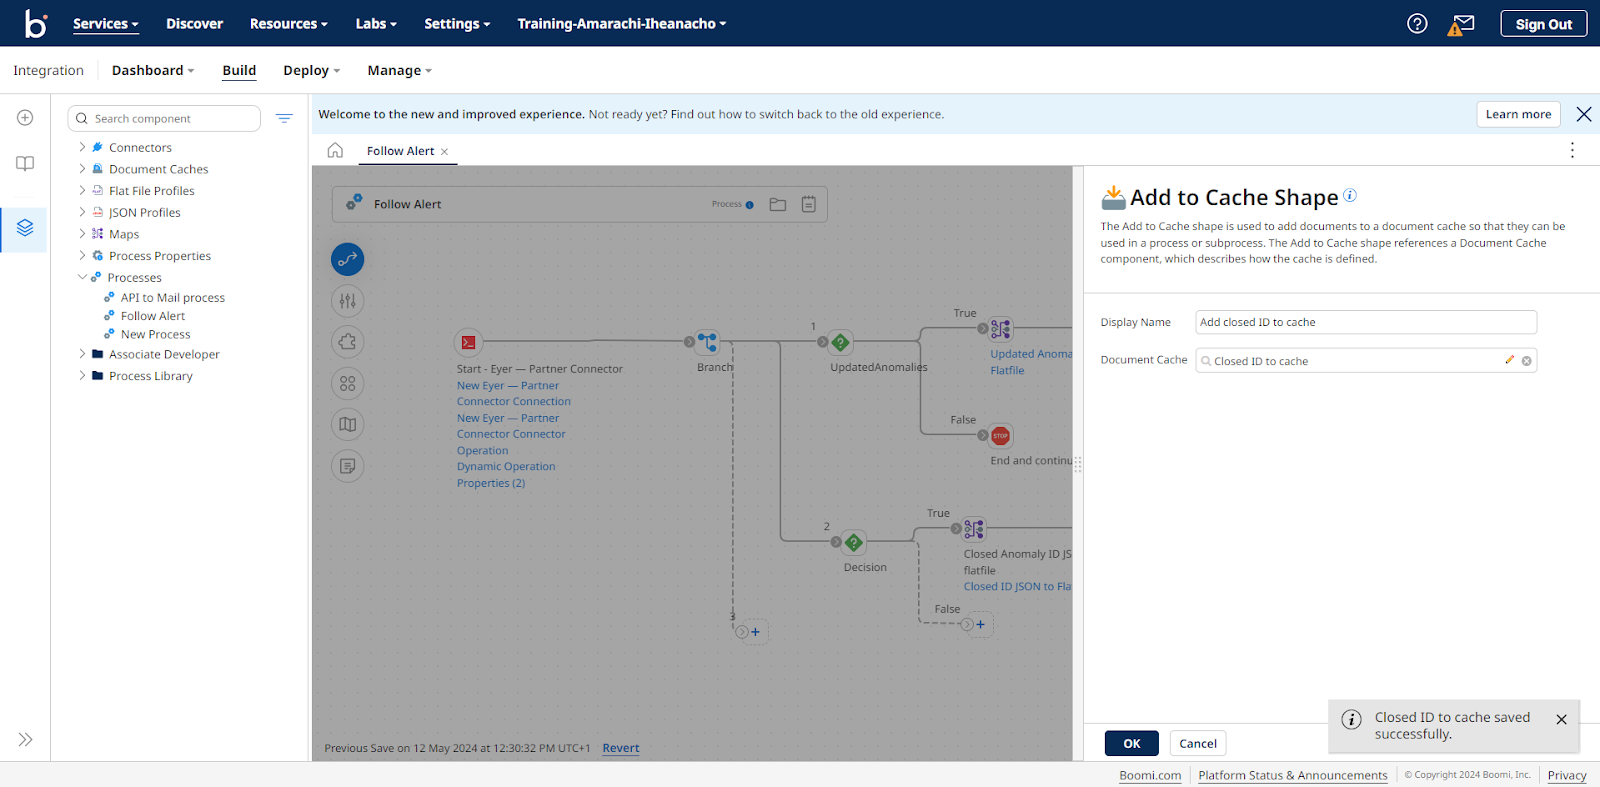
Add the updated anomaly id to a document Add the Add to Cache shape to your Boomi process to cache data.
Click on the Add to Cache shape to open up its dedicated sidebar. In the sidebar, give the Display Name a name you'd like the shape to represent. Click the + sign in the Document Cache field to open the Document Cache page.
On this page, do the following:
- Select the Cache by Profile radio button
- Choose a Profile Type of Flat File
- Select the flat file Profile you created when mapping the ID on the JSON object to a Flat file document
- Select the Option Enforce one index entry per document
Next, create an Index in the Indexes section. These indexes store the values for all keys; in this case, it will store your anomaly ID. Click the Add Index button, and input an Index Name in the Add Index modal. This tutorial uses ID, so click the OK button. Next, click the Add a Profile Element link to open a search bar. Click on this search bar to open the New Input modal, navigate through this modal, and select the Record -> Elements -> Id menu.
To save your index and return to the sidebar, click the OK button followed by Save and Close. Once back in the sidebar, click OK again to return to the Boomi canvas.
Next, add a Stop shape to the rejected path from the Decision shape to stop the process if the data does not meet the condition specified in the Decision shape.
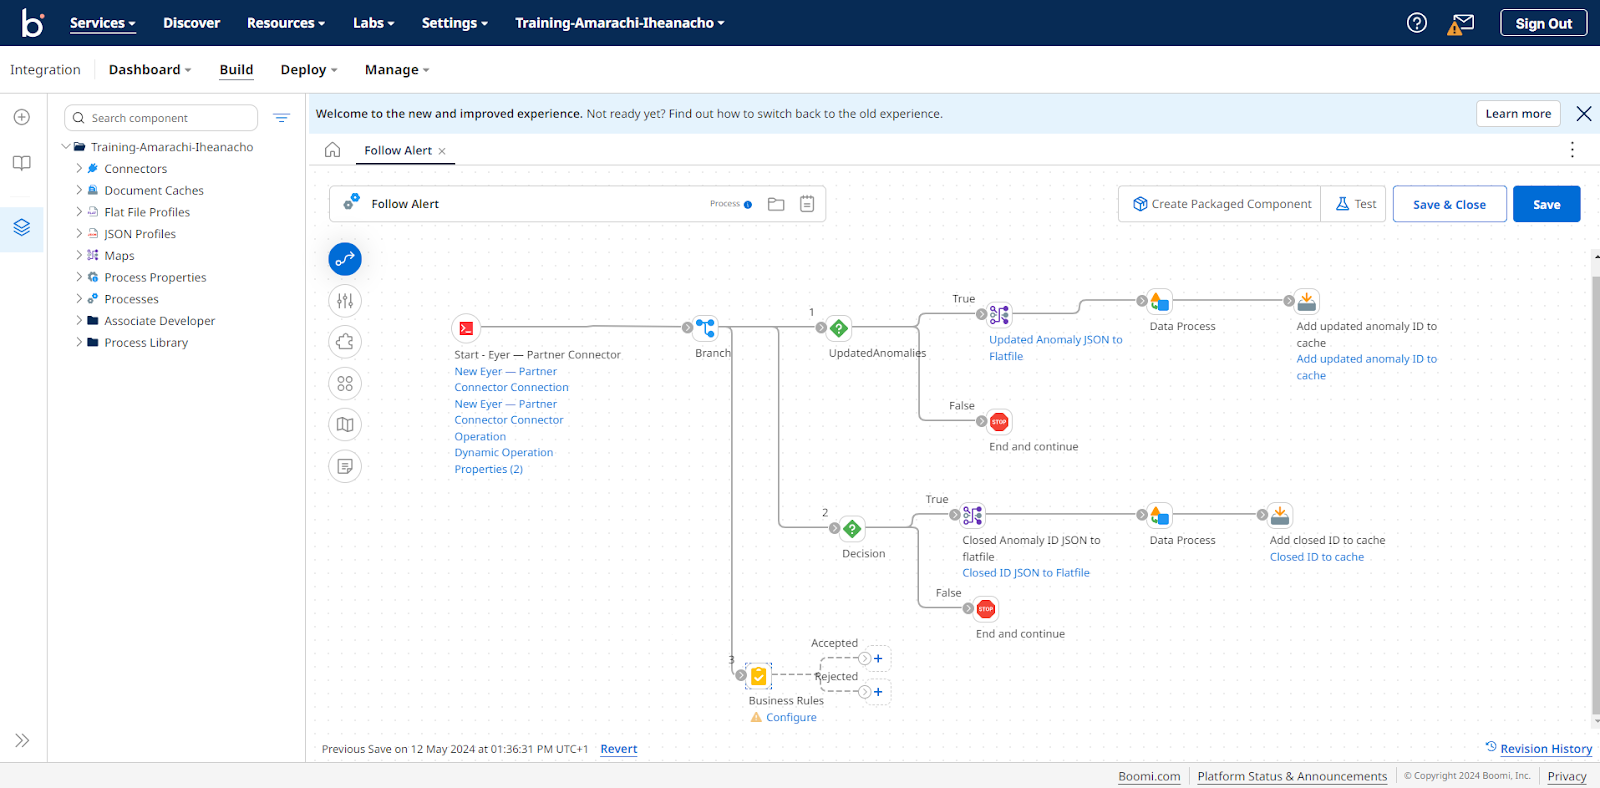
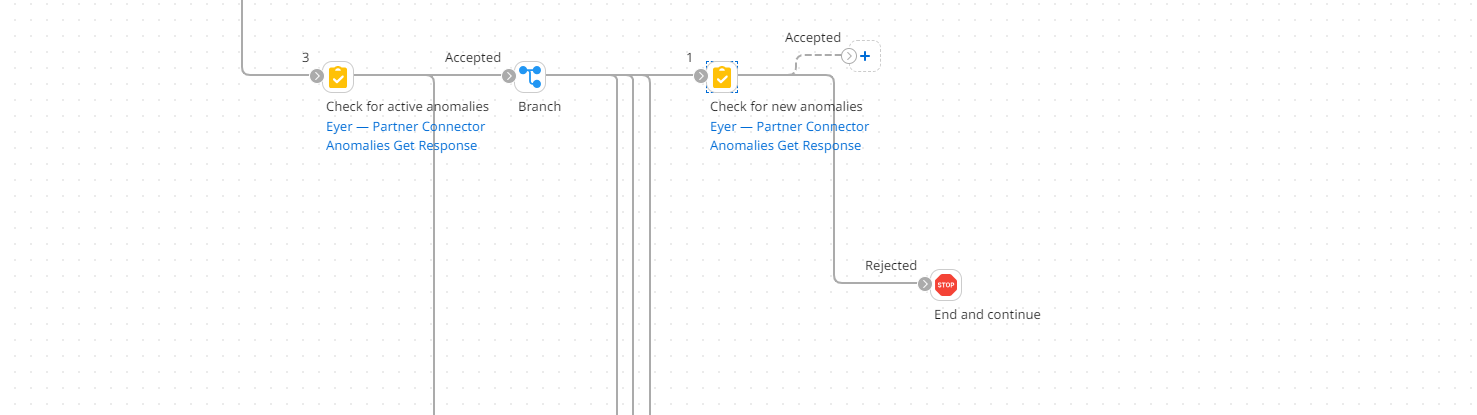
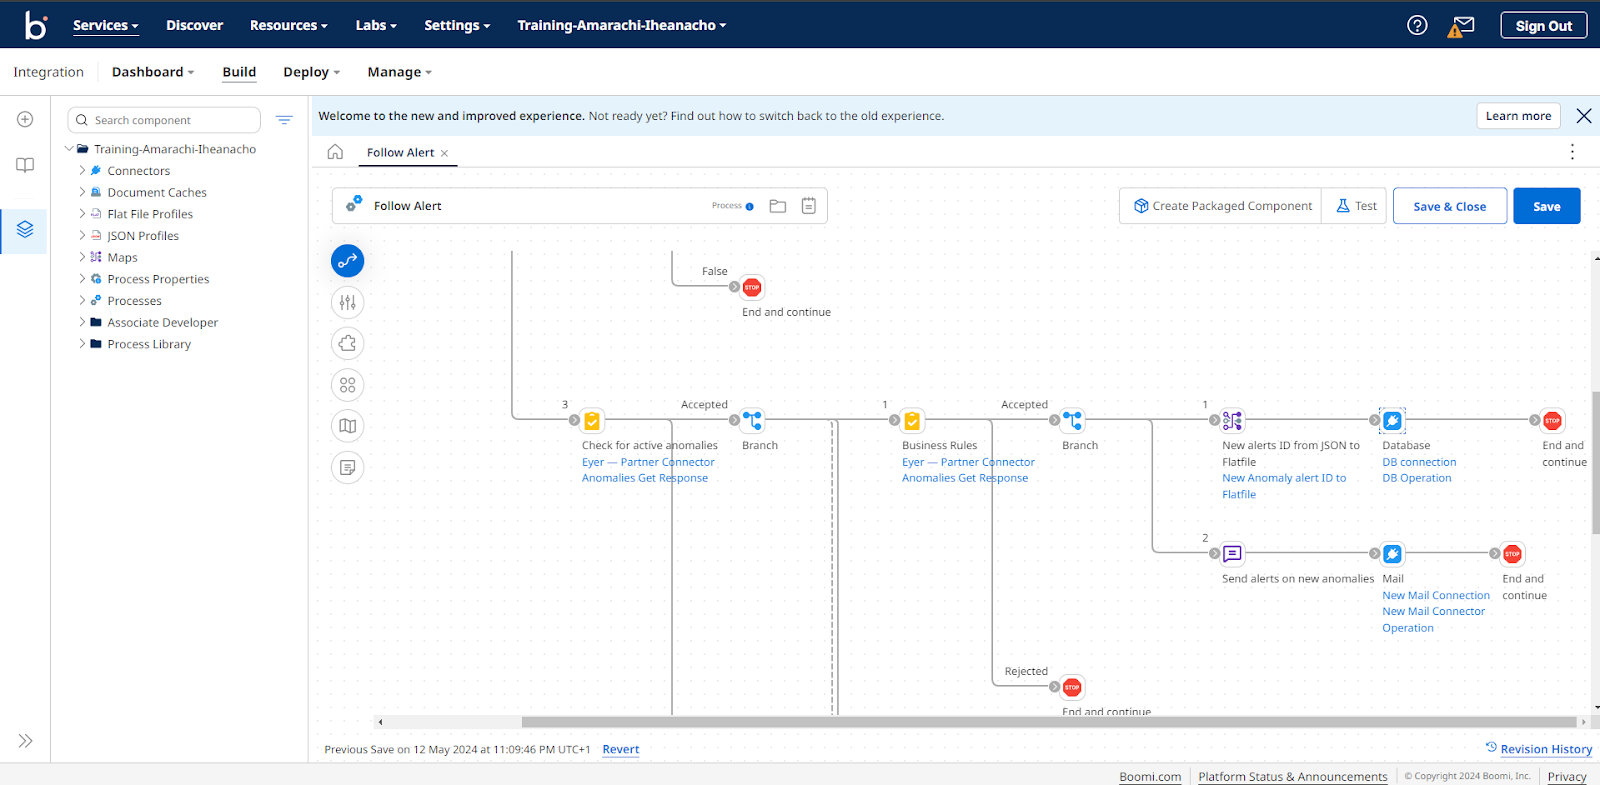
Filter through the for active anomalies
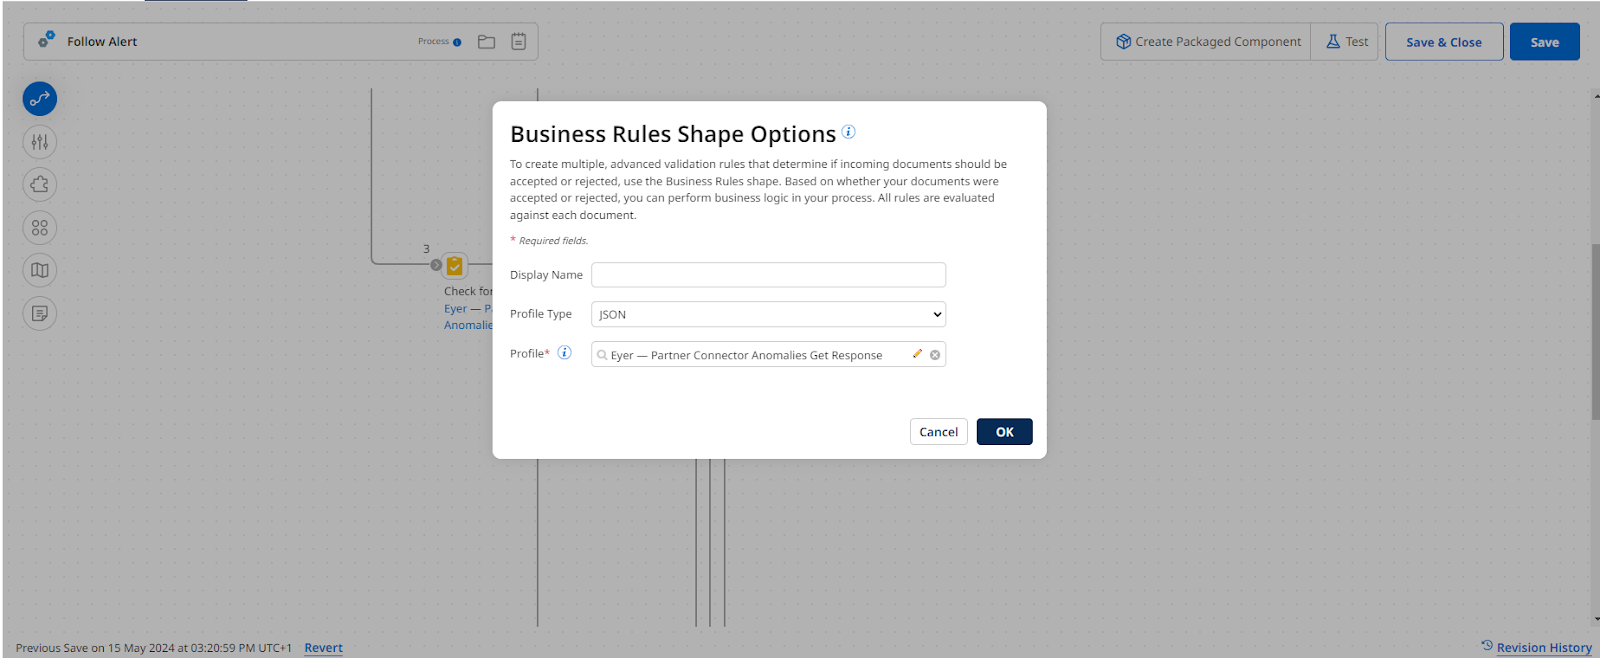
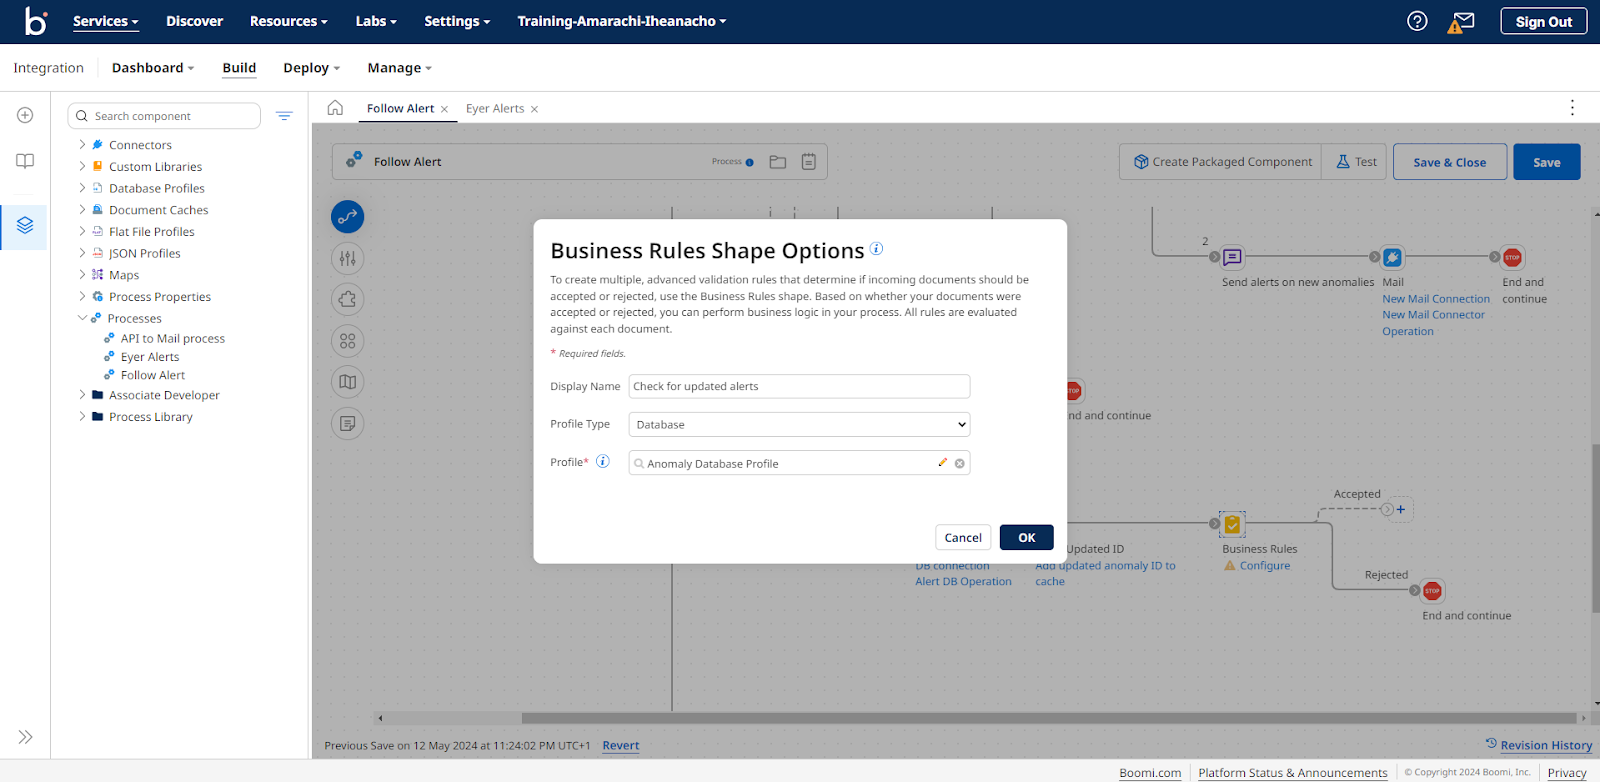
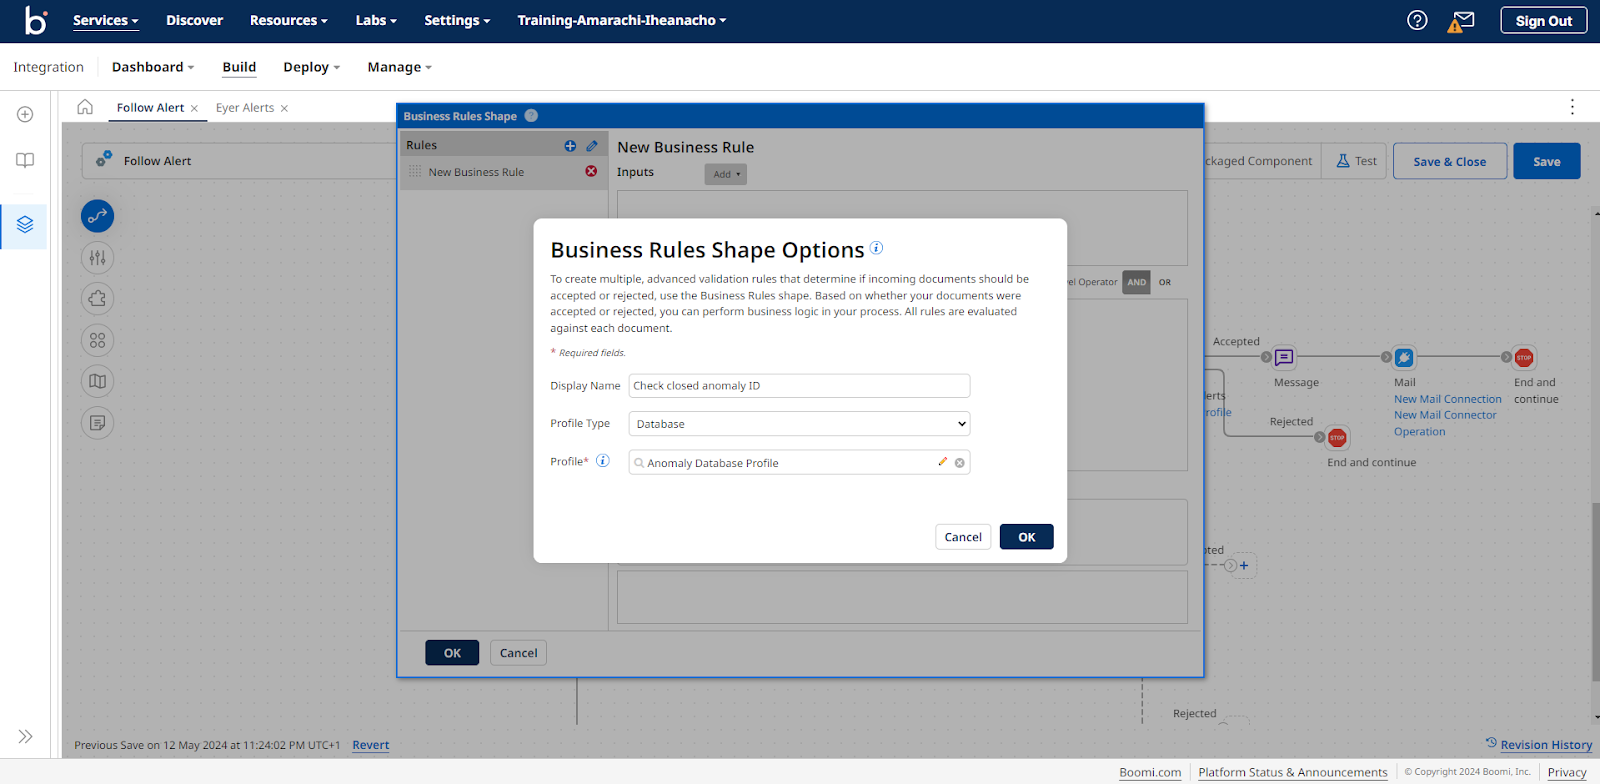
Once you have cached your anomaly ID, the next step is to filter through these anomalies and send out alerts when a new anomaly has been created, updated, or closed. In the third path from the Branch shape (labeled 3), add a Business Rules Shape to check for active anomalies.

Click on the Business Rules shape to open the Business Rules Shape Options modal. In this modal, select a JSON profile type. Then, in the Profile input field, select the profile you created earlier when configuring the Eyer-Partner connector.
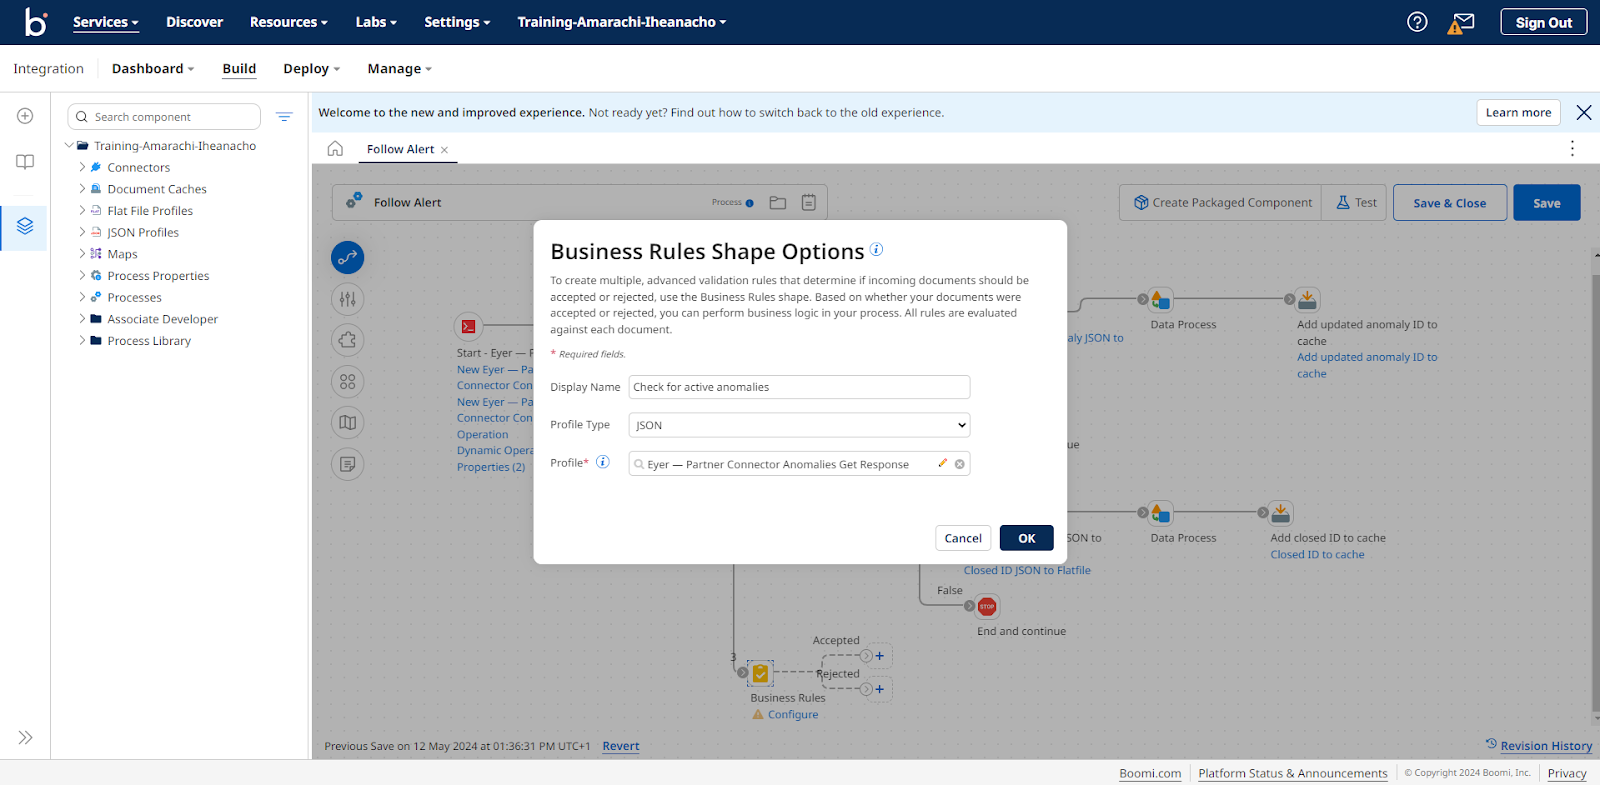
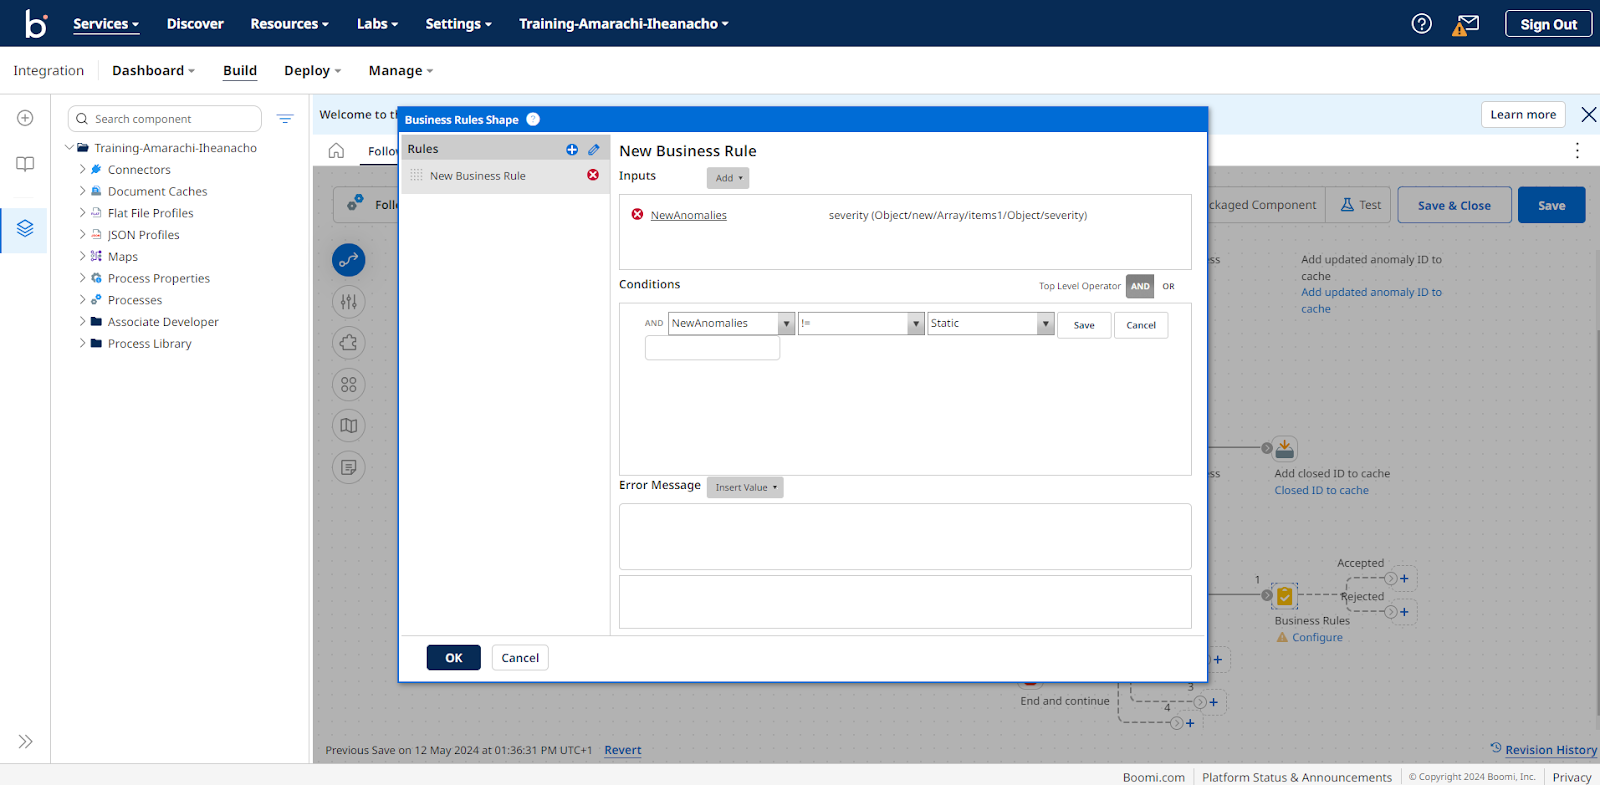
Next, click the OK button to open the Business Rules Shape modal. In this modal, click the Create a New Rule button to create a new business rule.
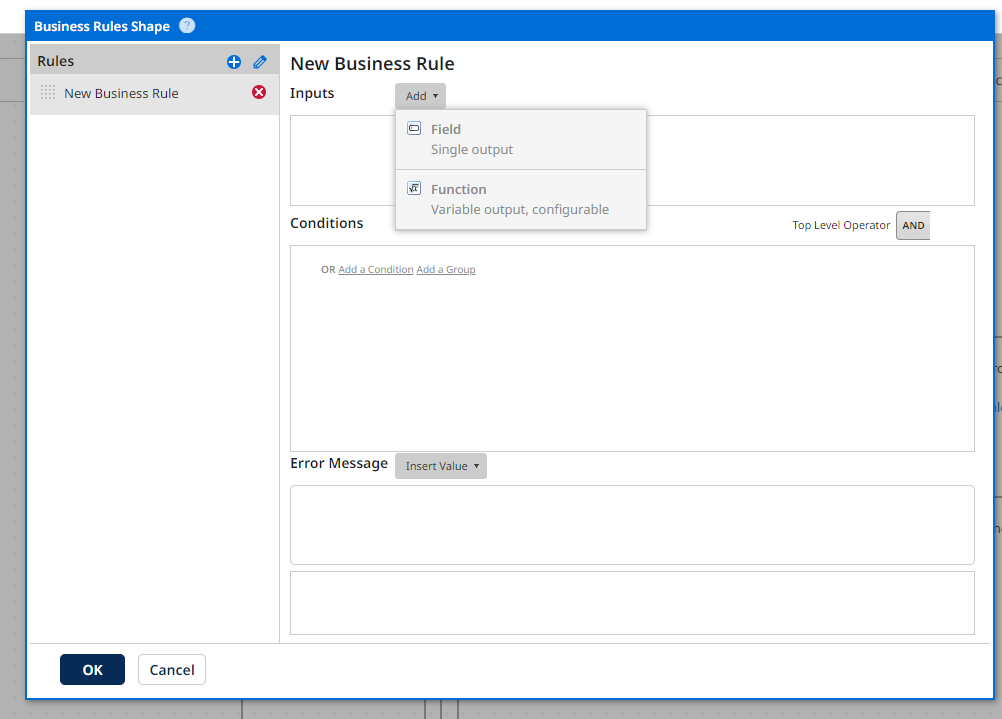
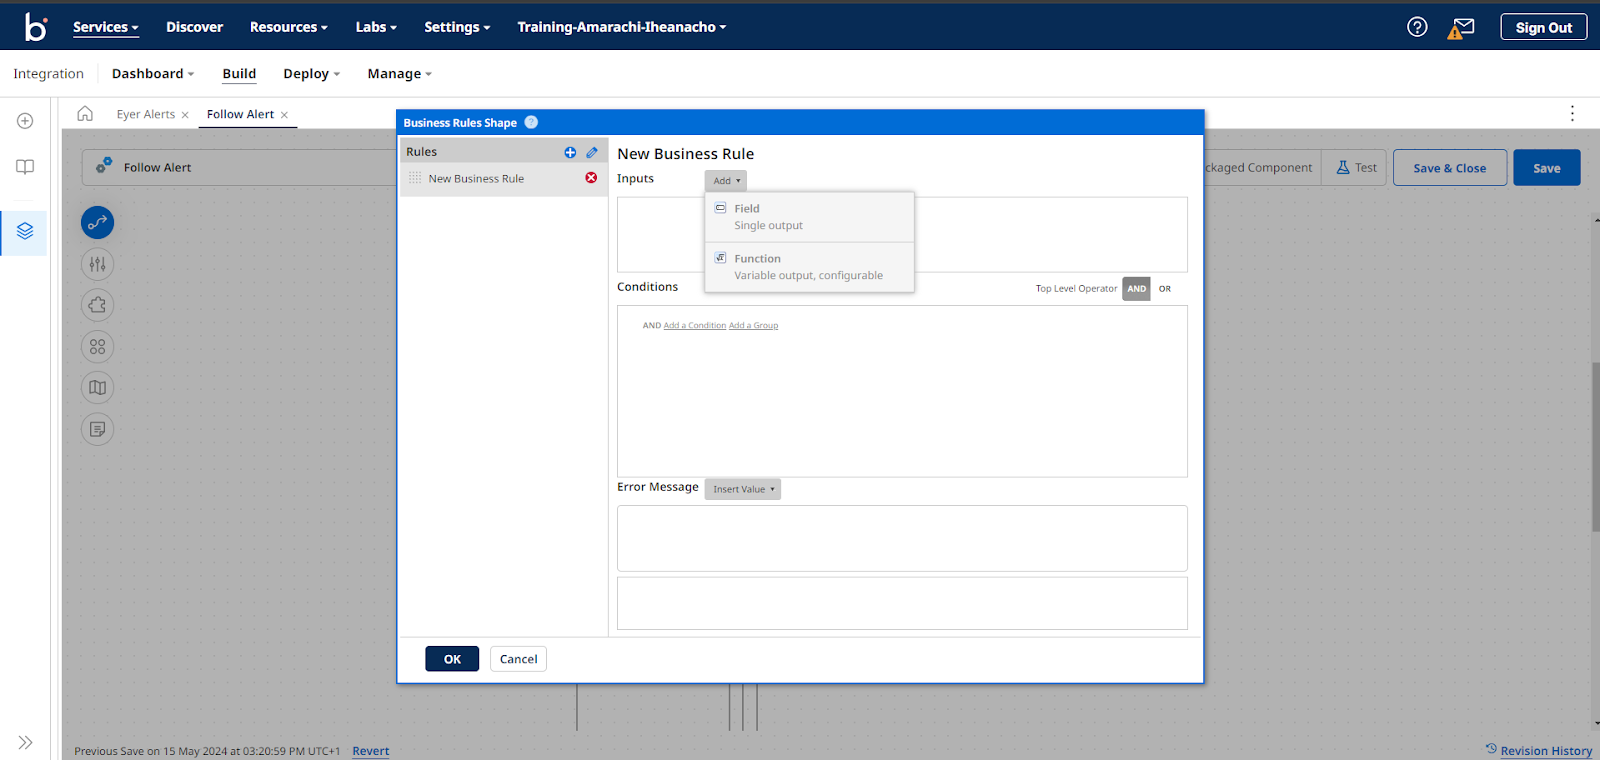
To create a business rule, you need the fields and the conditions to check if the field's values match the criteria for receiving alerts.
Creating the Business rules shape fields
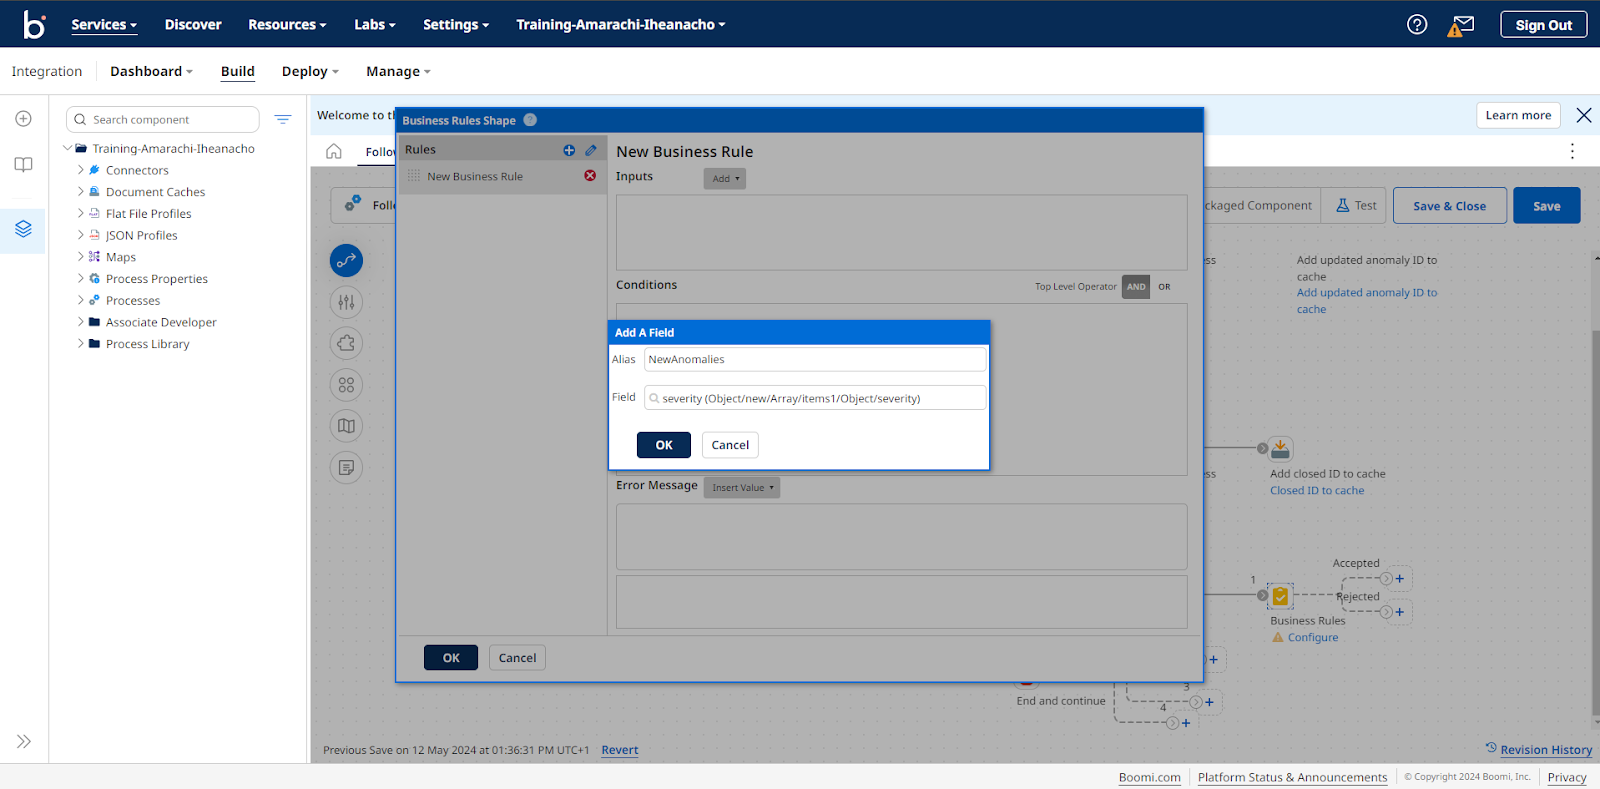
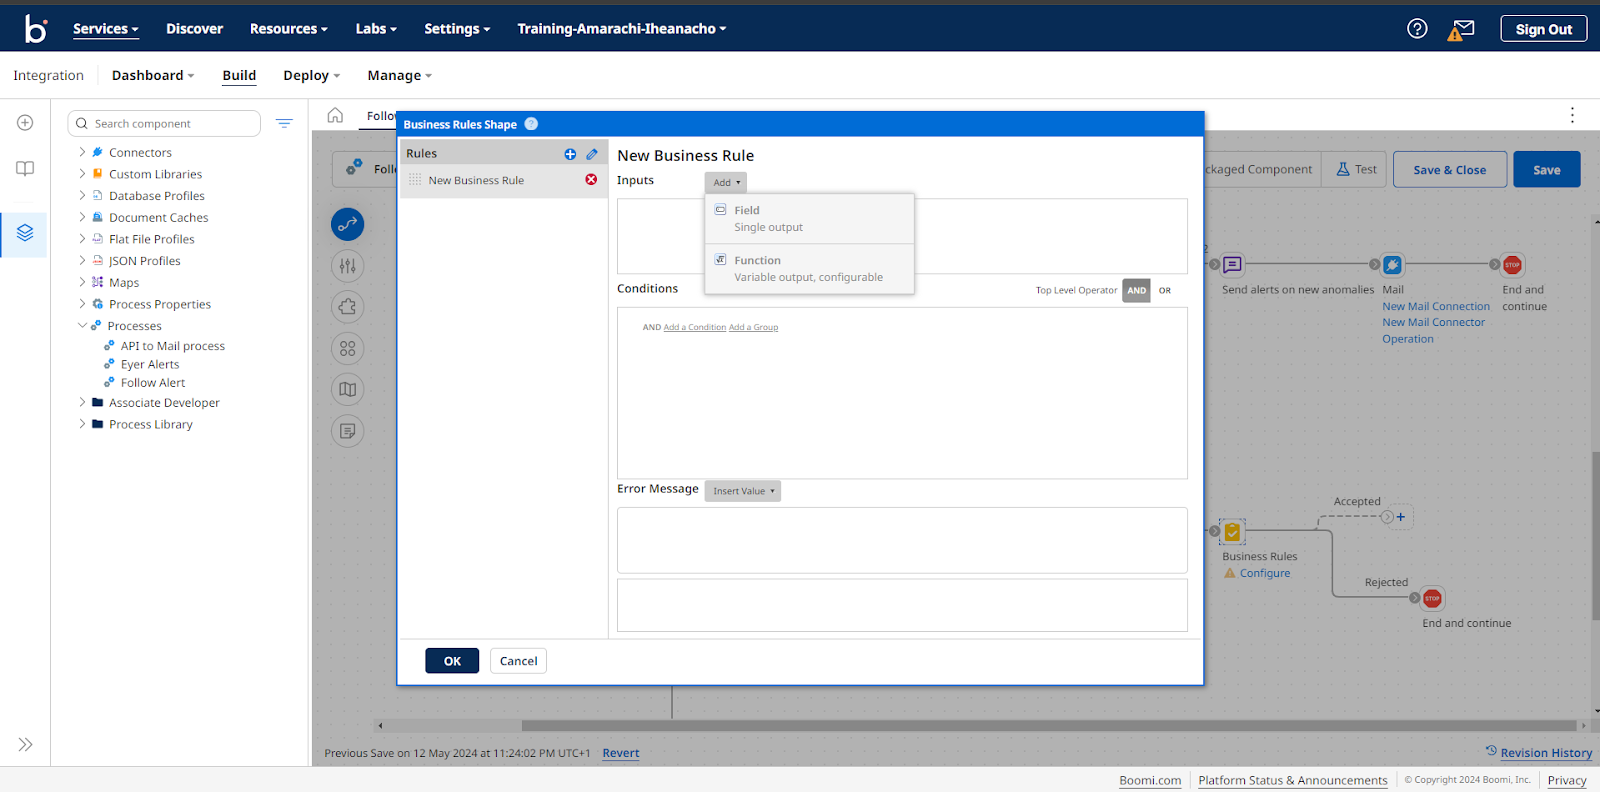
In this use case, you will create three fields: the NewAnomalies field, the UpdatedAnomalies field, and finally, the ClosedAnomalies field. These fields will capture the severity values of new, updated, and closed anomalies respectively. To create the NewAnomalies field, click the Add dropdown and select Field from the menu dropdown.
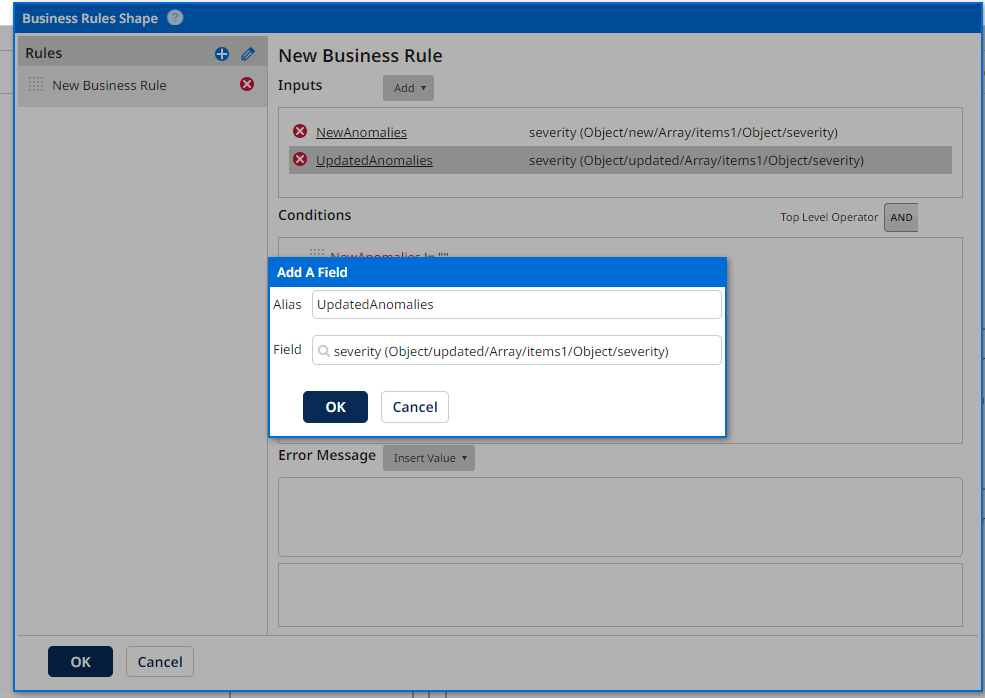
This action opens the Add a field modal. In the Alias field, input “NewAnomalies”. Then, navigate through the Field input menu and select this menu: Object -> new -> Array -> items1 -> Object -> severity.

Click the OK -> OK button to save your field. Next, you will create the “UpdatedAnomalies” field. Similar to creating the NewAnomalies field, click the Add dropdown and select the Field menu from the dropdown. This action opens up the Add a field modal. In the Alias field, input UpdatedAnomalies, then navigate through the Field input menu and select this menu: Object -> updated -> Array -> items1 -> Object -> severity.
Click the OK -> OK button to save your field.
The last field you will create for this business rules shape is the “ClosedAnomalies” field. Similar process to creating the last two fields: click the Add dropdown and select the Field menu from the dropdown. This action opens up the Add a field modal. In the Add a field modal, input “UpdatedAnomalies” in the Alias field, and then navigate through the Field input menu by selecting this menu: Object -> updated -> Array -> items1 -> Object -> severity
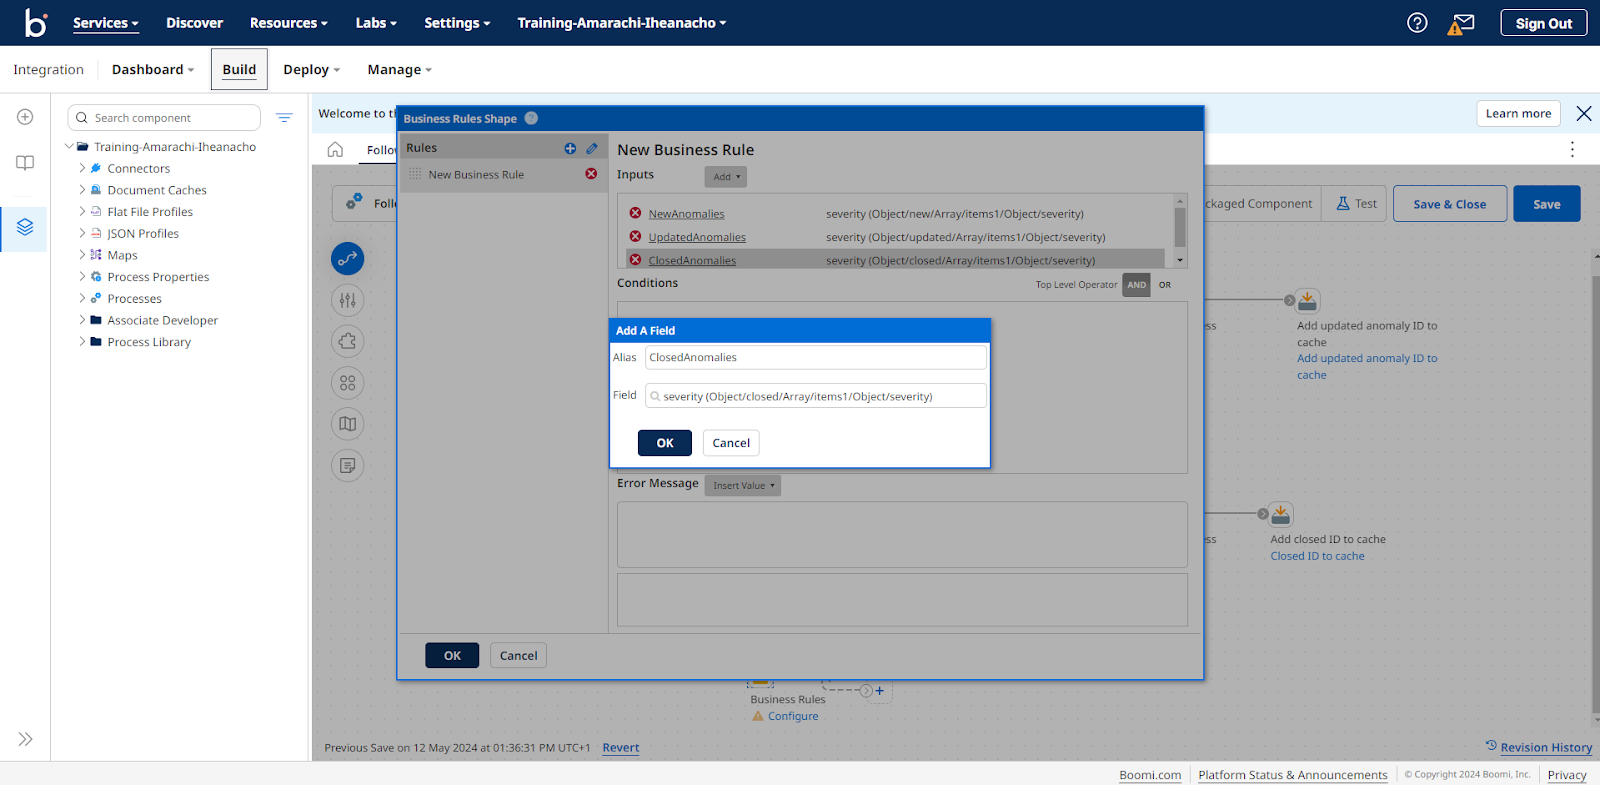
Click the OK -> OK button to save your field.
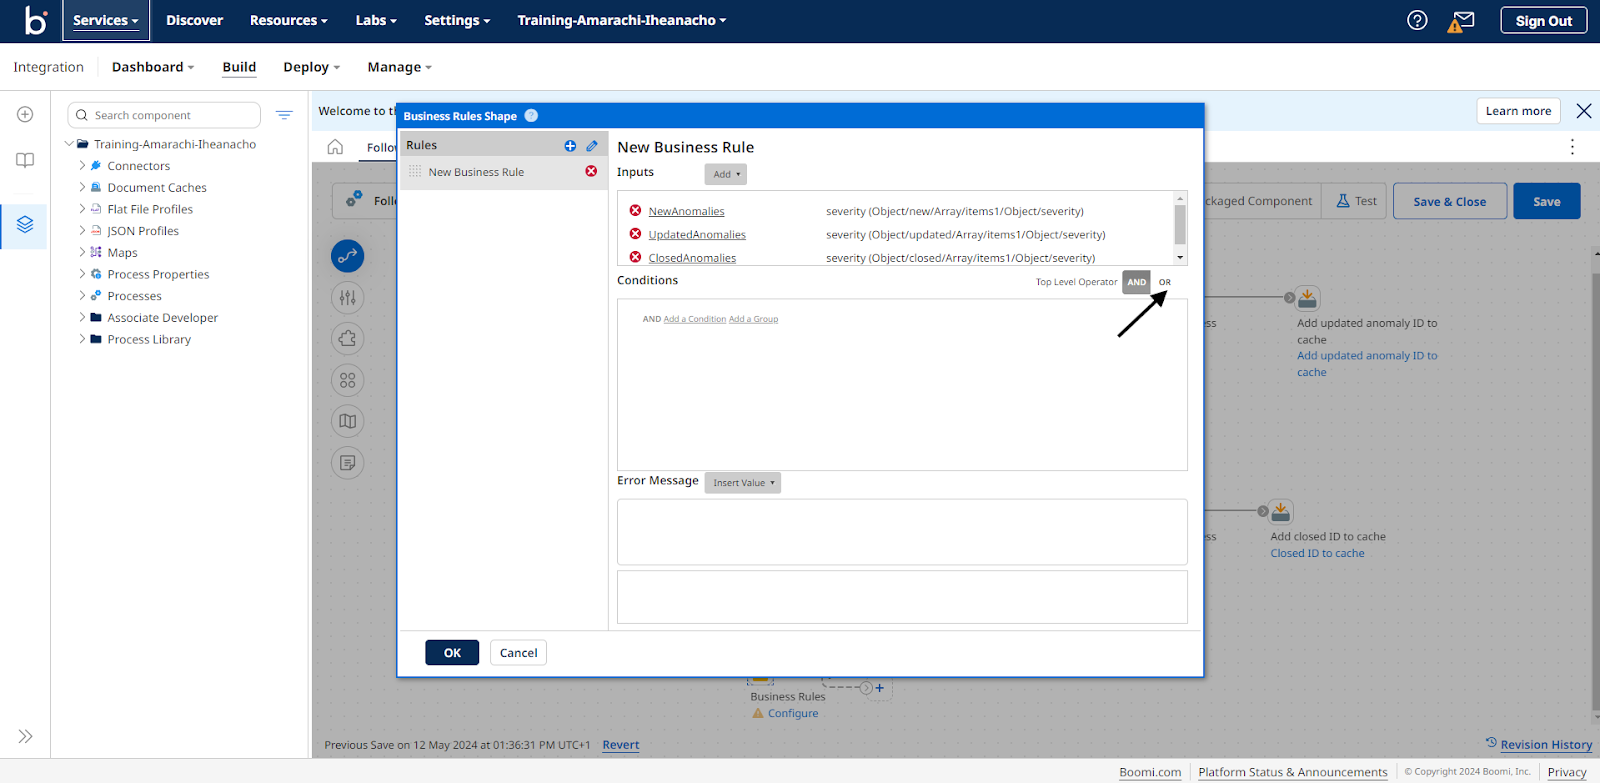
Create a Business rules condition to ensure that these fields are not null
To check if atleast one of these fields you just created has value, click the OR button at the top-right section of the Conditions section.
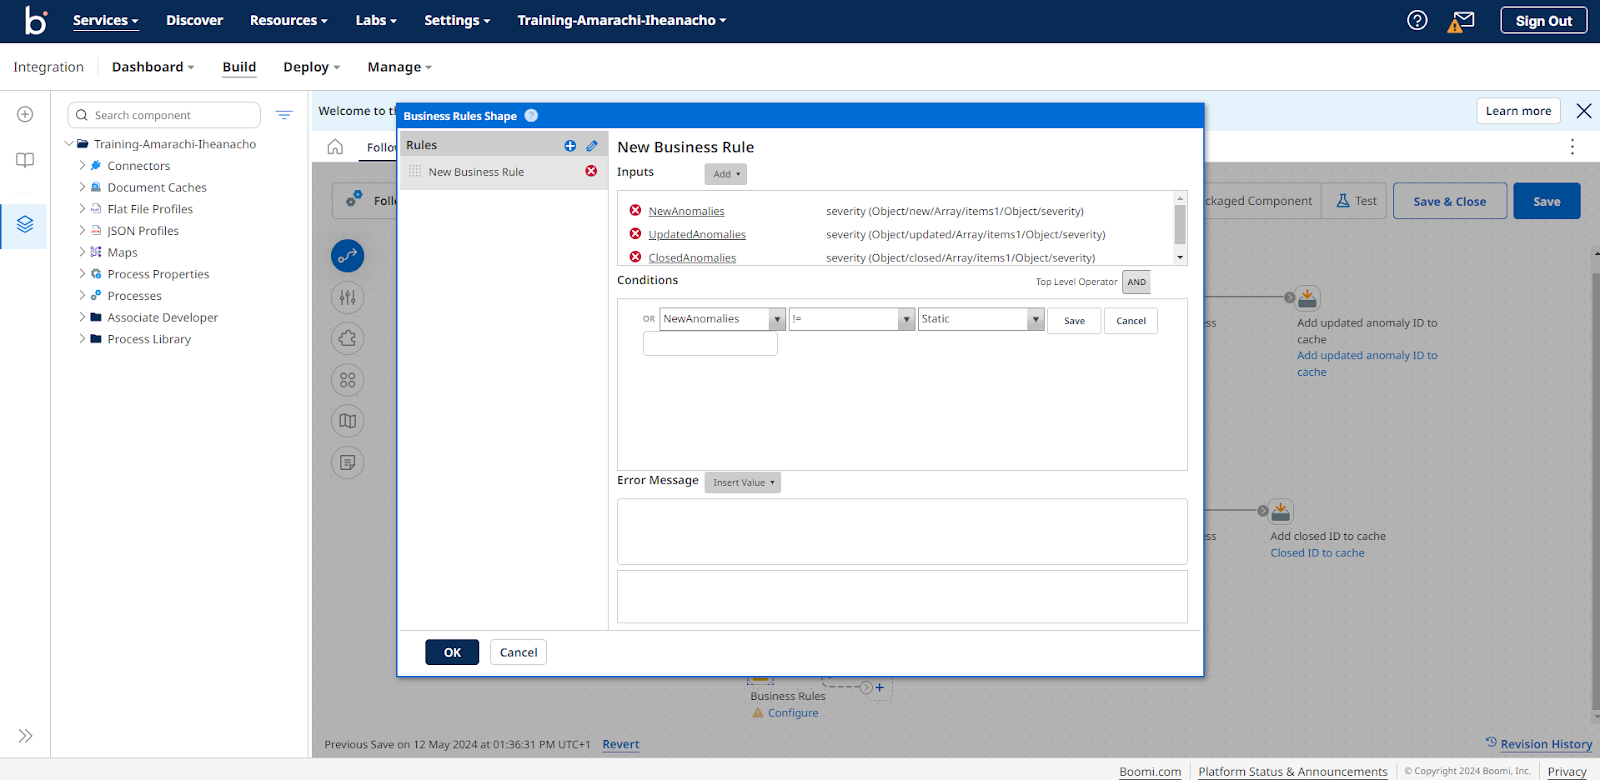
Next, follow this process to create conditions that verify that the fields are not null:
- Click the Add a Condition link:
- In the first dropdown, select the NewAnomalies field
- In the second dropdown, select the != field
- In the third dropdown, select the Static field
- Leave the fourth field empty
- Click the Save button
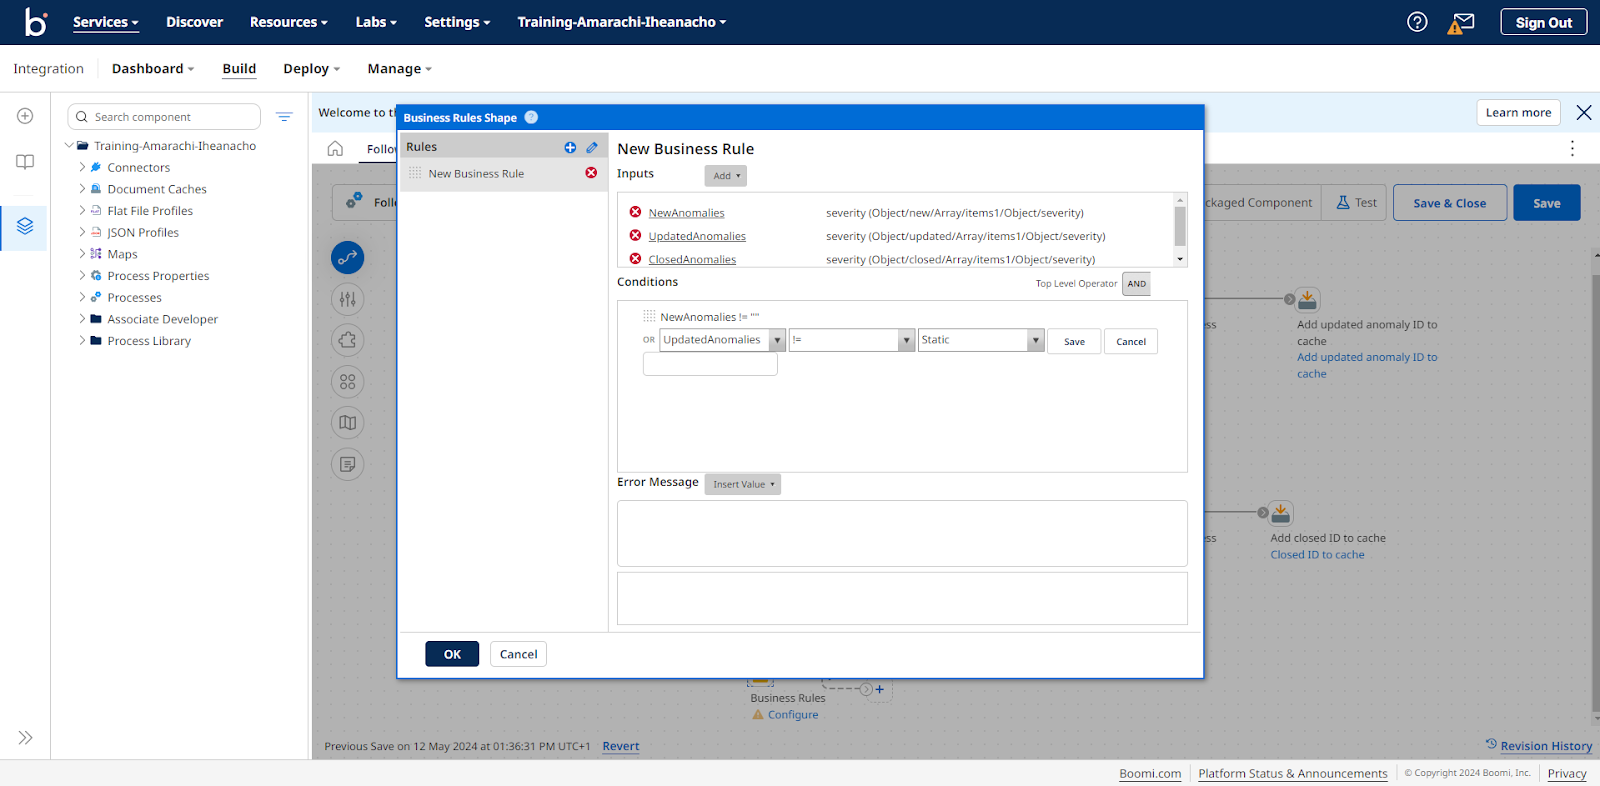
Repeat the create condition process twice, replacing NewAnomalies with UpdatedAnomalies and ClosedAnomalies, respectively.
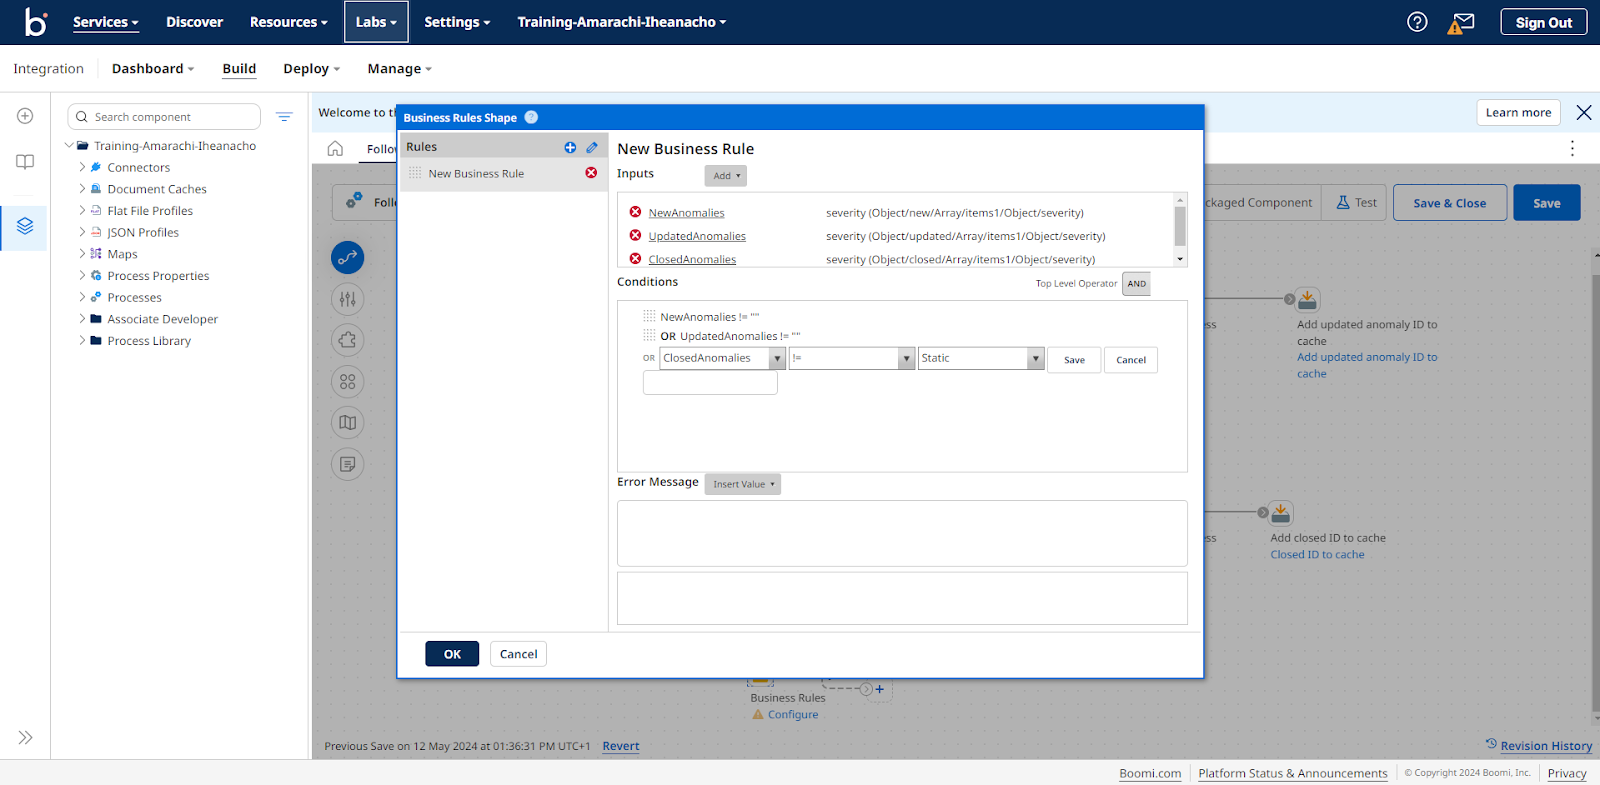
Click the OK button to save the conditions and return to the Boomi canvas. Add a Stop shape to the rejected path from the Business rules shape to end the process.
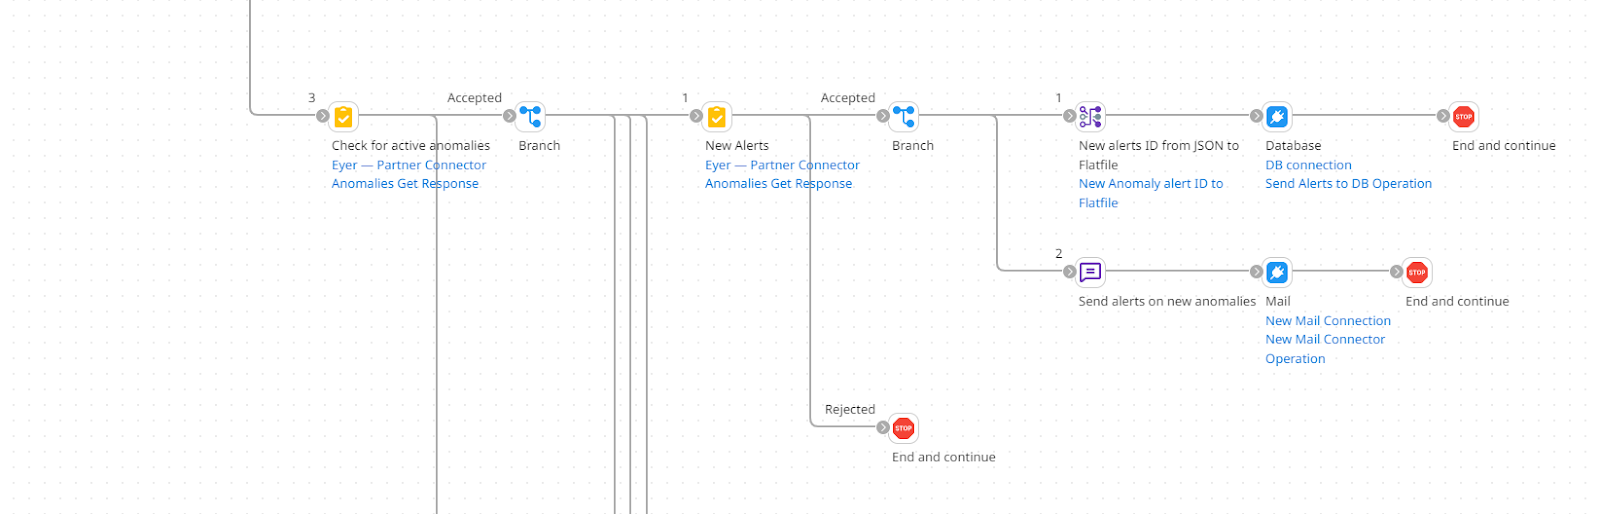
Adding the branch shape for sending out new, updated, or closed anomaly alerts
After checking if active anomalies exist, the next steps are: 1. New Anomaly Detection:
- Identify new alerts.
- Store their IDs in a database.
- Send an alert notification for a newly detected anomaly.
2. Updated Anomaly Detection:
- Retrieve both the stored new ID and the cached updated ID.
- If the IDs match, it indicates an update to the existing anomaly.
- In this case, send an alert notification that the anomaly has changed.
3. Closed Anomaly Detection:
- Retrieve both the stored new ID and the cached closed ID.
- If the IDs match, it indicates the anomaly has been closed.
- In this case, send an alert notification that the anomaly has been closed.
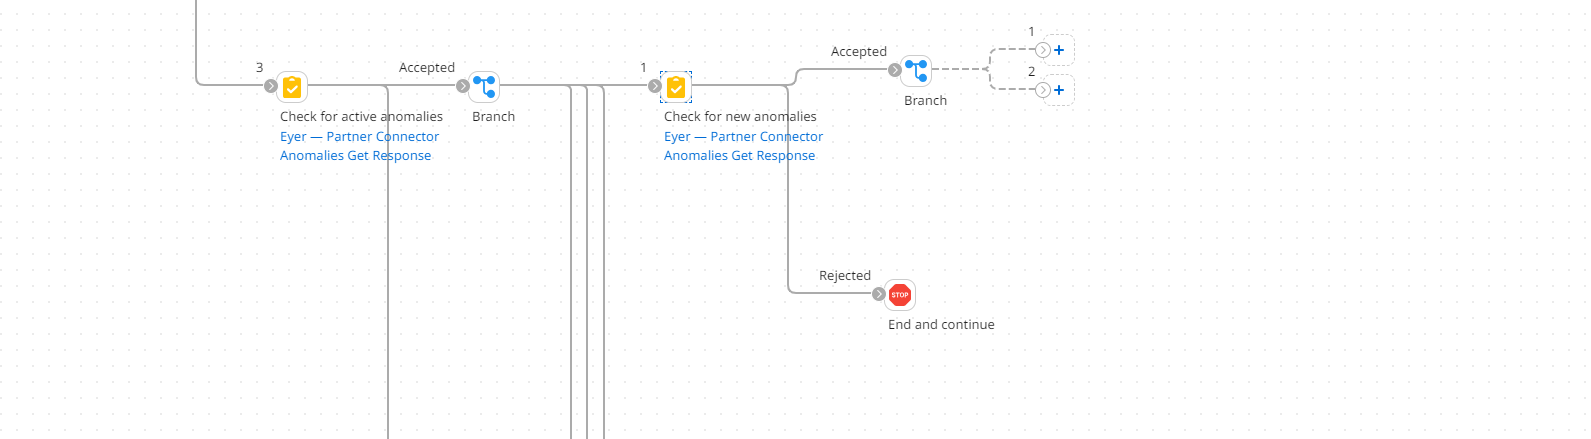
To run these processes consecutively, Add the Branch shape to the process. Click the Branch shape to open its dedicated sidebar; in this sidebar, change the number of branches to four and click the OK button to save your selection.
Store new anomaly IDs in the database and send an alert for each new anomaly.
To store a new anomaly id and send out an alert for each new anomaly detected, you need to:
- Check if new anomalies exist on the anomalies object
- Change the anomalies data format from JSON to database format
- Store the new anomaly id on the database
- Create the custom message you would like to alert the user
- Send out the alerts via email
Add a business rule to check if new anomalies exist on the anomalies object You will start this section of by adding a Business Rule shape to the first path leading from the Branch Shape you created earlier. This shape will determine which anomalies are new.

Click the Business Rules shape to open the Business Rules Shape Options modal. In this modal, give a Display Name you’d like. Next, select "JSON" from the Profile Type field. Then, in the Profile field, choose the profile you created while setting up the Eyer-Partner connector.
Next, click OK to open the Business Rules Shape modal. Here, select Create a New Rule to create a new business rule.

In the Business Rules Shape modal, click the Add dropdown and select Field.
This action opens the Add a field modal. In the Alias field, enter “NewAnomalies”. Then, navigate through the Field input menu and select this menu: Object -> new -> Array -> items1 -> Object -> severity.
Click the OK -> OK button to save your field. Next, create the condition that defines the criteria for the NewAnomalies field by following this process:
- Click the Add a condition link
- In the first dropdown, select the NewAnomalies field
- In the second dropdown, select the != field
- In the third dropdown, select the Static field
- Leave the fourth field empty
- Click the Save button
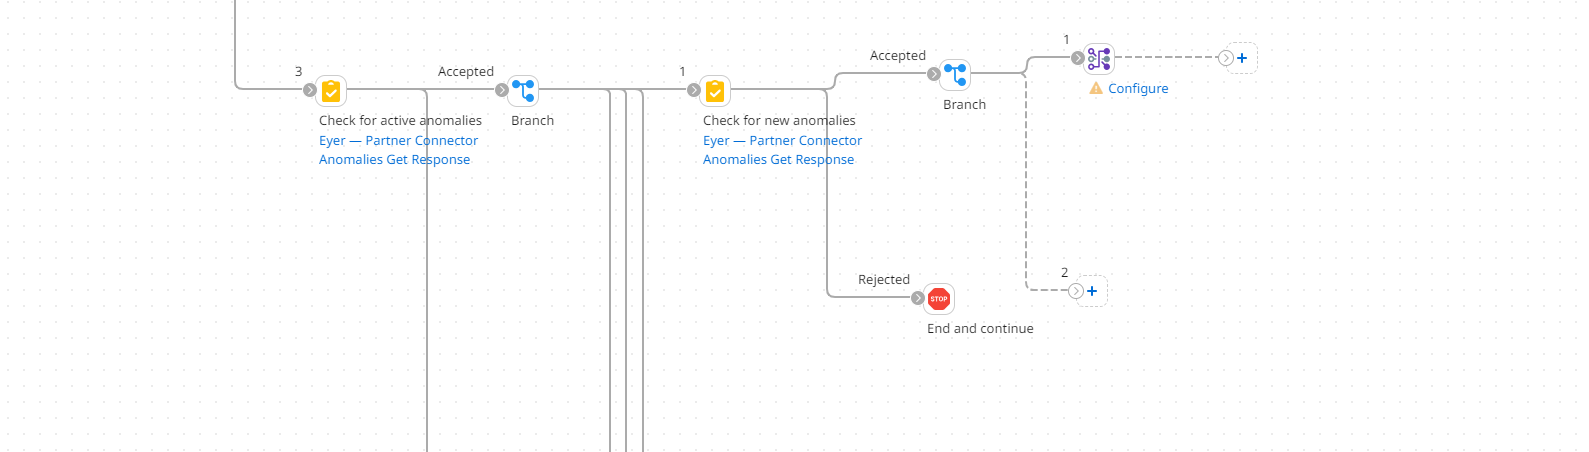
Add a stop shape to the rejected path of the process.
If the anomalies are new, you want to save their IDs to your database so that they can persist for future monitoring. After storing the IDs of the anomaly alerts, you would want to send out an alert that a new anomaly has been detected. To run both these processes consecutively, you need to add a Branch shape to the Accepted path from the Business rules shape.
Change the anomalies data format from JSON to database format In the first path from the Branch shape (labeled 1), add the Map shape that will extract the id from the new anomalies object and change its format from JSON to database format. For in-depth information about the Map shape and its properties, refer to the Boomi documentation.
While this section won't cover the complete Map shape configuration, here are some key points to remember:
- Source Profile: The profile type is JSON, and the profile is the Eyer Connector Profile
- Destination Profile: The profile type is Database, and the profile is your database profile.
Mapping Instructions: Within the Map source, locate the field path new -> Array -> items1 -> Object -> id. Map this field to the field you want to store "id" in the Map destination section.
Store the new anomaly id on the database Next, add the Database connector to store the alert ID. Then, add the Stop shape. To learn more about the Boomi Database connector, check out the official Boomi documentation.
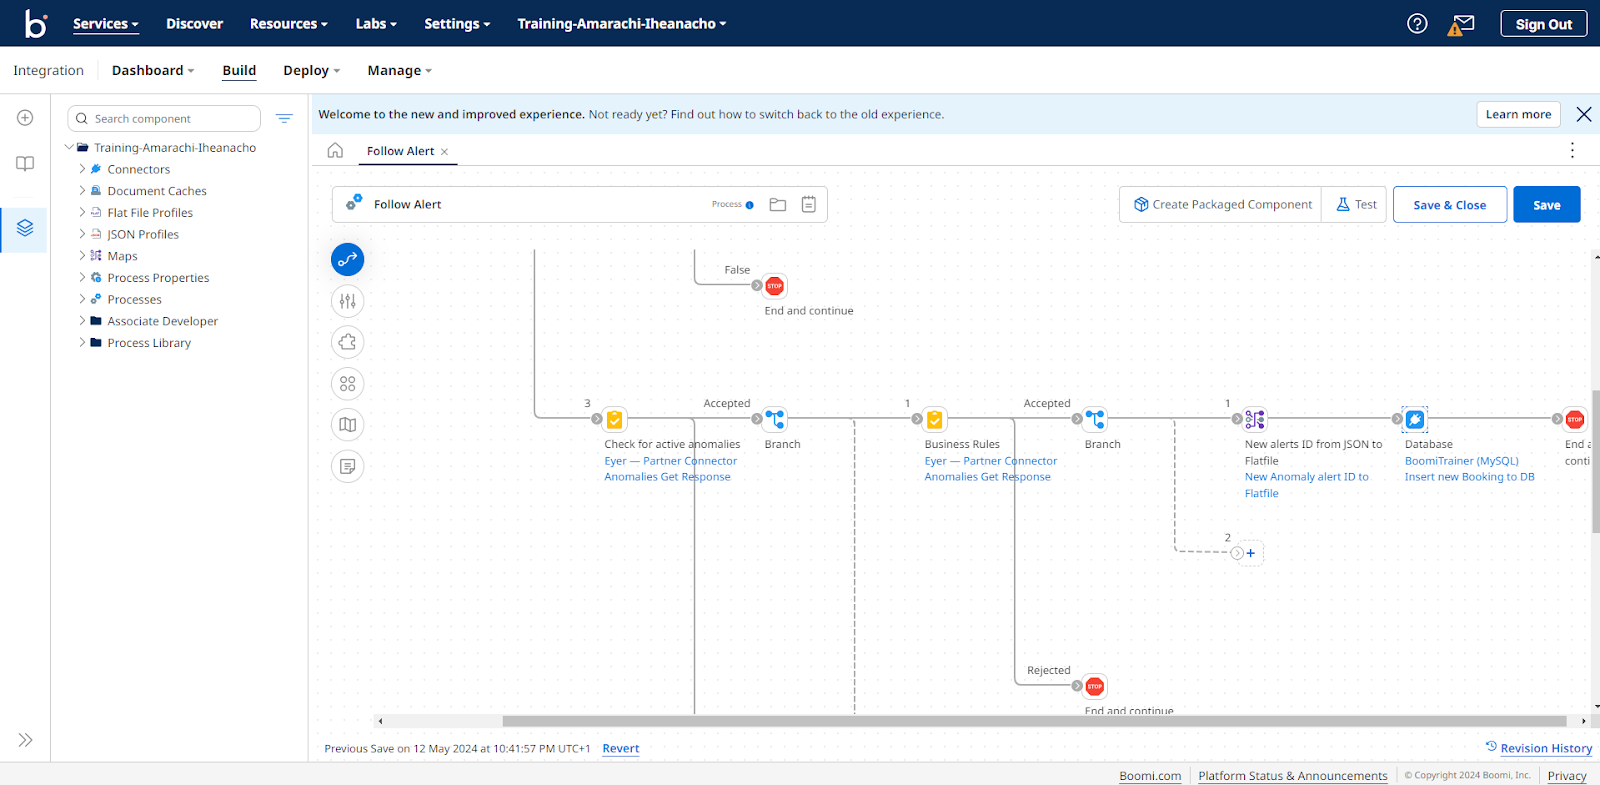
Create the custom message you would like to alert the user You will create the process for alerting the user in the second path from the Branch shape (labeled 2 ). Add the Message shape to create your custom message. Click the shape to open its dedicated sidebar.

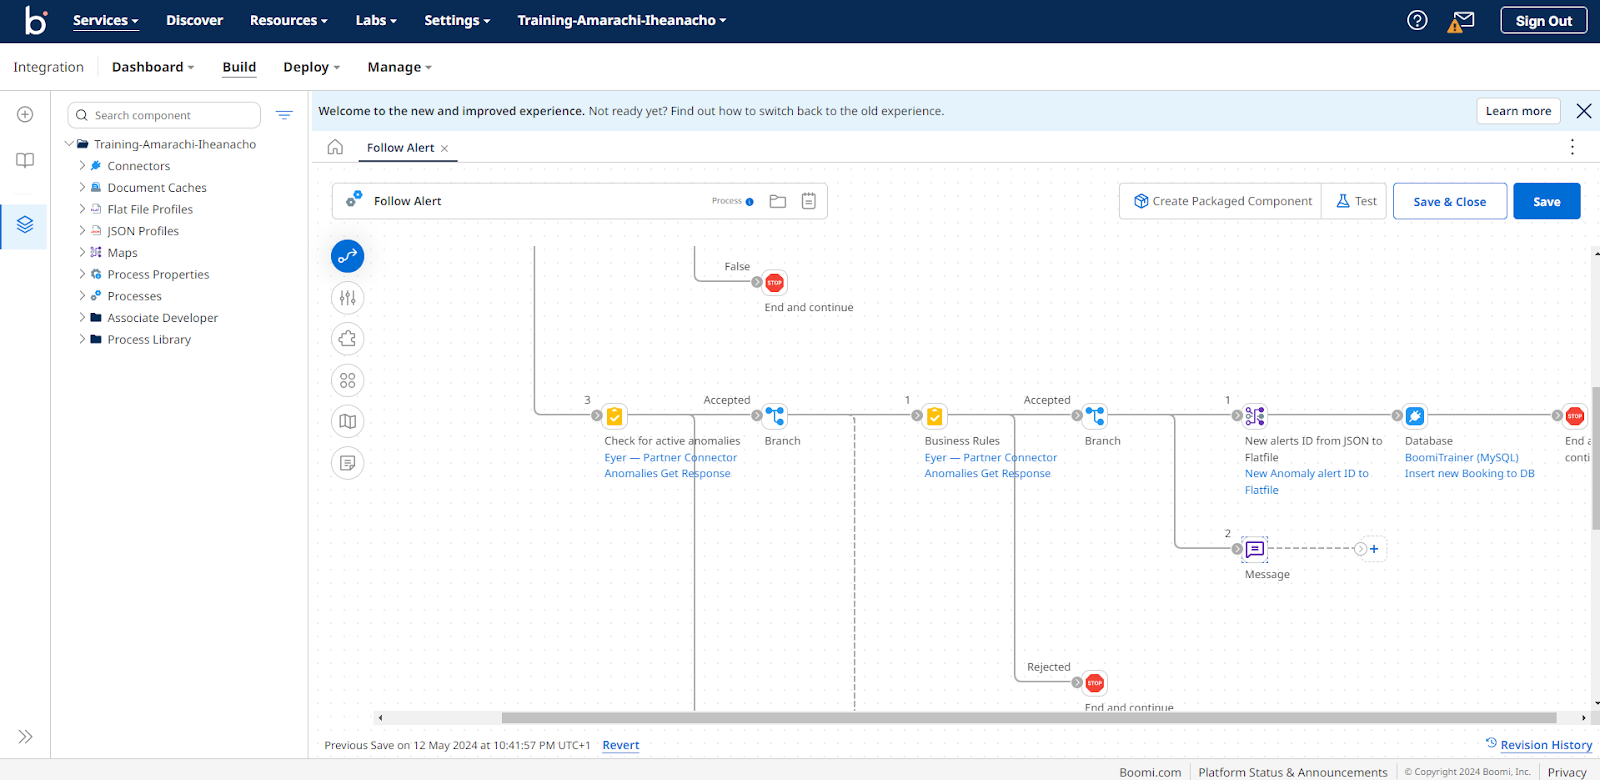
In this sidebar, write the message you want to send out in the Message input field. For example:
New anomaly of interest detected and ID is written to the database.
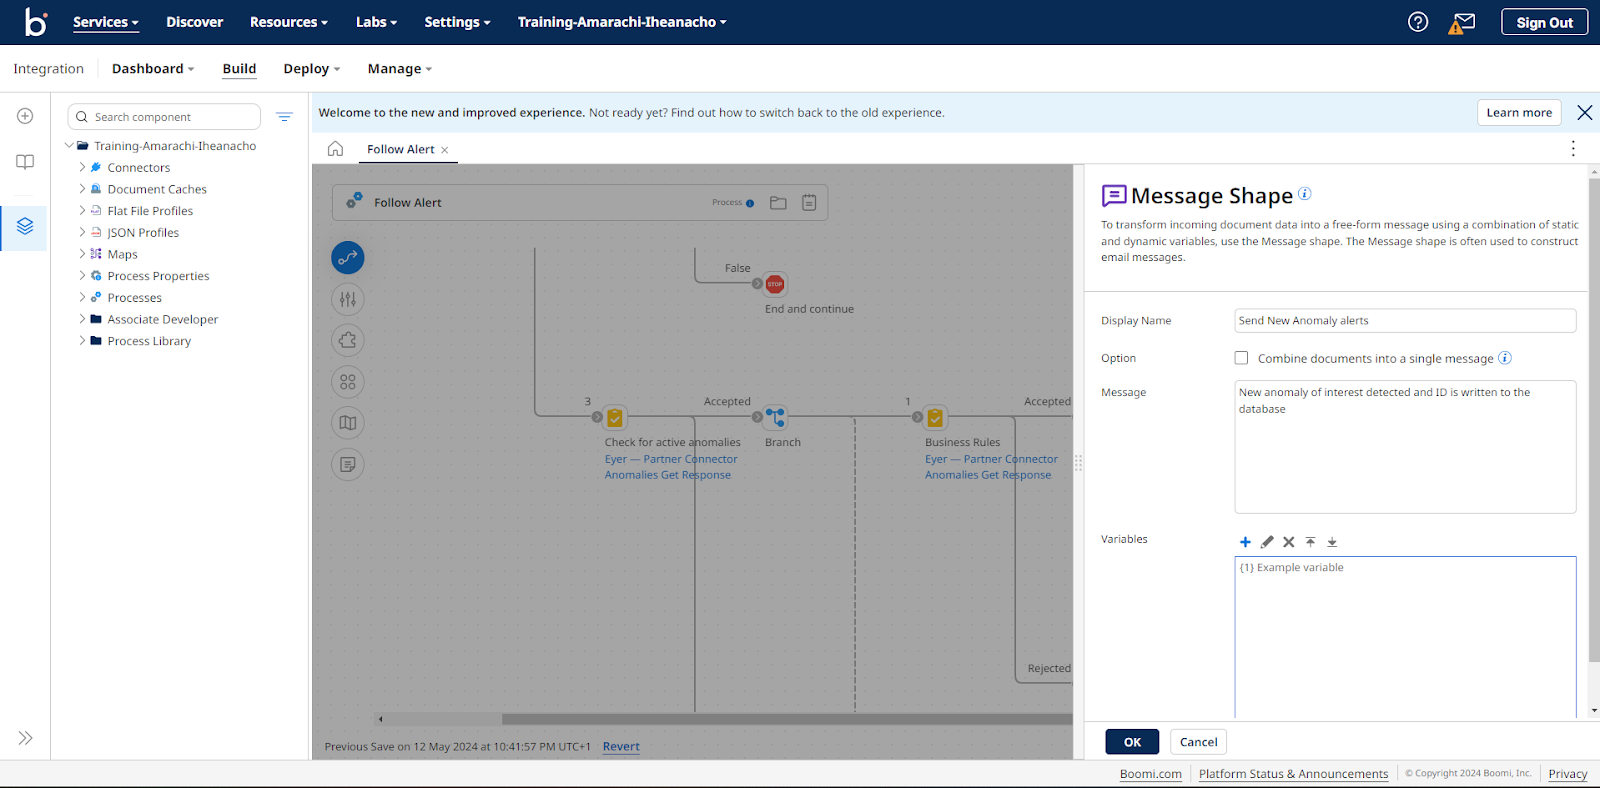
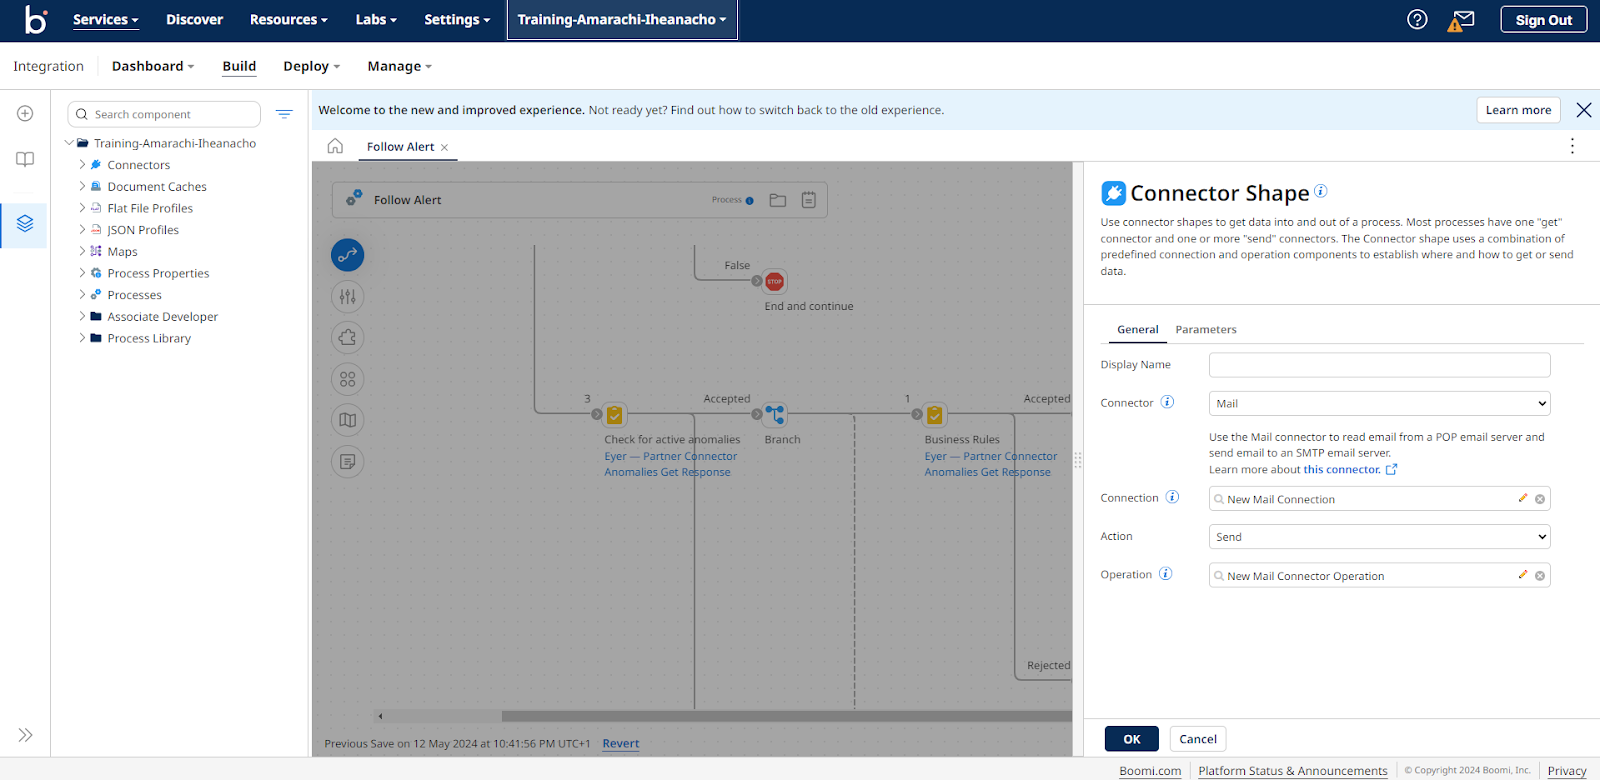
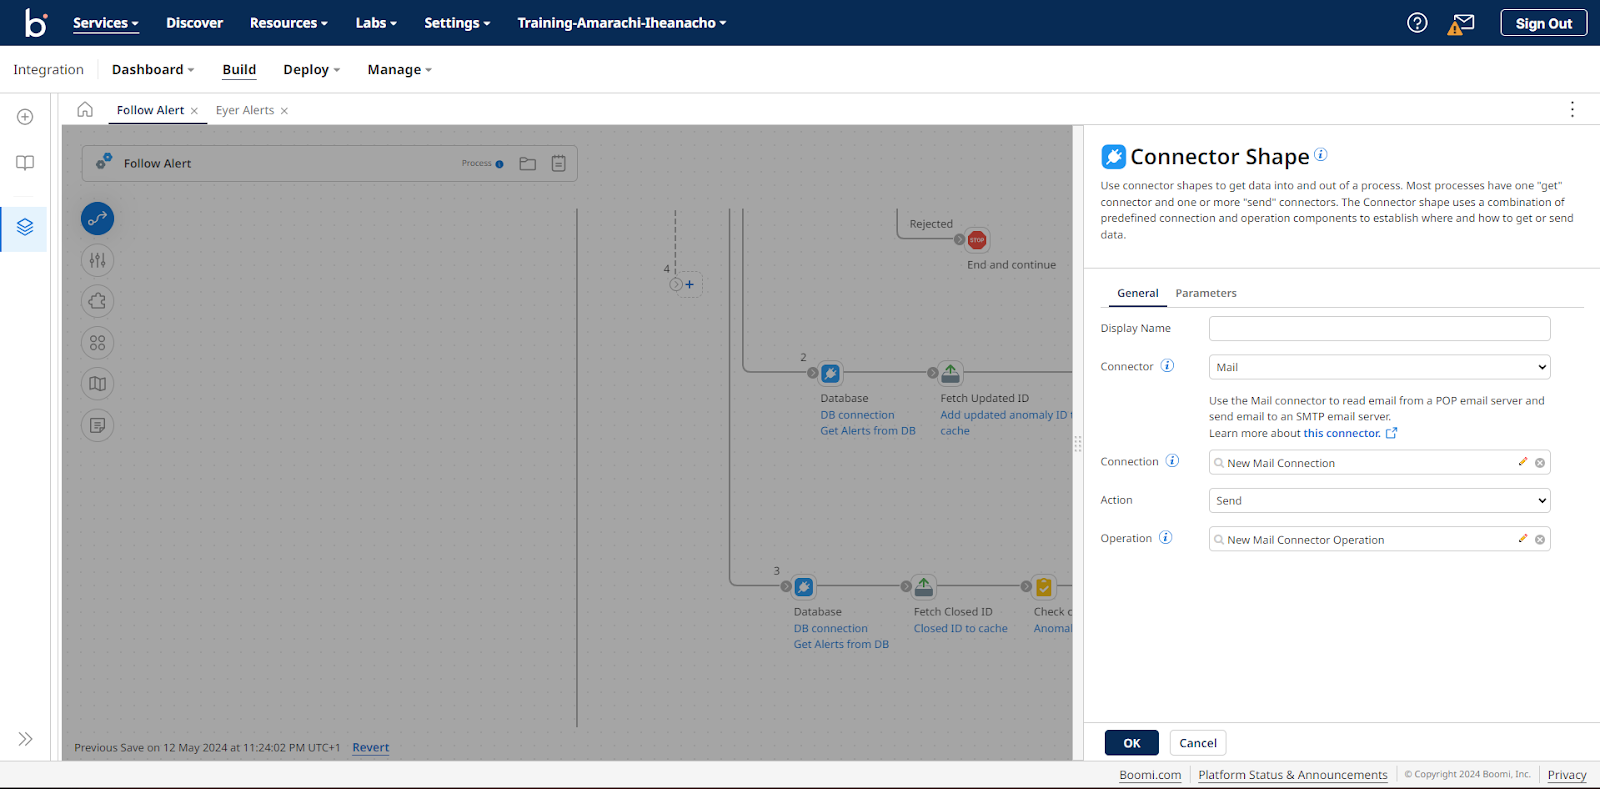
Click the OK button to save your custom message. Send out the alerts via email Add the Mail connector to send out the message to learn how to configure the Mail connector. Check out the Boomi documentation to learn how to connect and configure your Mail connector.
Add the Stop shape to end the process after sending out the alerts.
Send out an alert when an anomaly is updated
To follow an anomaly and send out an alert when the anomaly is updated, you need to:
- Get the anomaly id from the database
- Get the updated anomaly id from the cache
- Check if the updated anomaly is the anomaly you are interested in following
- Create a custom message if the updated anomaly is the anomaly of interest
- Send out an alert to the user
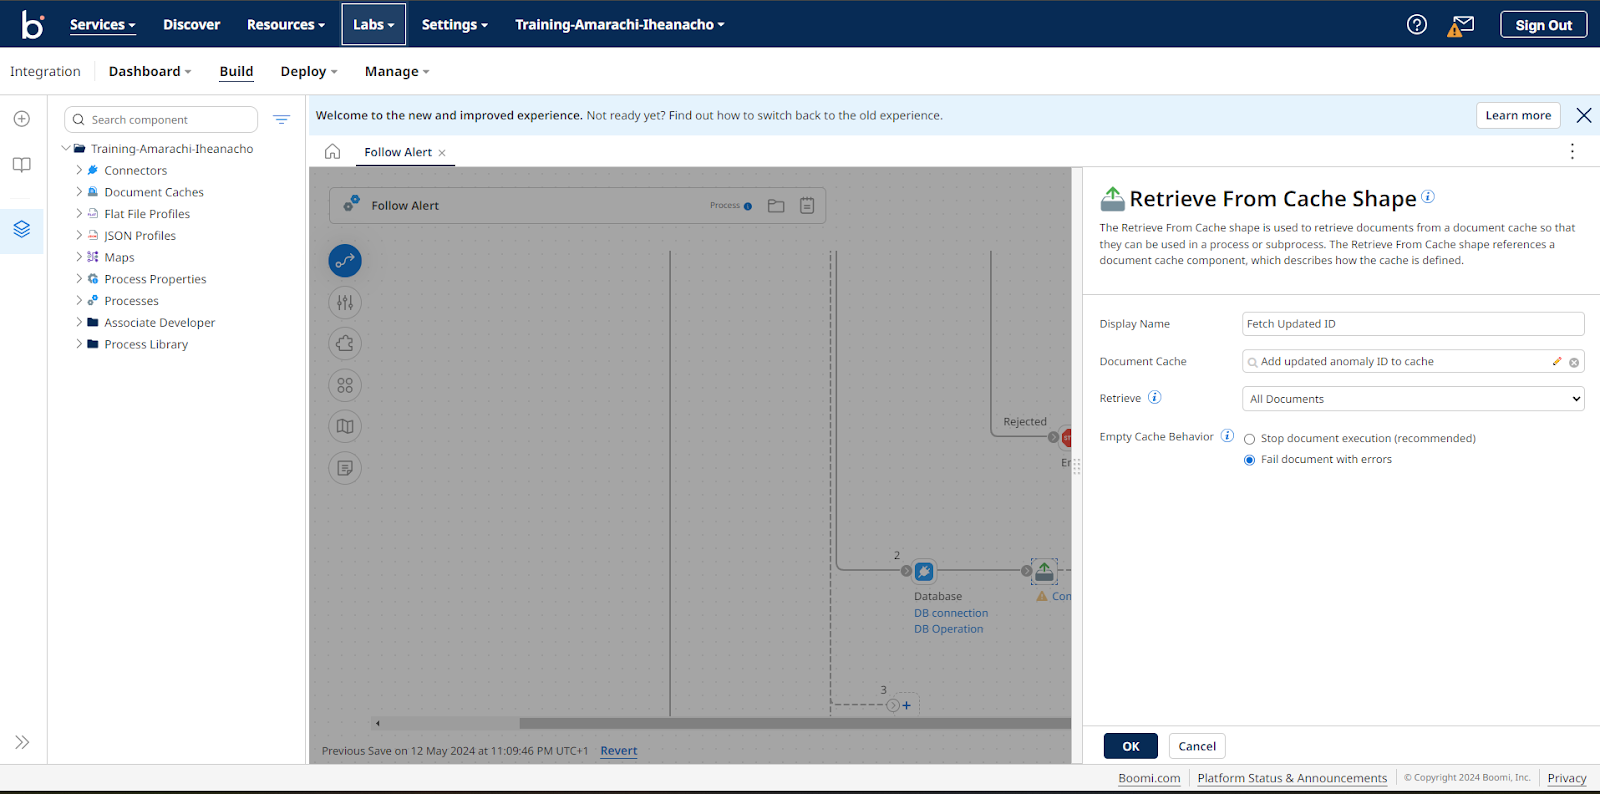
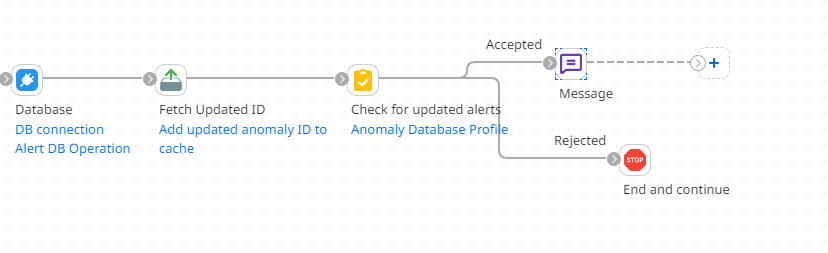
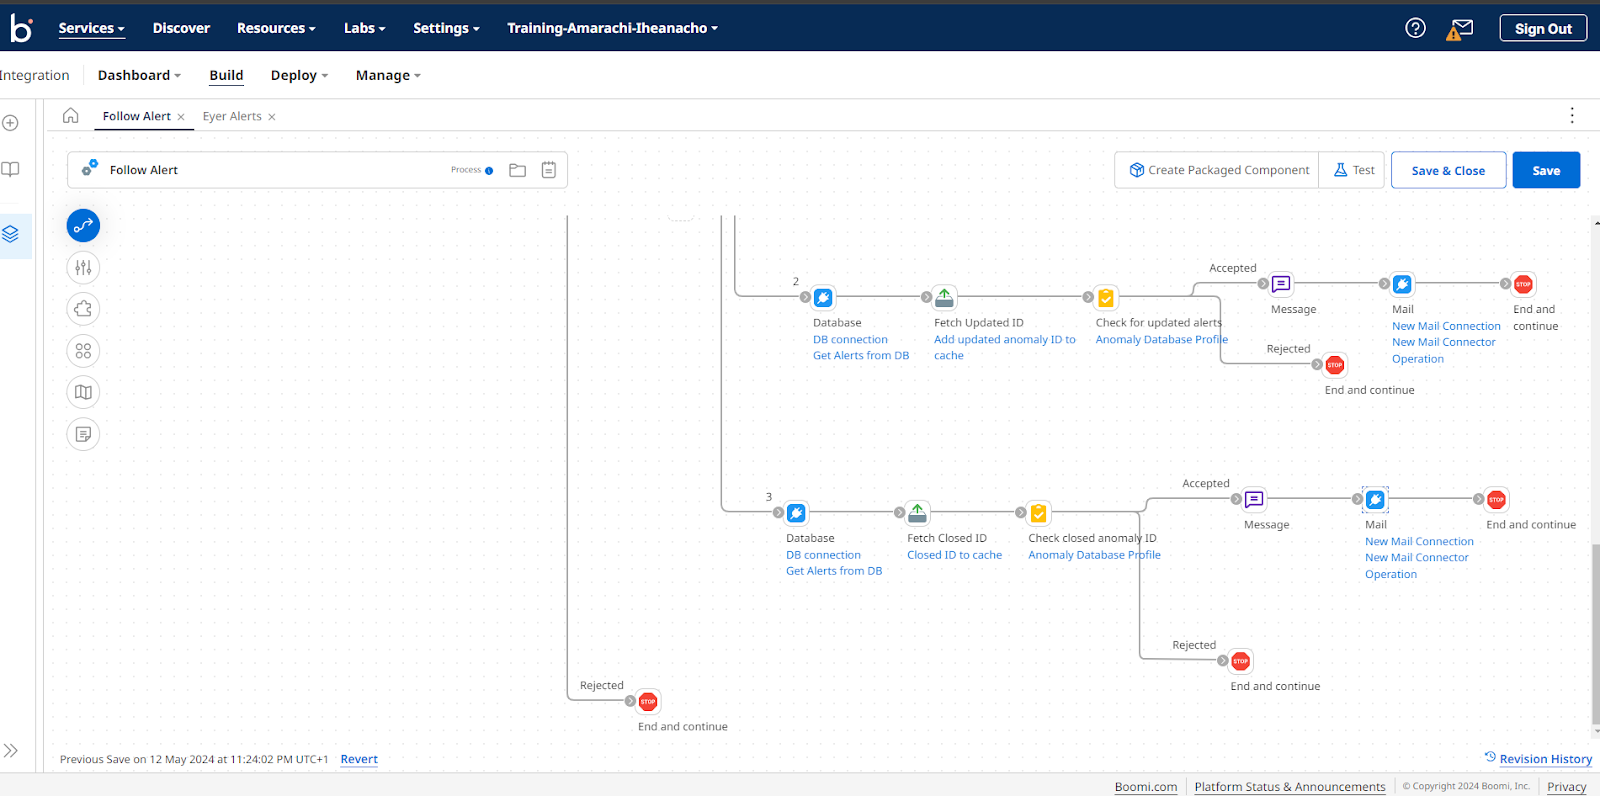
Get the anomaly id from the database In the second branch, add the Boomi database connector to retrieve the data. To learn more about the database connector, check out the official Boomi documentation. Get the updated anomaly id from the cache Next, add the Retrieve from Cache shape to collect the updated anomaly id you stored at the start of the process.
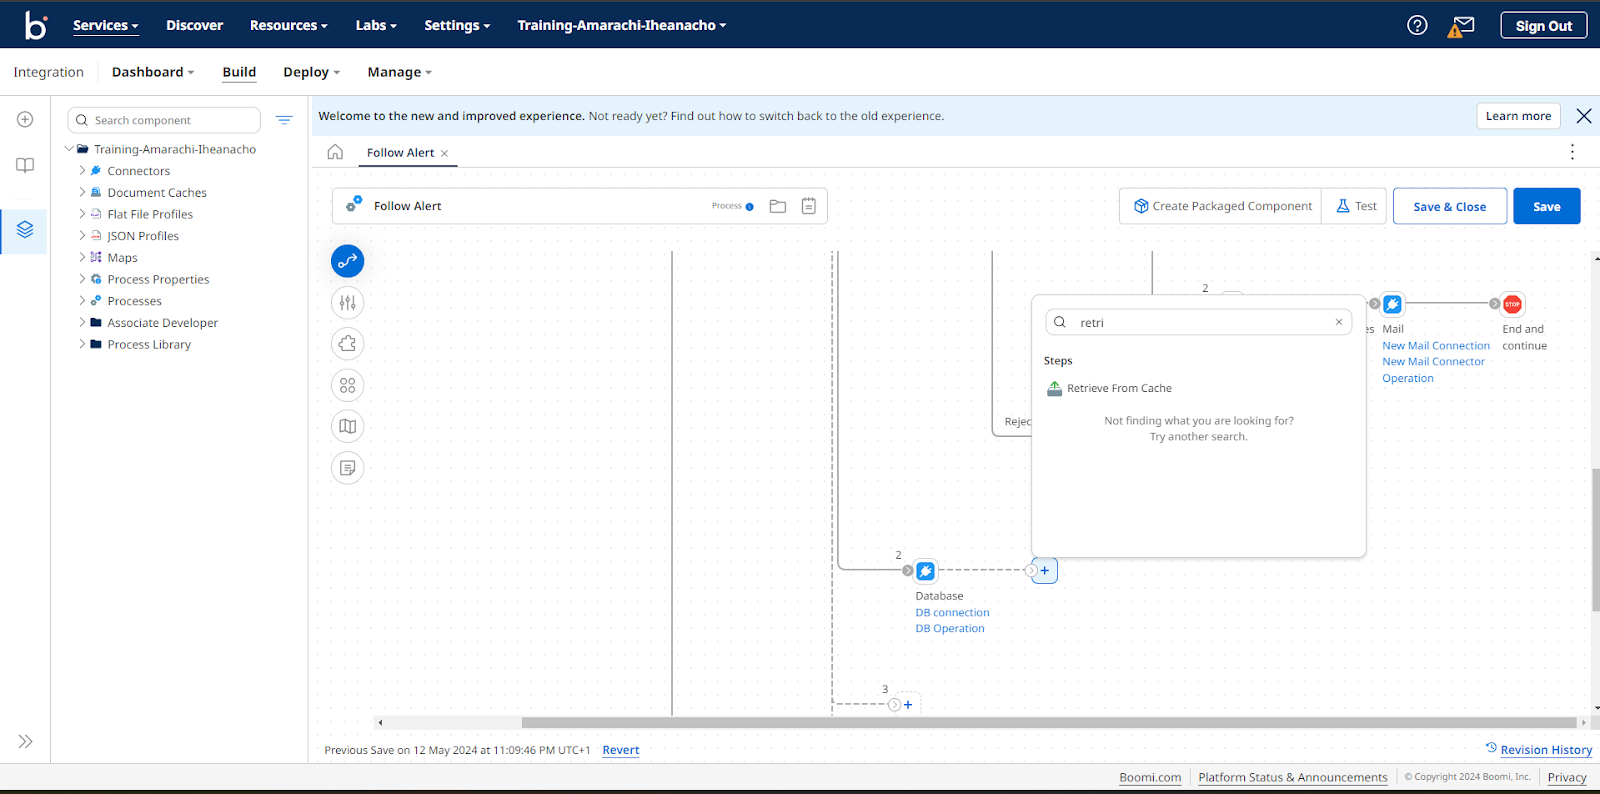
Click on this Retrieve from Cache shape to open its dedicated sidebar. Fill out this sidebar with the following information:
- Display Name -> Fetch Updated ID
- Document Cache -> Select the updated cache document you created previously
- Retrieve -> All Documents
- Empty Cache Behaviour -> Fail document with errors
/;
Understanding that you can have multiple alert ids on your database, you need to verify whether the cache ID and anomaly ID stored in the database are the same. This enables you to determine if you are monitoring the alert of interest. Create the Business rules fields. To perform this check, add a Business Rules shape to your process.

Click on the Business Rules shape to open the Business Rules Shape Options modal. In this modal, select Database in the Profile Type field. In the Profile field, select the profile you created while configuring your database connector.
Next, click the OK button to open the Business Rules Shape modal. In this modal, click the Create a New Rule button to create a new business rule.
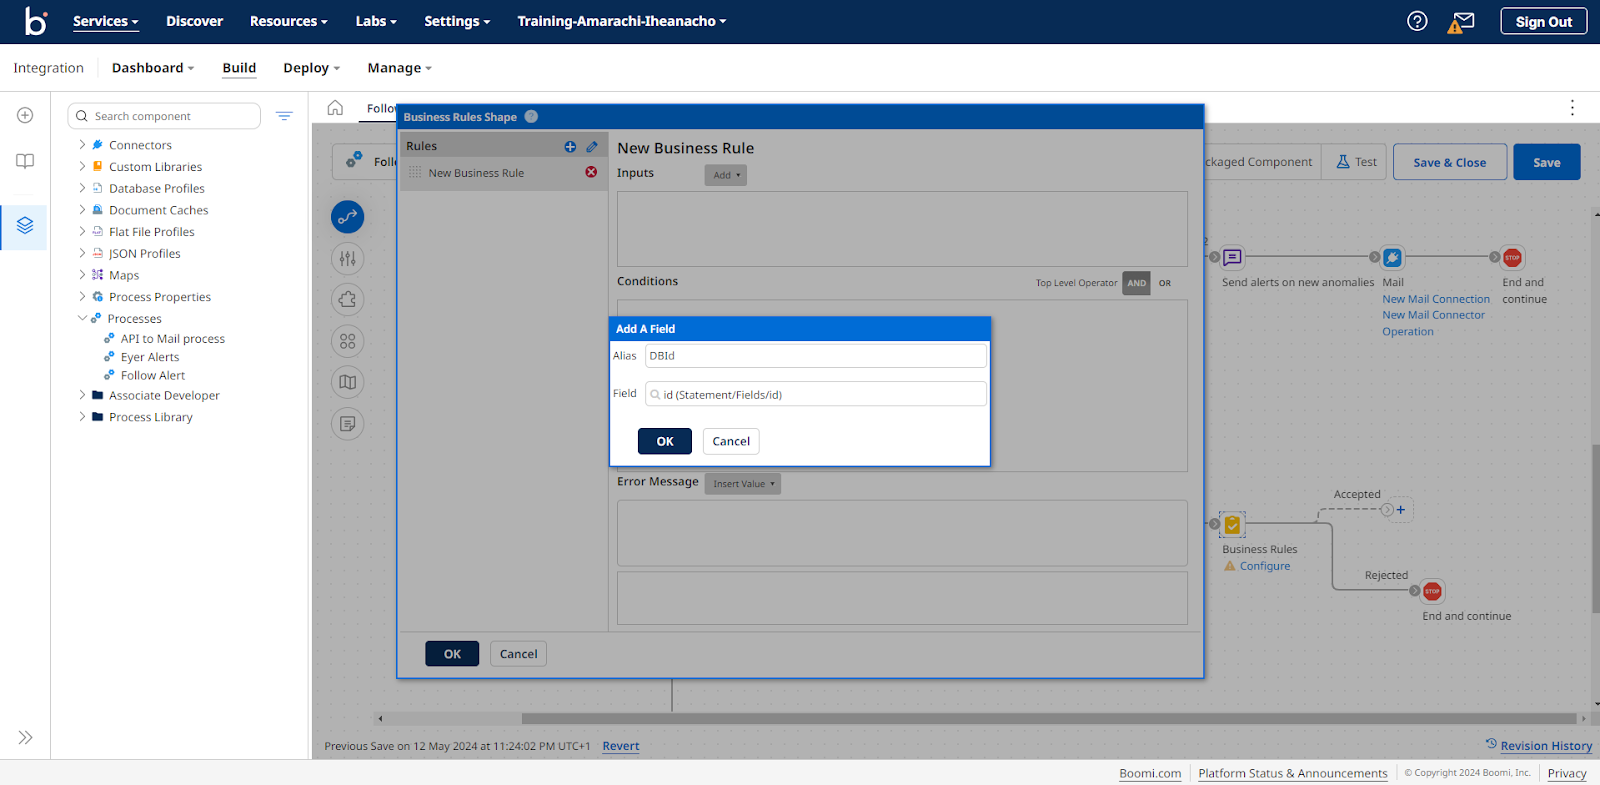
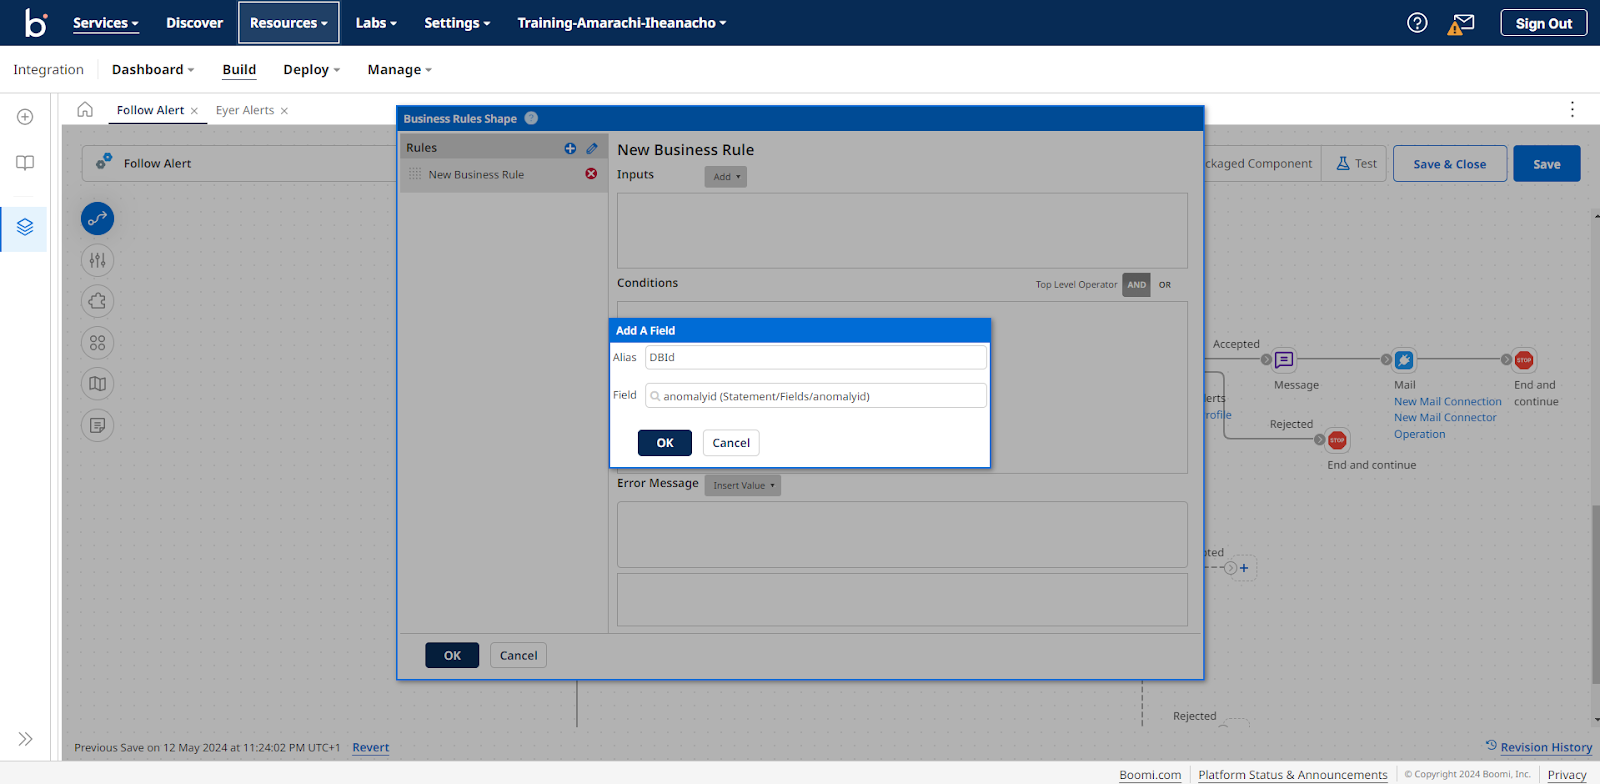
Click the Add dropdown and select Field from the menu dropdown.
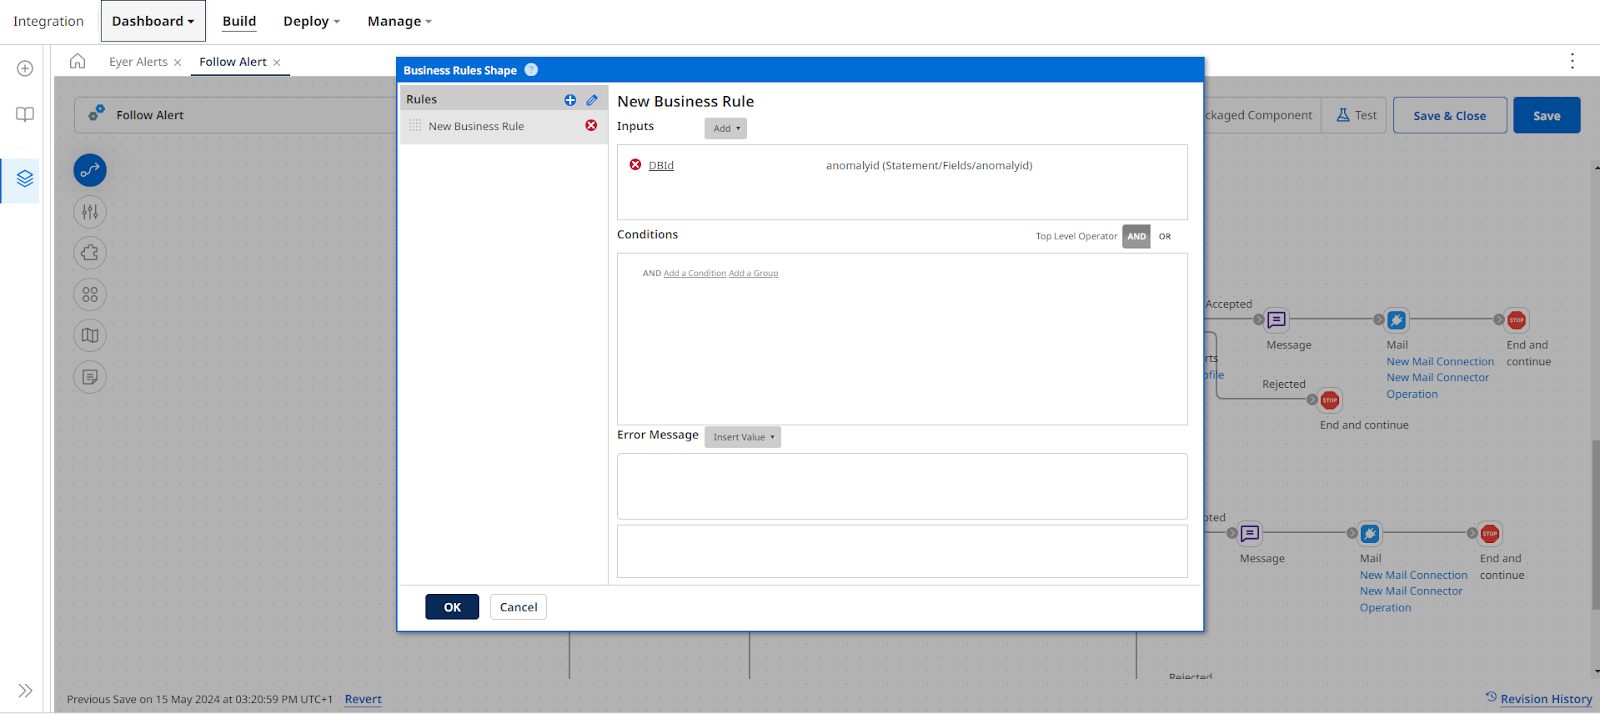
This action opens up the Add a field modal. In the Alias field, input “DBId”, then navigate through the Field input menu and select: Statement -> Fields -> id.
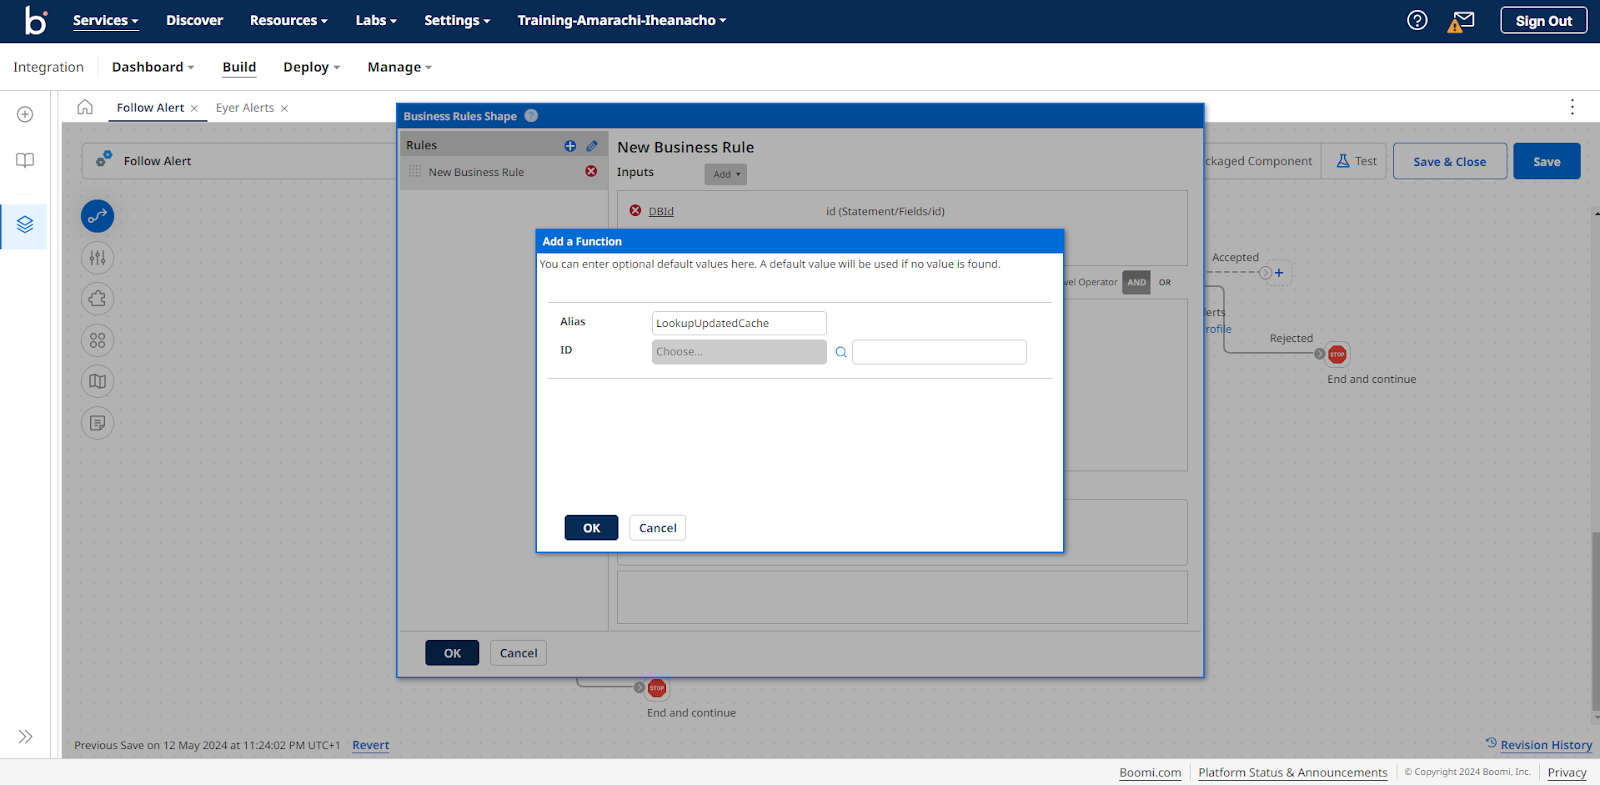
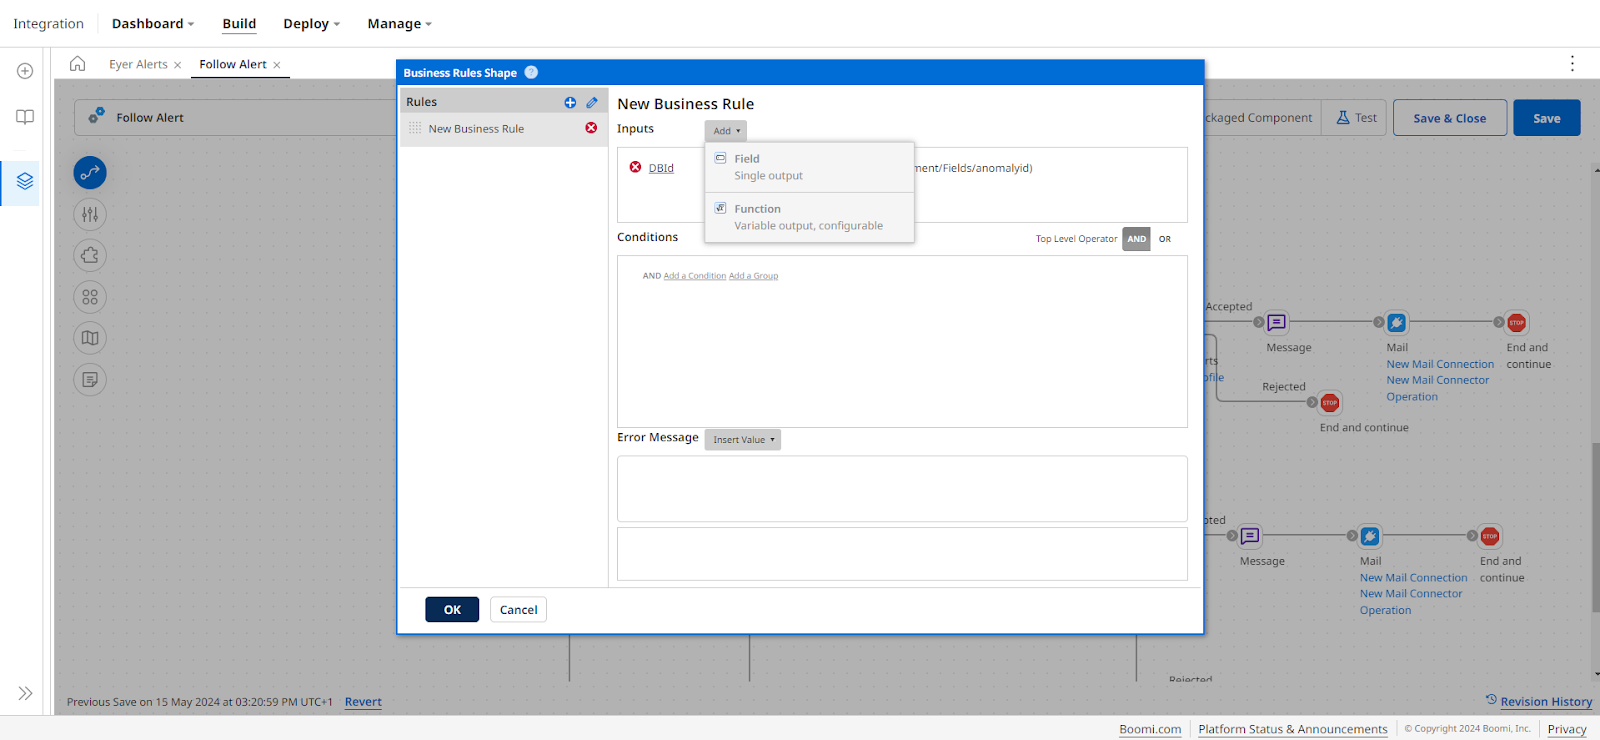
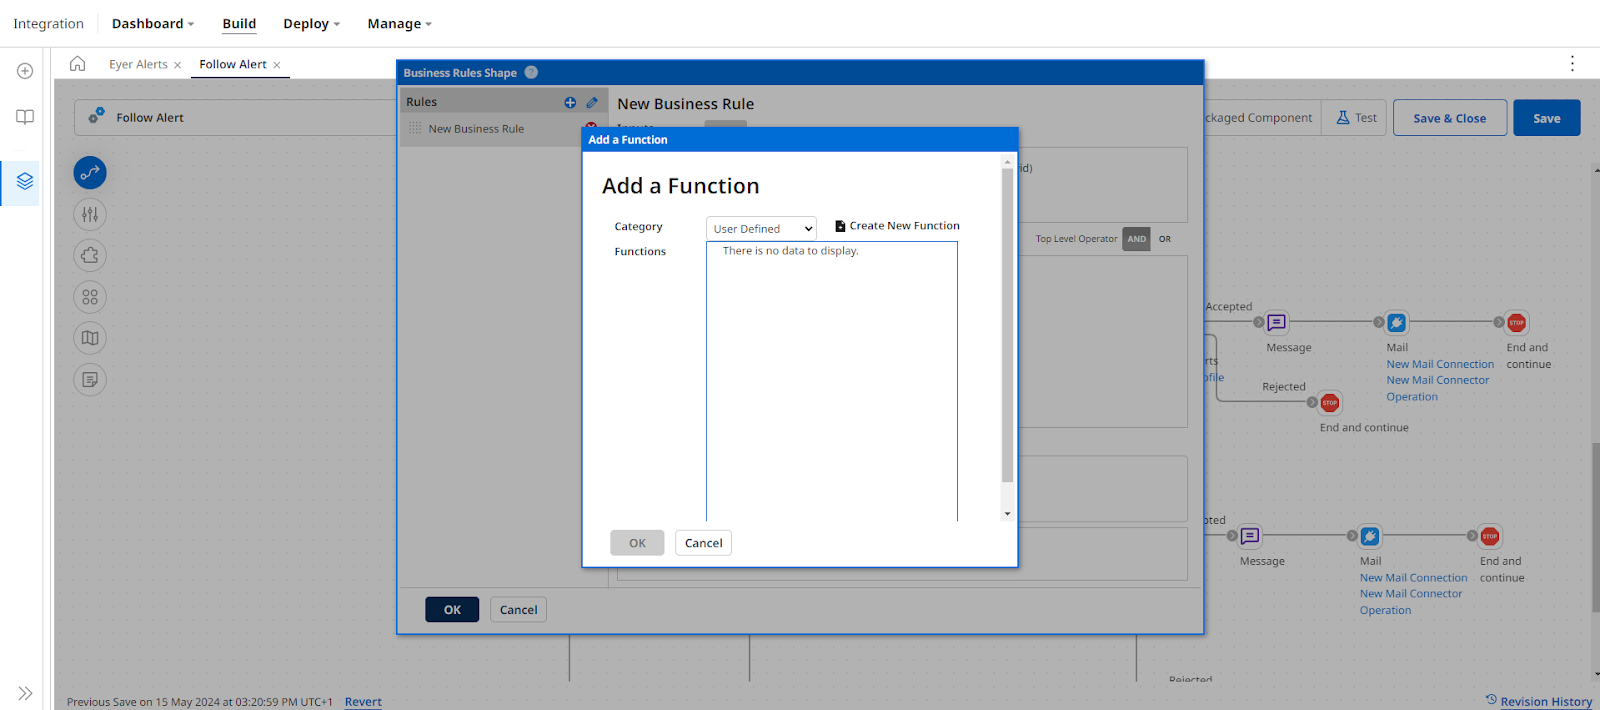
Click the OK -> OK button to save your field. Create another field to hold the cached id. To collect this id, you need to create a Business rules function, click the Add dropdown, and select Function from the menu dropdown.
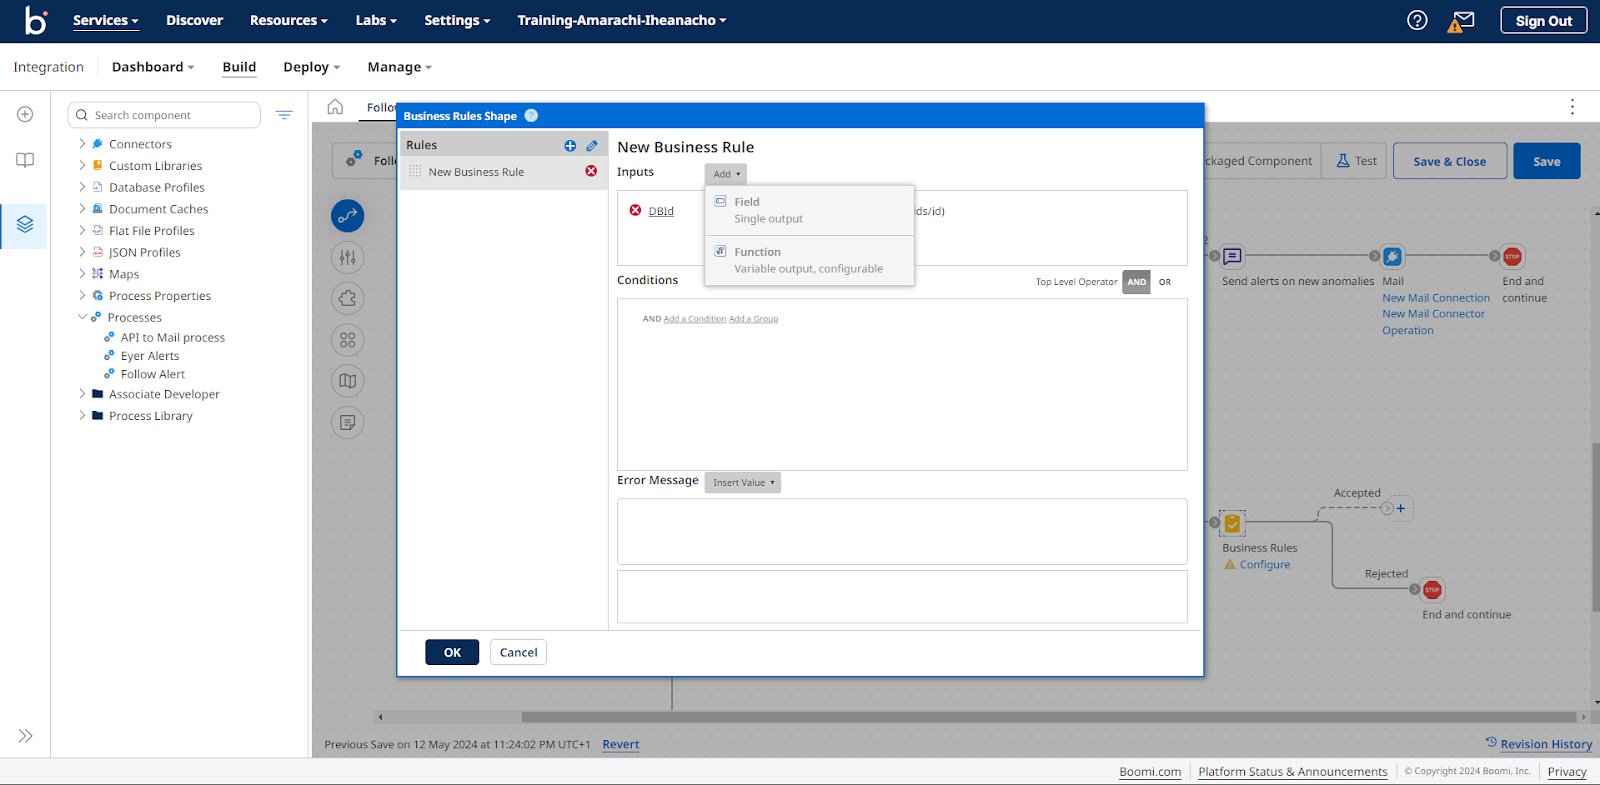
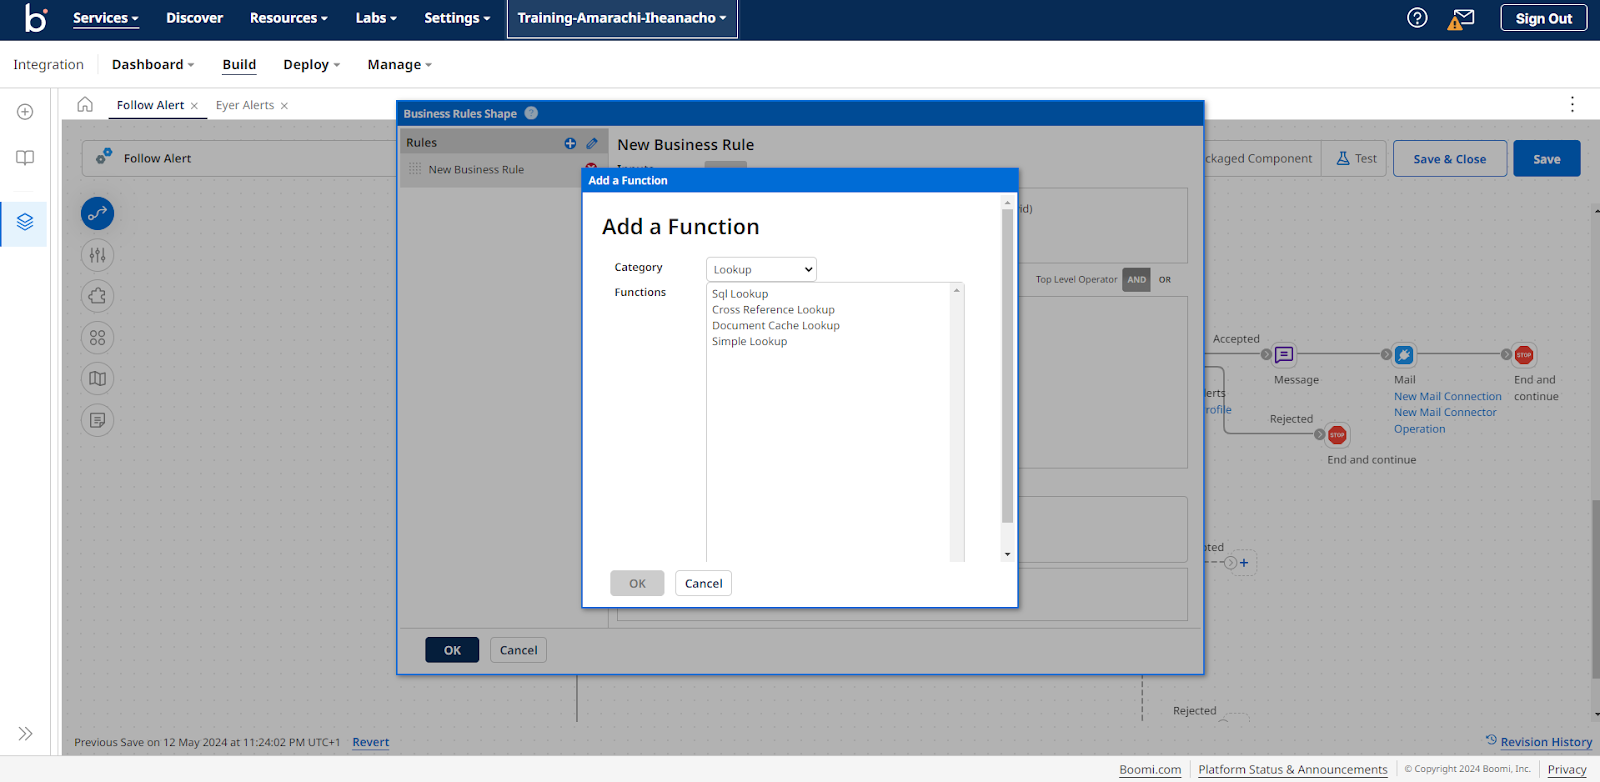
This action opens up an Add a Function modal. In this modal, click the Category dropdown and select Lookup. In the Functions menu, select Document cache lookup and click the OK button.
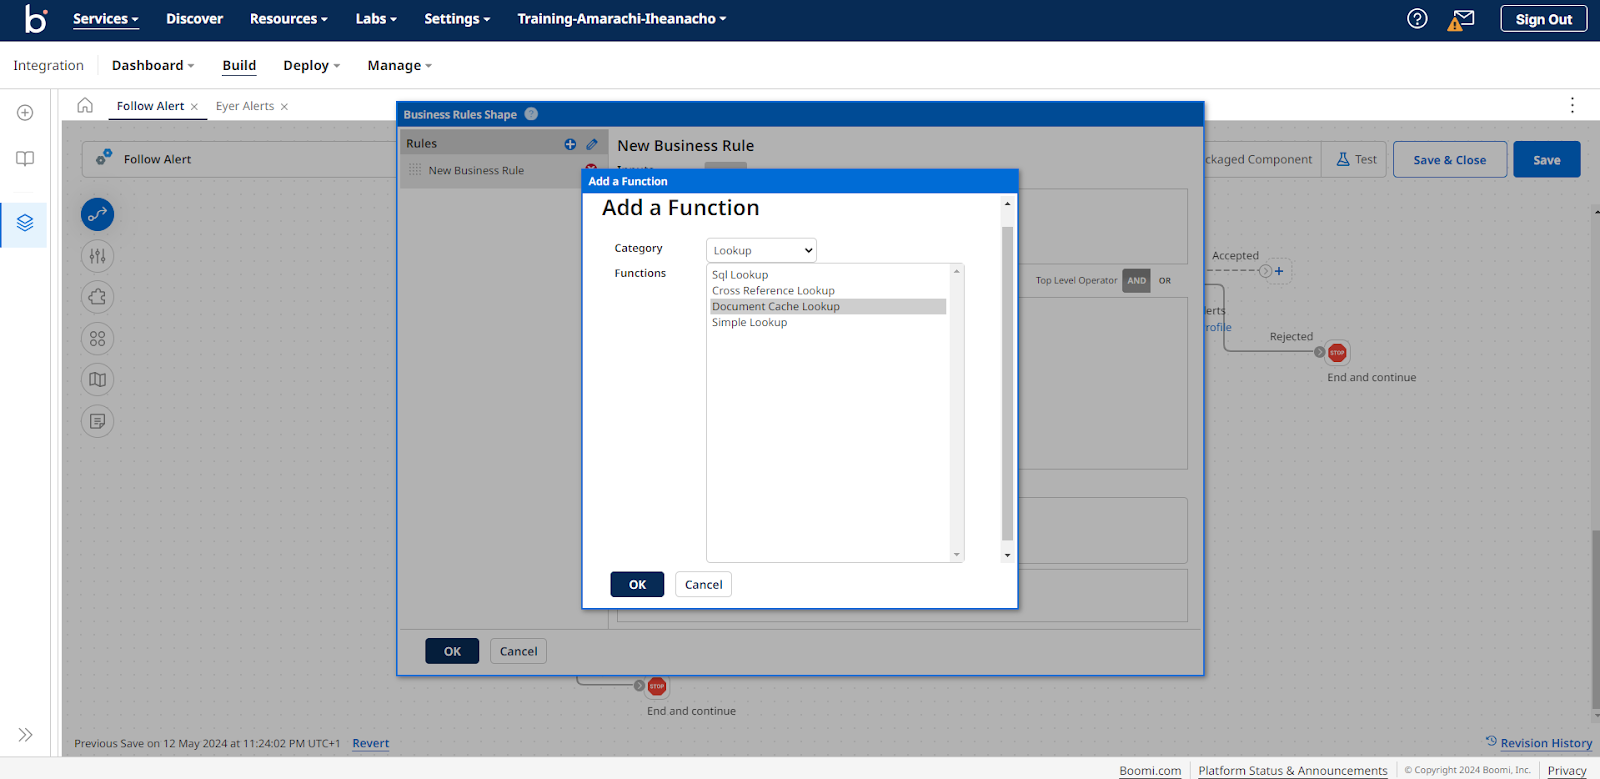
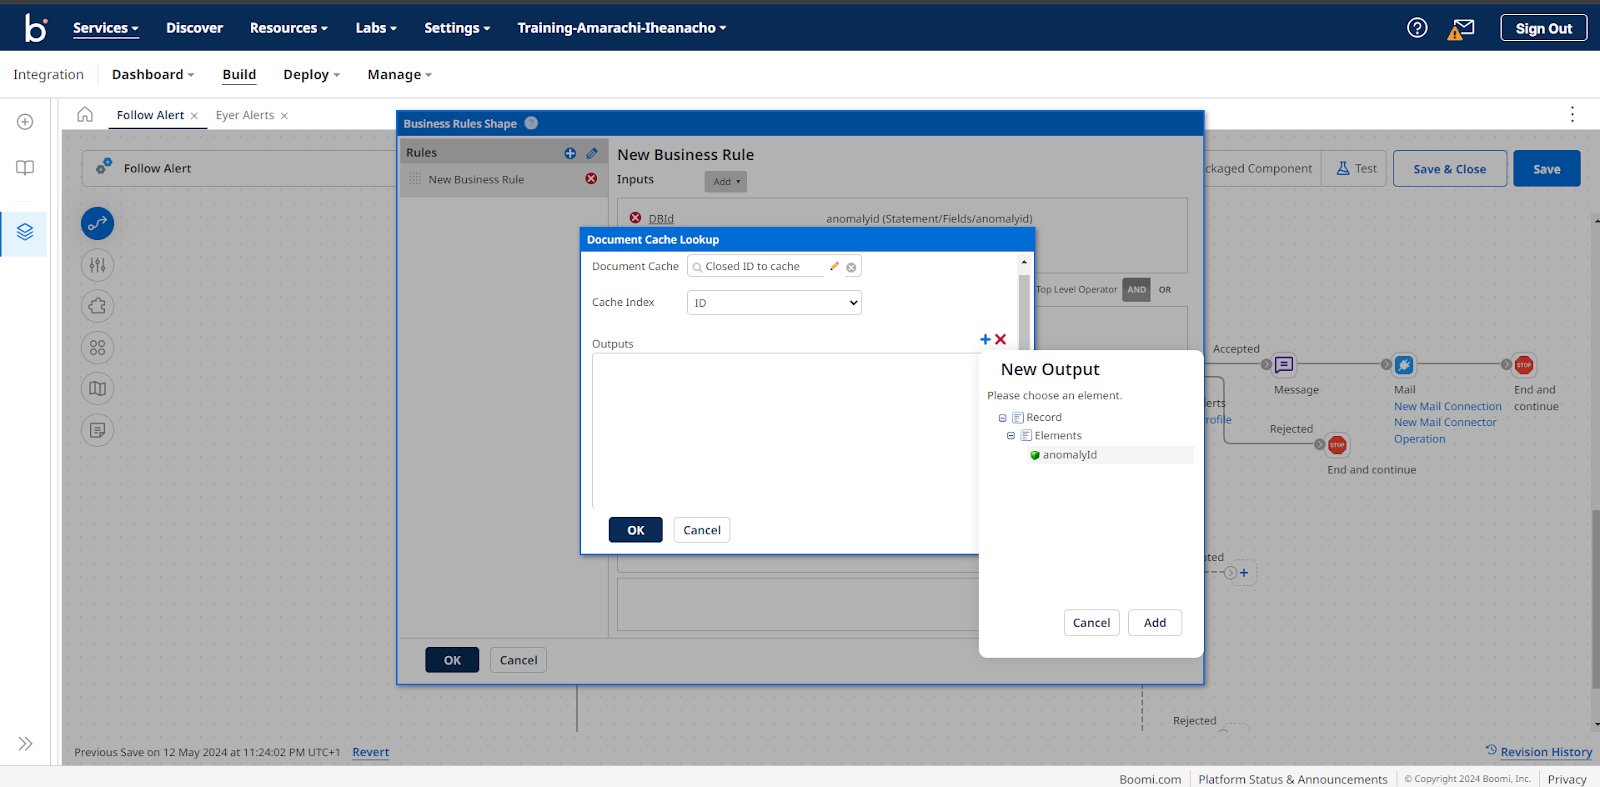
This action opens up the Document Cache Lookup modal.
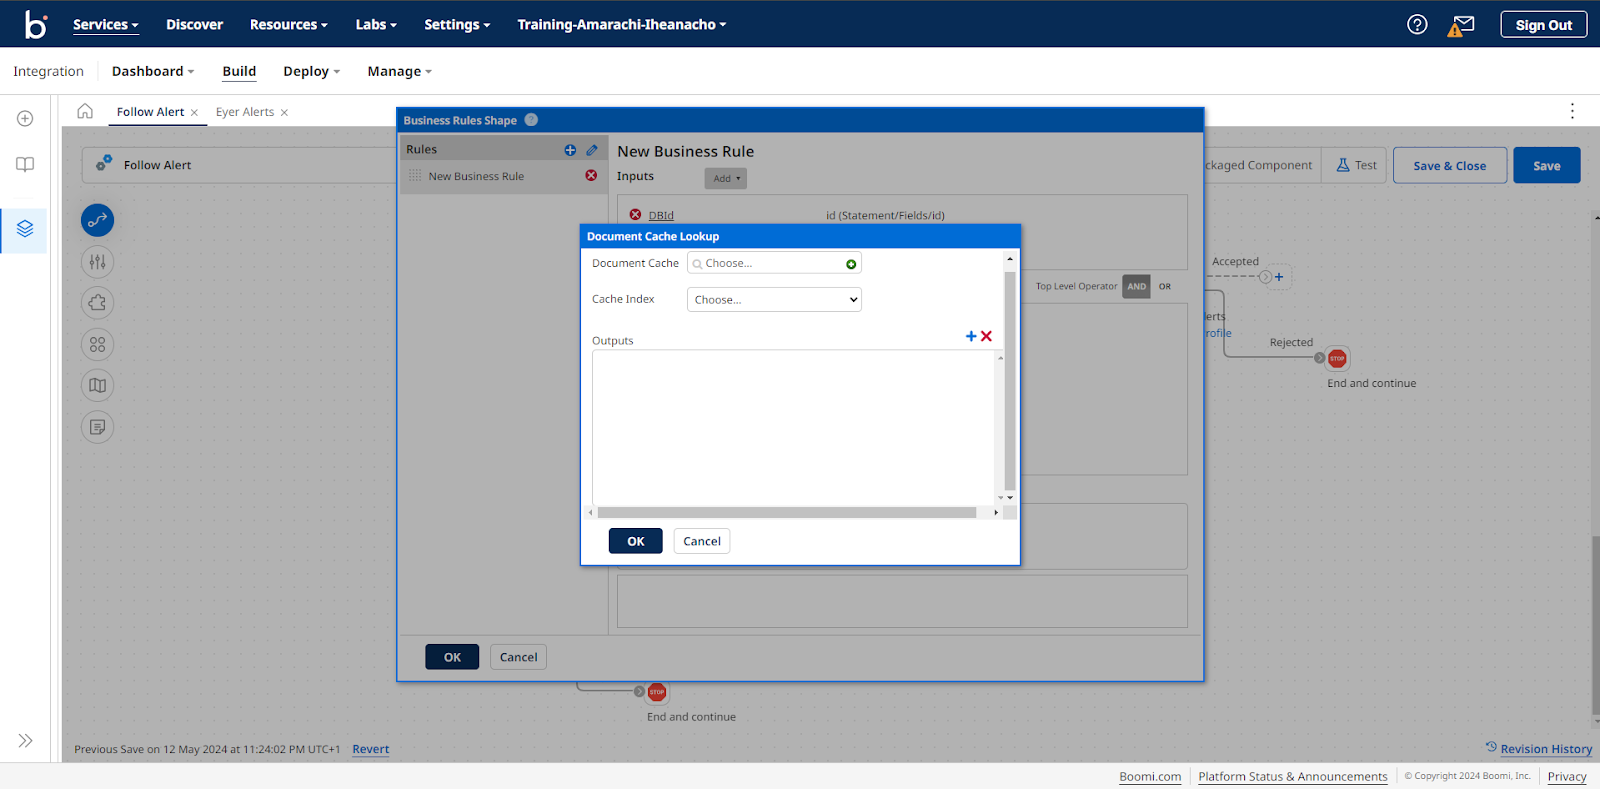
Fill out this modal with the following information:
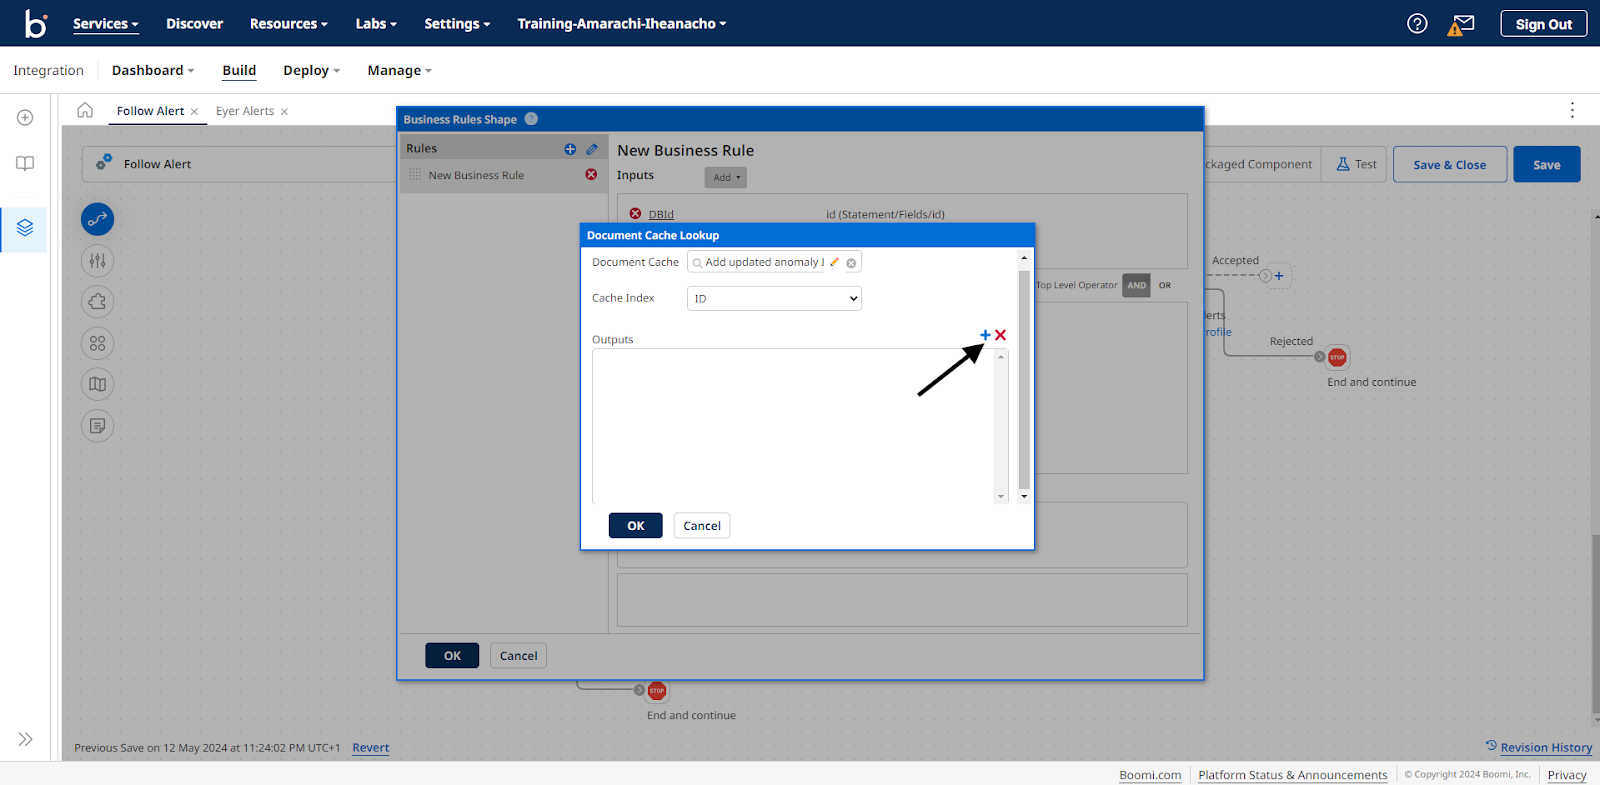
- Document Cache -> Select the Cache profile you created for the updated anomaly cache at the beginning
- Cache Index -> Select ID from the dropdown
- Outputs -> Select the + button, navigate through the menu, and select ID you created
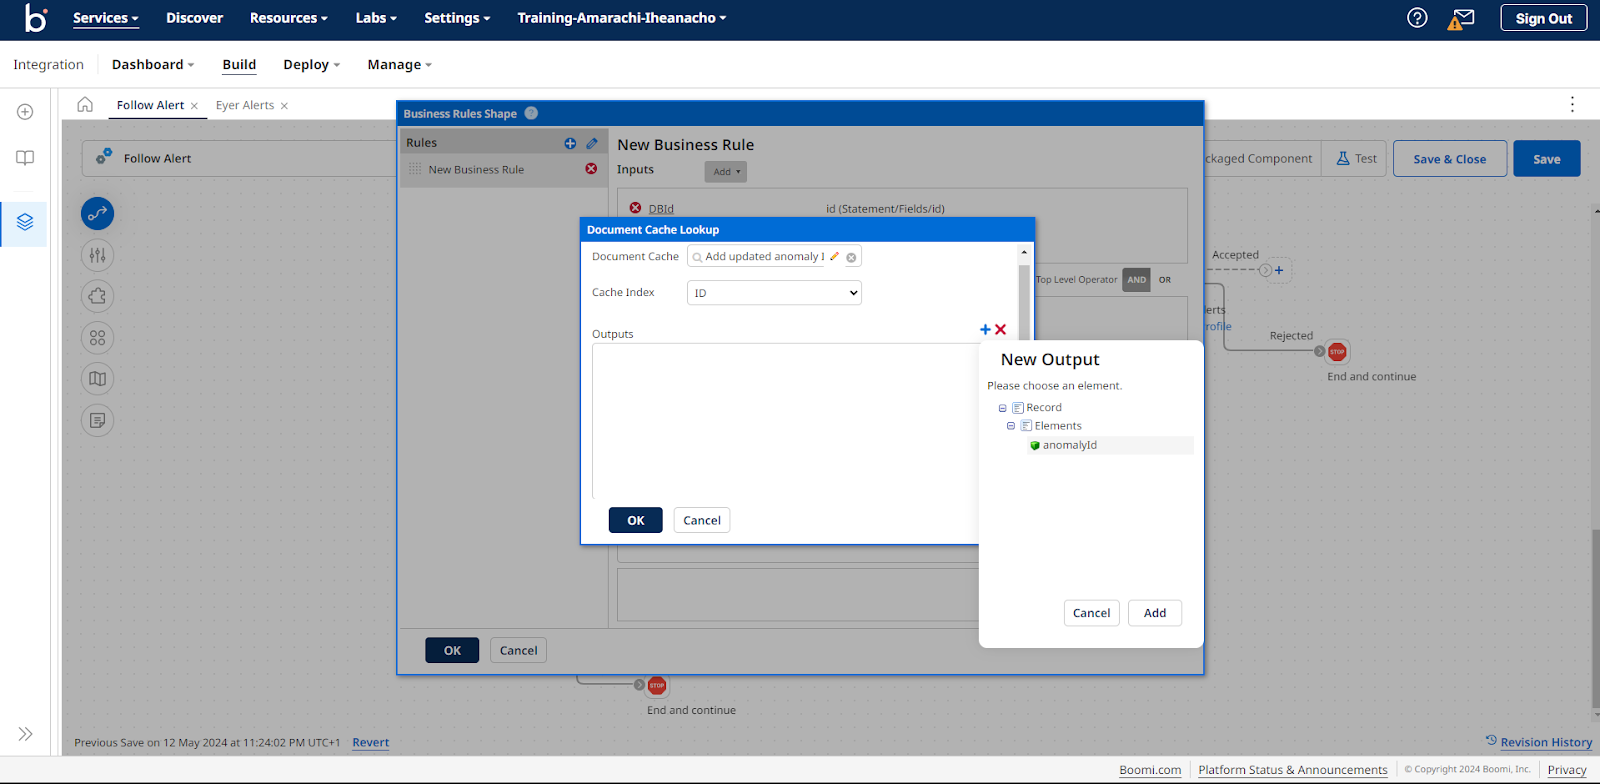
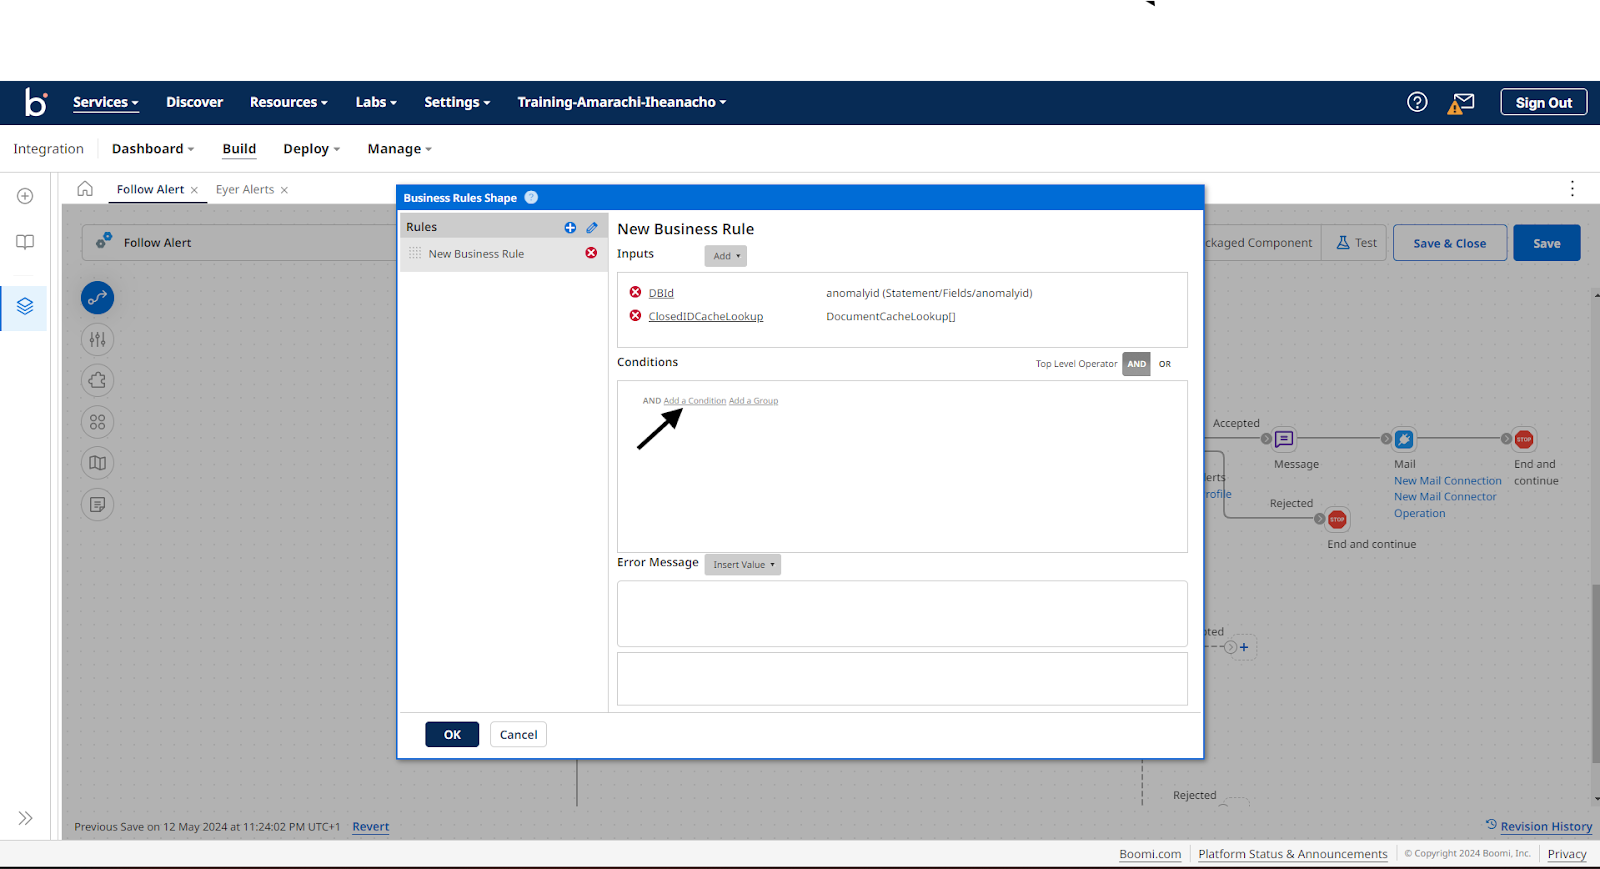
Click the Add button, followed by the OK button, to return to the Add a Function modal. In this modal, you can provide the Alias you require, then click OK to save the Alias and return to the Business Rules modal.
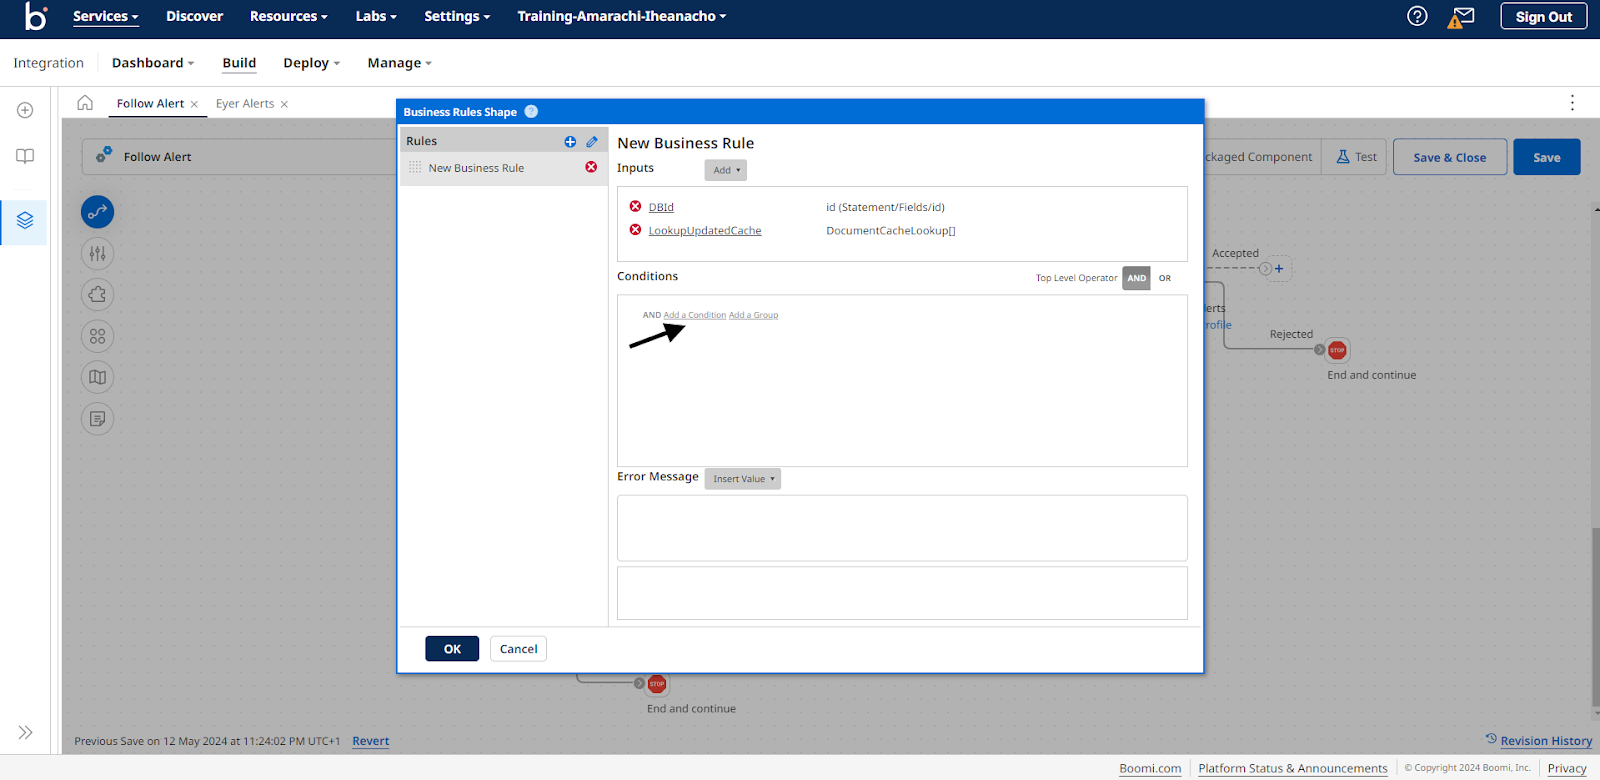
Create the Business rules condition that checks if the updated anomaly is the anomaly of interest To create the condition that checks if the id stored in the database and cache are the same, perform the following processes:
- Click the Add a Condition link:
- In the first dropdown, select the DBId field
- In the second dropdown, select the = field
- In the third dropdown, select the CacheId field
- Click the Save button

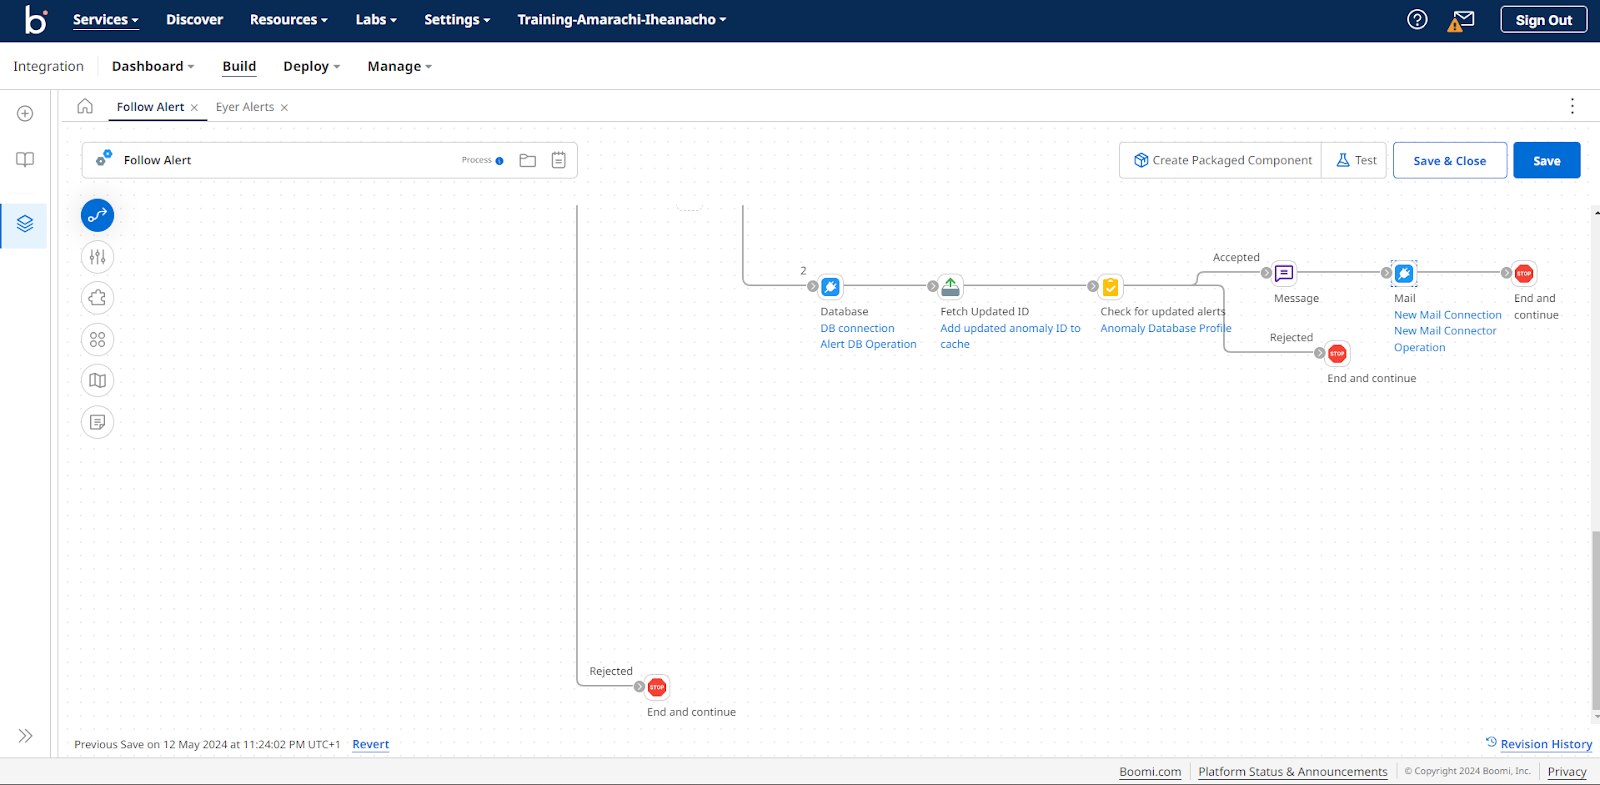
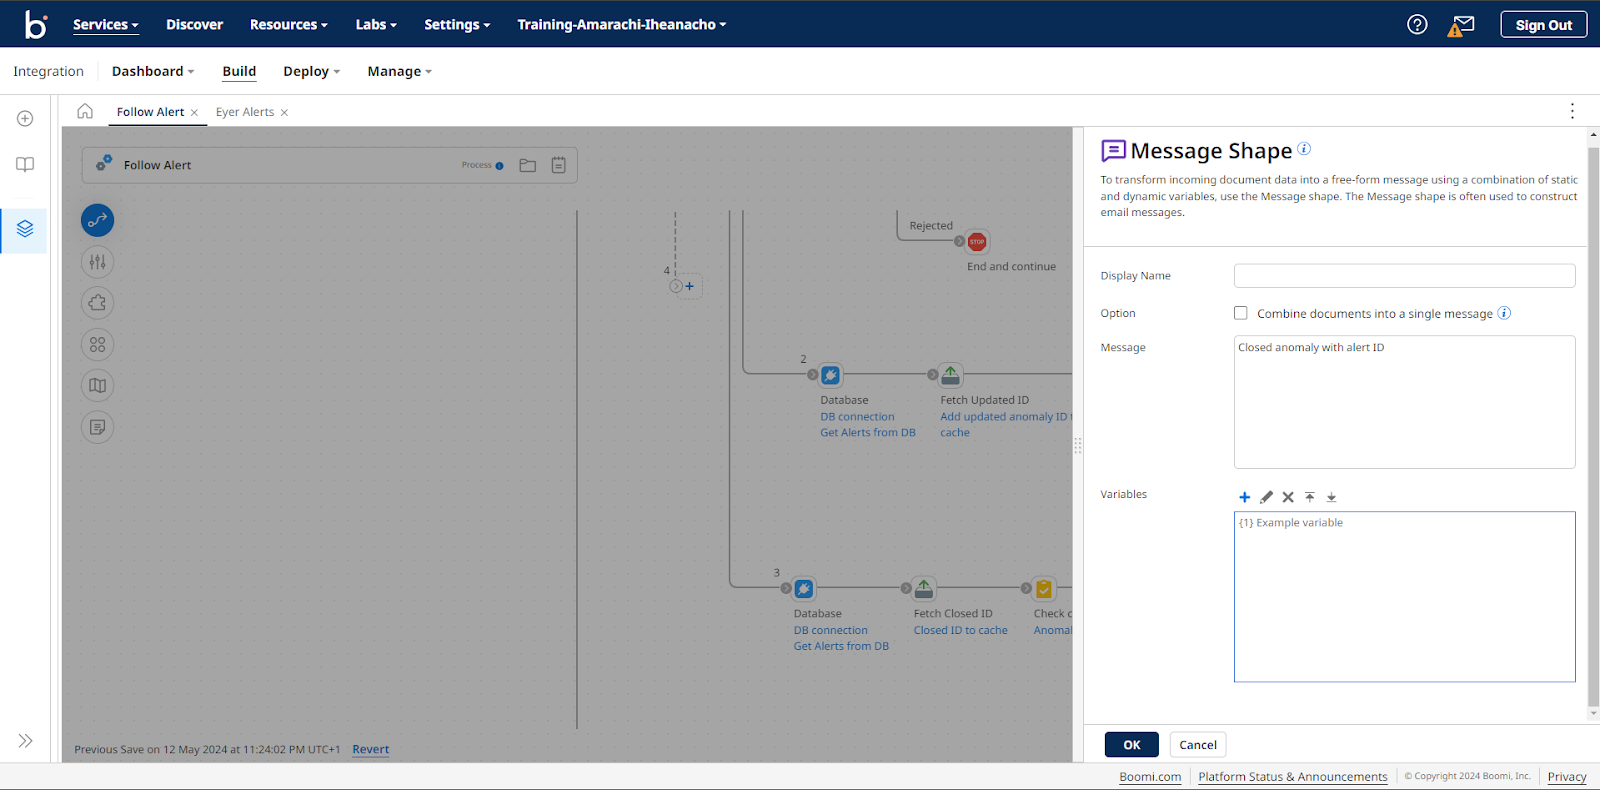
Create a custom message if the updated anomaly is the anomaly of interest In the accepted path from the Business Rules shape, you will create the process alerting the user. Add the Message shape to create your custom message. Click the shape to open its dedicated sidebar.
In this sidebar, write the message you want to send out in the Message input field. For example:
Anomaly of interest has been updated.

Click the OK button to save your custom message. Send out an alert to the user Add the Mail connector to send out the message to learn how to configure the Mail connector; Check out the Boomi documentation to learn how to connect and configure your Mail connector. When you are done, add a Stop shape to the rejected path from the Business rules shape, and after sending out the email.
Send out an alert when an anomaly is closed
Just like we set up alerts for updated anomalies, you can also create alerts for closed anomalies within your Boomi ecosystem. Here's what you need to do:
- Get the anomaly id from the database
- Get the closed anomaly id from the cache
- Check if the closed anomaly is the anomaly you are interested in following
- Create a custom message if the closed anomaly is the anomaly of interest
- Send out an alert to the user
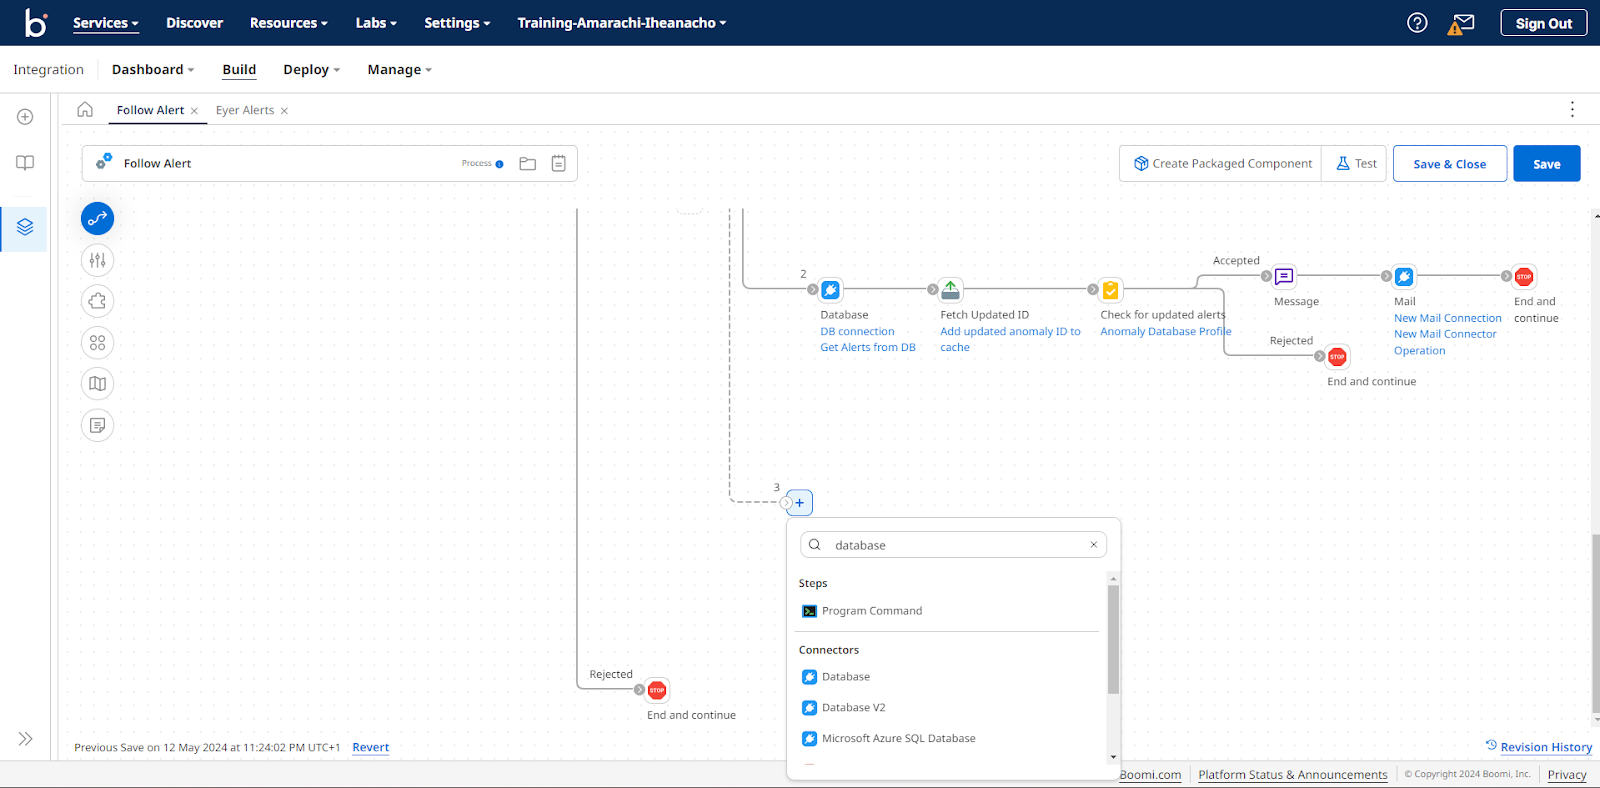
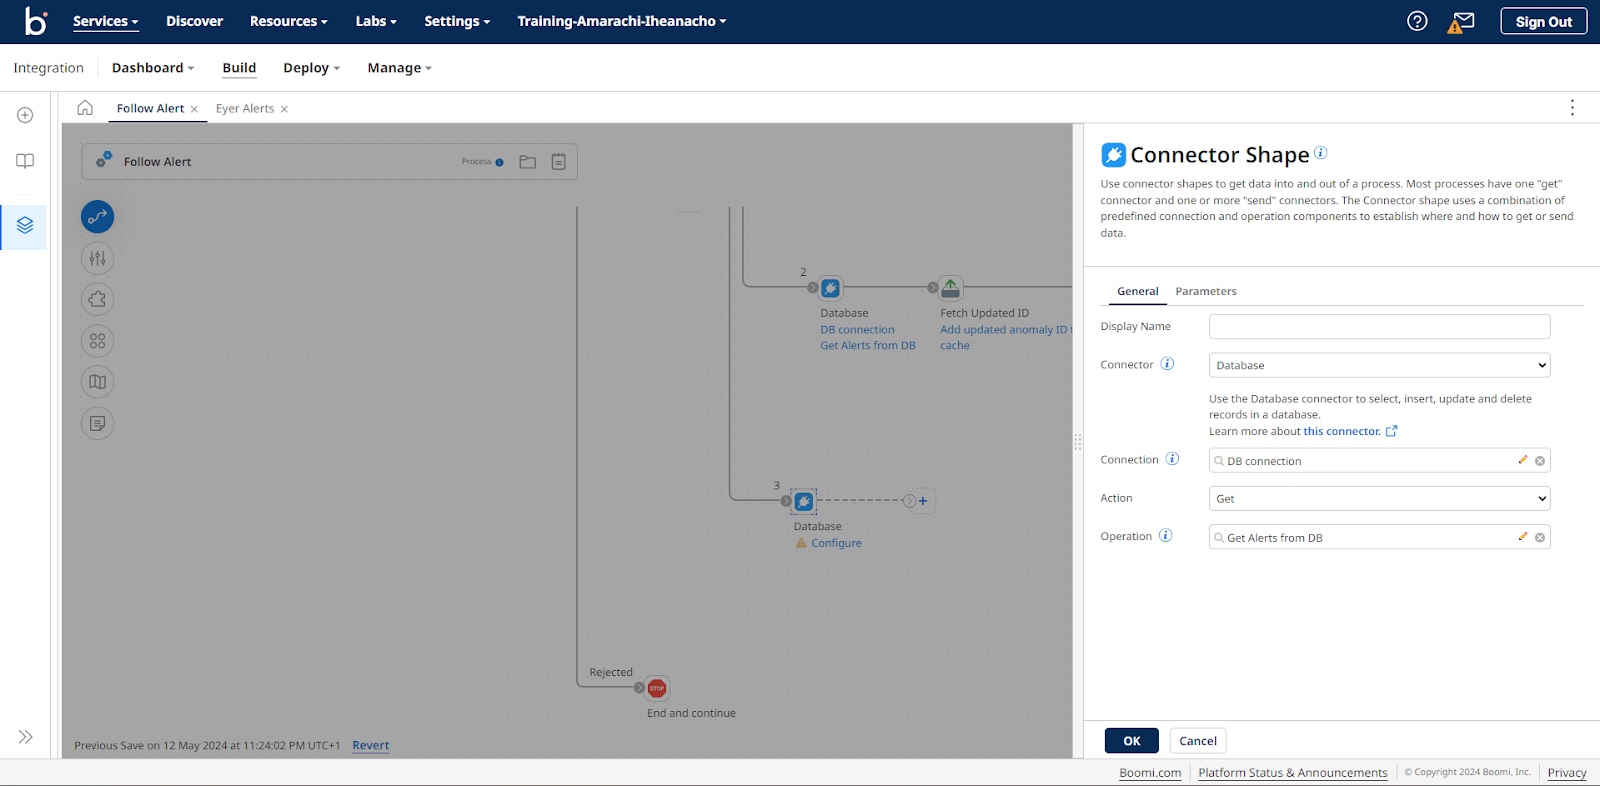
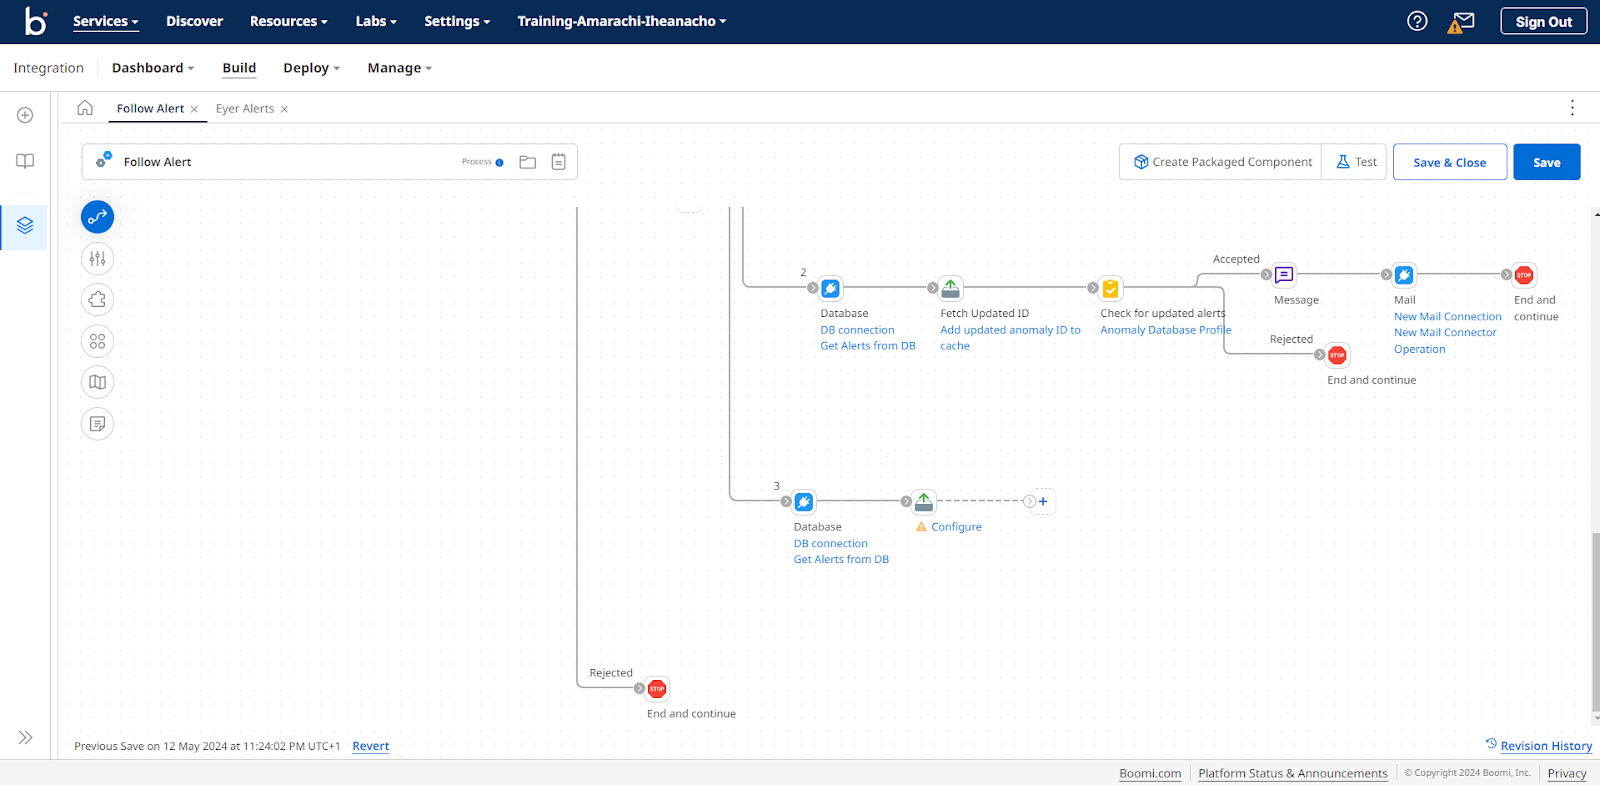
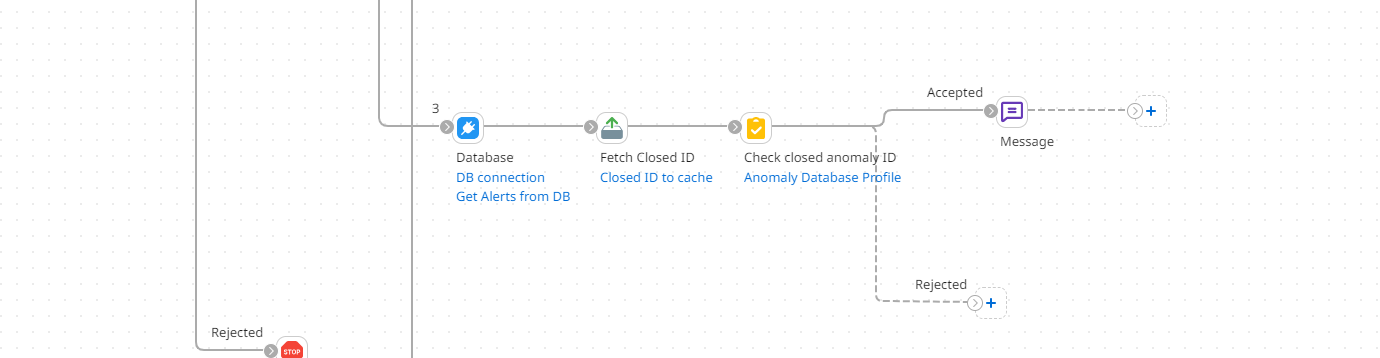
Get the anomaly id from the database In the third branch, add the Boomi database connector to retrieve the data. To learn more about the database connector, check out the official Boomi documentation.
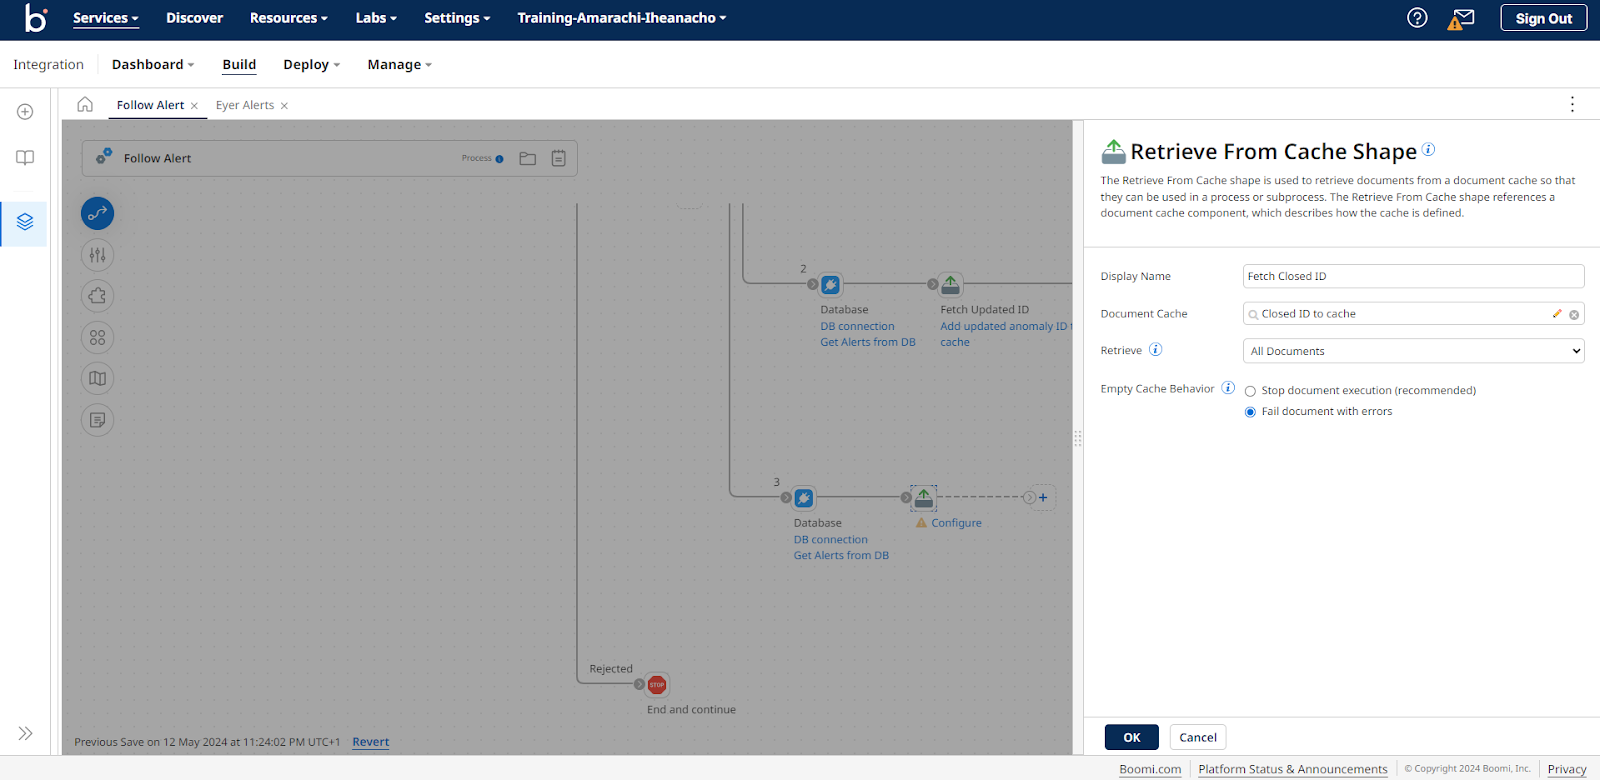
Get the updated anomaly id from the cache Next, add the Retrieve from Cache shape to collect the closed anomaly id you stored at the start of the process.
Click on this Retrieve from Cache shape to open its dedicated sidebar. Fill out this sidebar with the following information:
- Display Name -> Fetch Closed ID
- Document Cache -> Select the closed cache document you created previously
- Retrieve -> All Documents
- Empty Cache Behaviour -> Fail document with errors
Understanding that you can have multiple alert ids on your database, you need to verify whether the cache ID and anomaly ID stored in the database are the same. This enables you to determine if you are monitoring the alert of interest. Create the Business rules fields To perform this check, add a Business Rules shape to your process.

Click on the Business Rules shape to open the Business Rules Shape Options modal. In this modal, select Database in the Profile Type field. In the Profile field, select the profile you created while configuring your database connector.
Next, click the OK button to open the Business Rules Shape modal. In this modal, click the Create a New Rule button to create a new business rule.
Click the Add dropdown and select Field from the menu dropdown.

This action opens up the Add a field modal. In the Alias field, input “DBId”, then navigate through the Field input menu and select this menu: Statement -> Fields -> id.
Click the OK -> OK button to save your field.
Create another field to hold the cached ID. To collect this id, you need to create a Business rules function, click the Add dropdown, and select Function from the menu dropdown.
This action opens up an Add a Function modal.
In this modal, click the Category dropdown and select Lookup. In the Functions menu, select Document cache lookup and click the OK button.
This action opens up the Document Cache Lookup modal. Fill out this modal with the following information:
- Document Cache -> Select the Cache profile you created for the closed anomaly cache at the beginning
- Cache Index -> Select ID from the dropdown
- Outputs -> Select the + button, navigate through the menu, and select ID you created
Click the Add button, followed by the OK button, to return to the Add a Function modal. In this modal, you can provide the Alias you require, then click OK to save the Alias and return to the Business Rules modal.

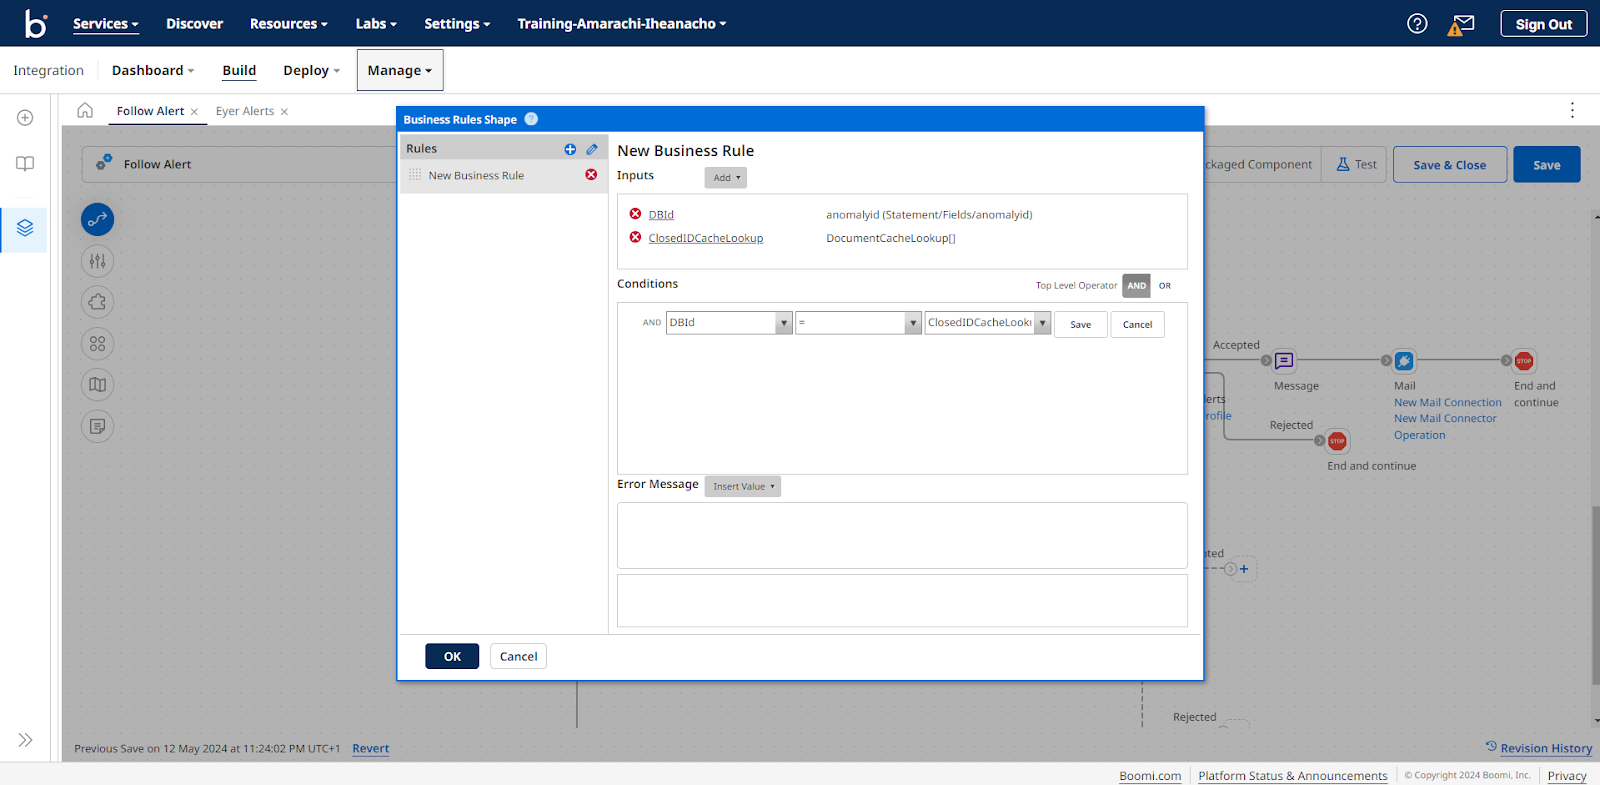
Create the Business rules condition that checks if the updated anomaly is the anomaly of interest To create the condition that checks if the id stored in the database and cache are the same, perform the following processes:
- Click the Add a Condition link:
- In the first dropdown, select the DBId field
- In the second dropdown, select the = field
- In the third dropdown, select the CacheId field
- Click the Save button
Create a custom message if the updated anomaly is the anomaly of interest In the accepted path from the Business rules shape, you will create the process alerting the user. Add the Message shape to create your custom message. Click the shape to open its dedicated sidebar.
In this sidebar, write the message you want to send out in the Message input field. For example:
Anomaly of interest has been closed.
Click the OK button to save your custom message. Send out an alert to the user Add the Mail connector to send out the message to learn how to configure the Mail connector; Check out the Boomi documentation to learn how to connect and configure your Mail connector.
When you are done, add a Stop shape to the rejected path from the Business rules shape, and after sending out the email.
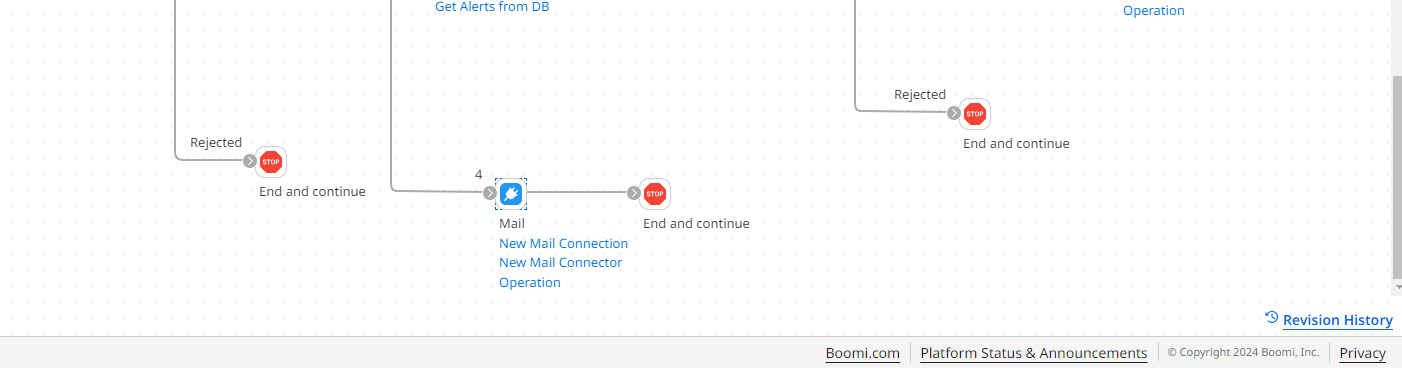
Send out an email containing all active alerts in a JSON object (optional) Finally, you can also decide to receive alerts for all anomalies regardless of their status. To do this, add a Mail connector to the fourth branch (labeled 4), and then a Stop connector to end the process.